Creating Master Key
Before using any features of Swavan SSH Studio, you need to create a secure vault with a master password. This vault will protect all your SSH connections and credentials with enterprise-grade encryption.
1 Initial Setup Screen
After downloading and launching the app, you'll see the initial setup screen where you can choose how to set up your vault:

Figure 1: Initial setup screen - Choose vault setup method
You have three options:
- Create New Vault: Start fresh with a new vault and add your SSH connections manually
- Receive from another device: Get connections sent from another device using encrypted P2P transfer
- Restore from backup: Restore SSH connections and tunnels from a previously created encrypted backup file
2 Creating Master Password
If you choose "Create New Vault," you'll be prompted to create a master password to secure your connection credentials:
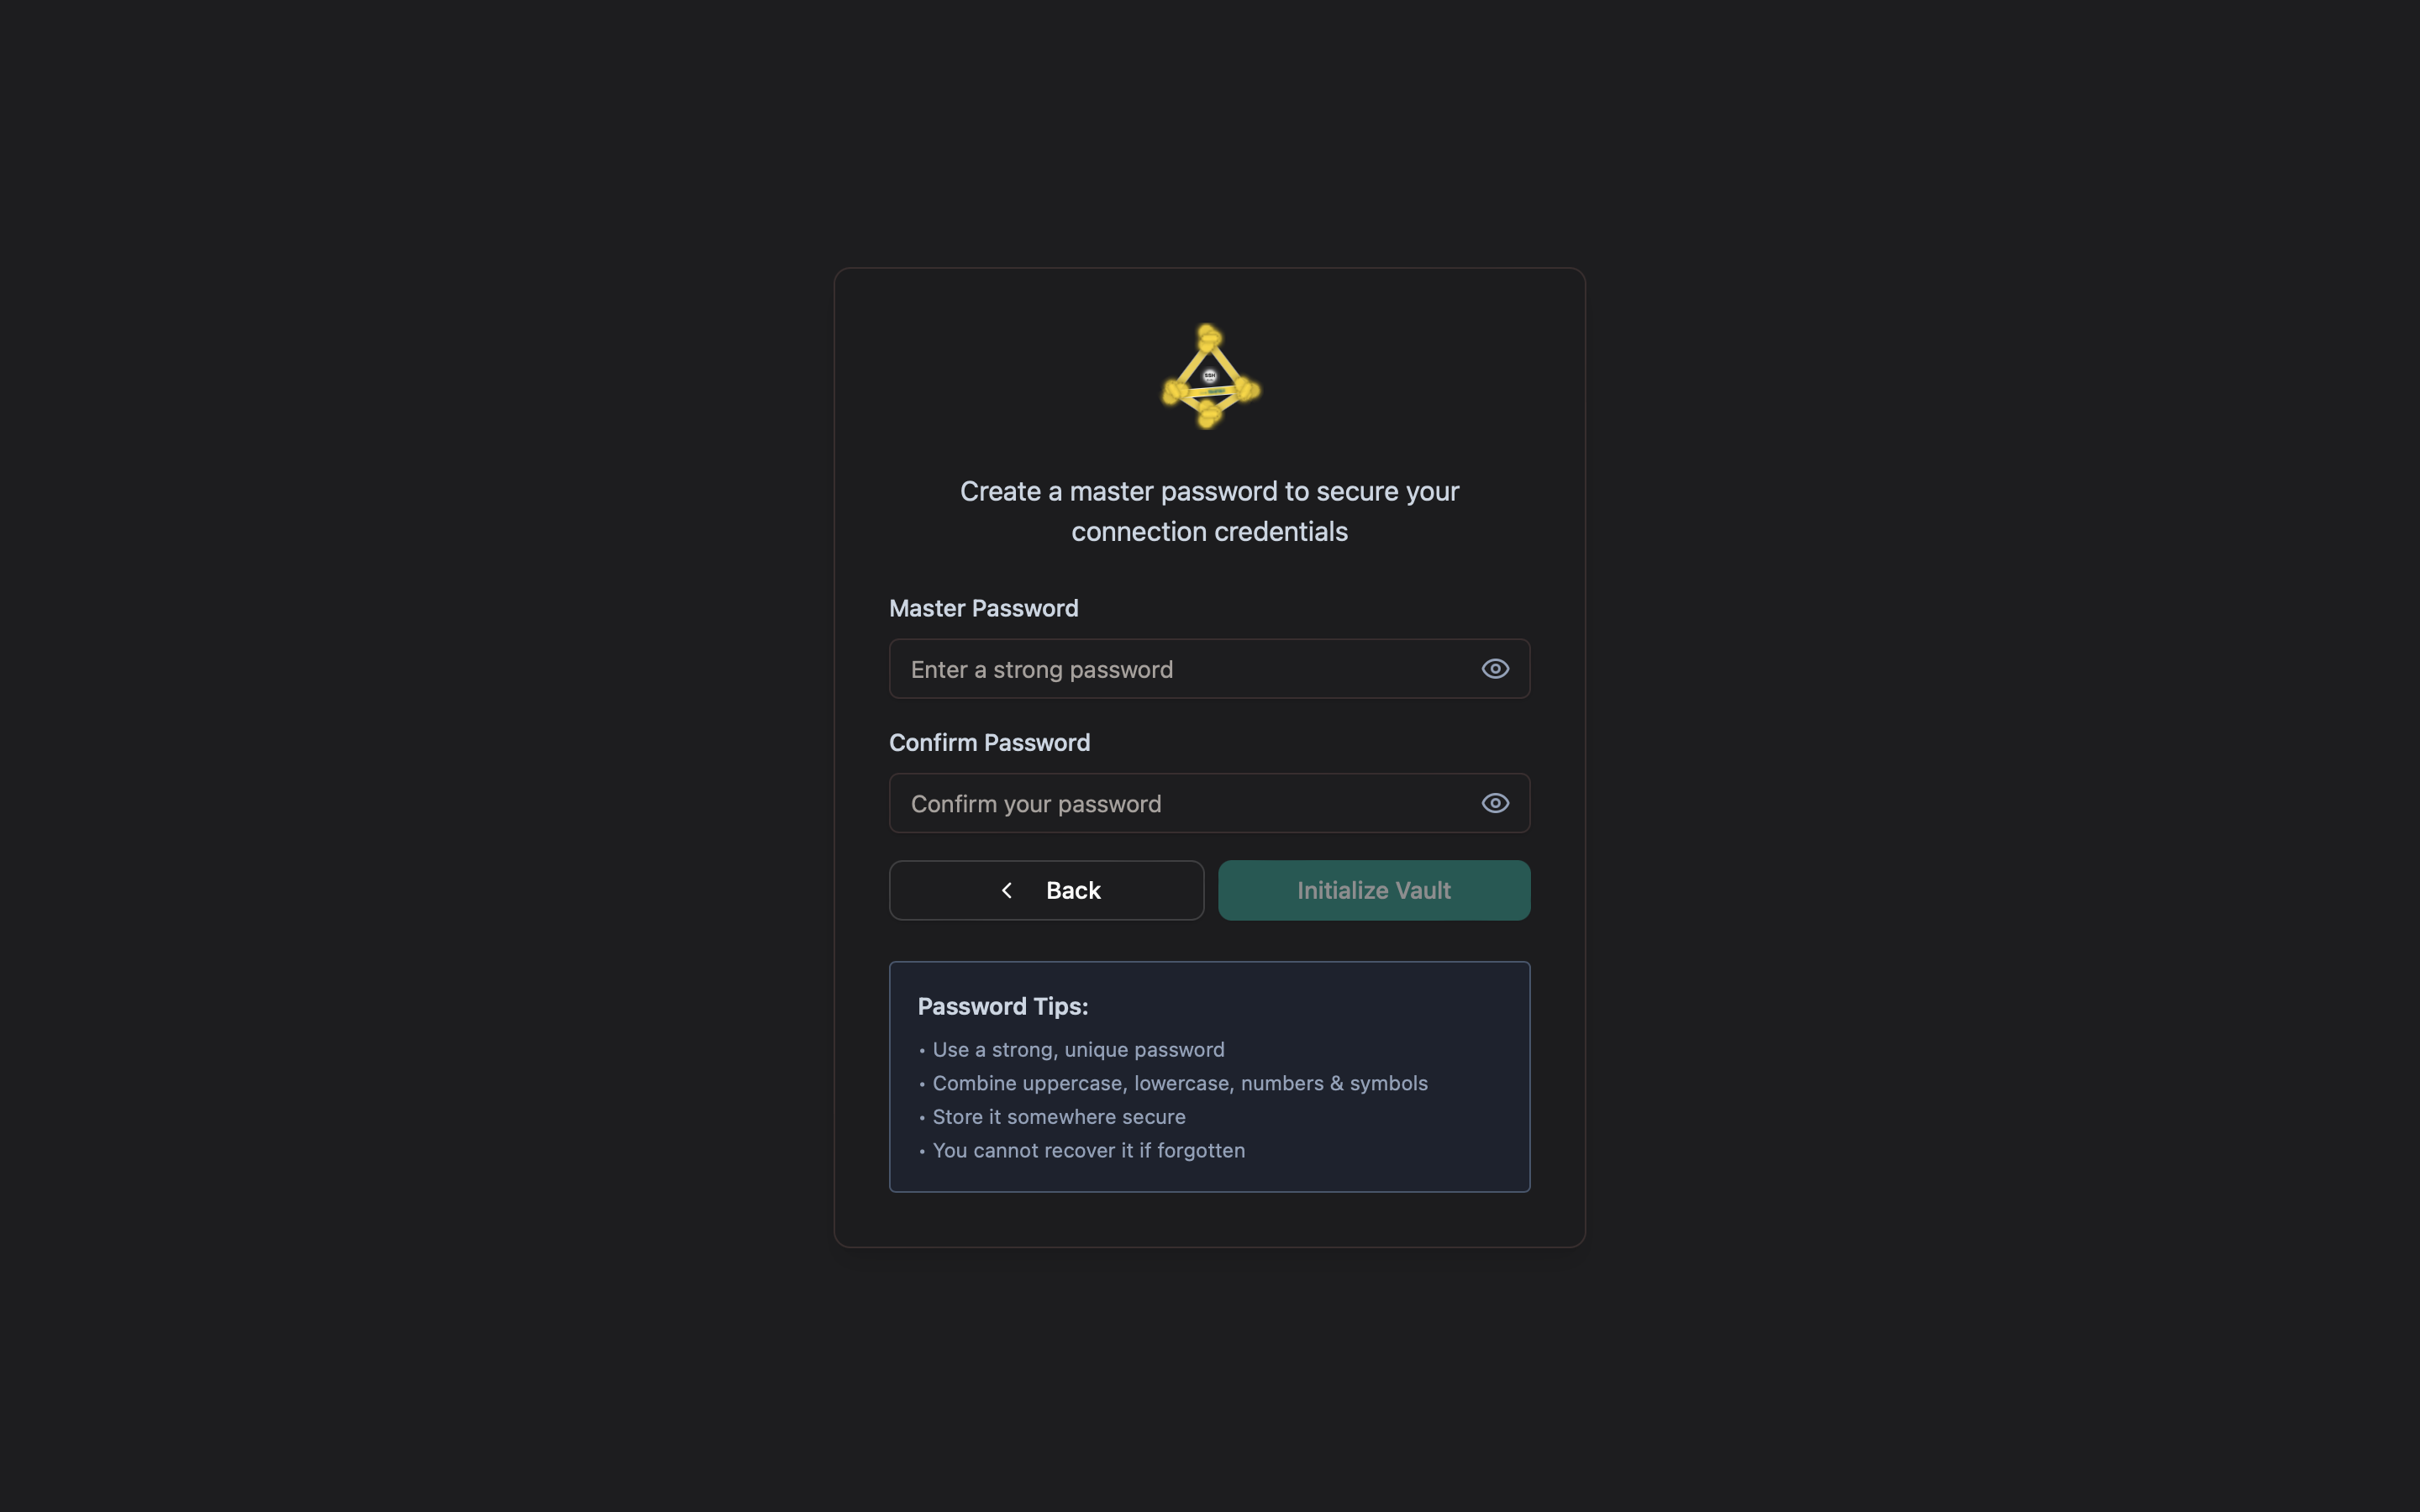
Figure 2: Master password creation screen
You need to:
- Enter a strong master password
- Confirm the password
- Click "Initialize Vault" to proceed
3 Unlocking the Vault
After creating your master password and vault, every time you open the app you'll need to unlock it:
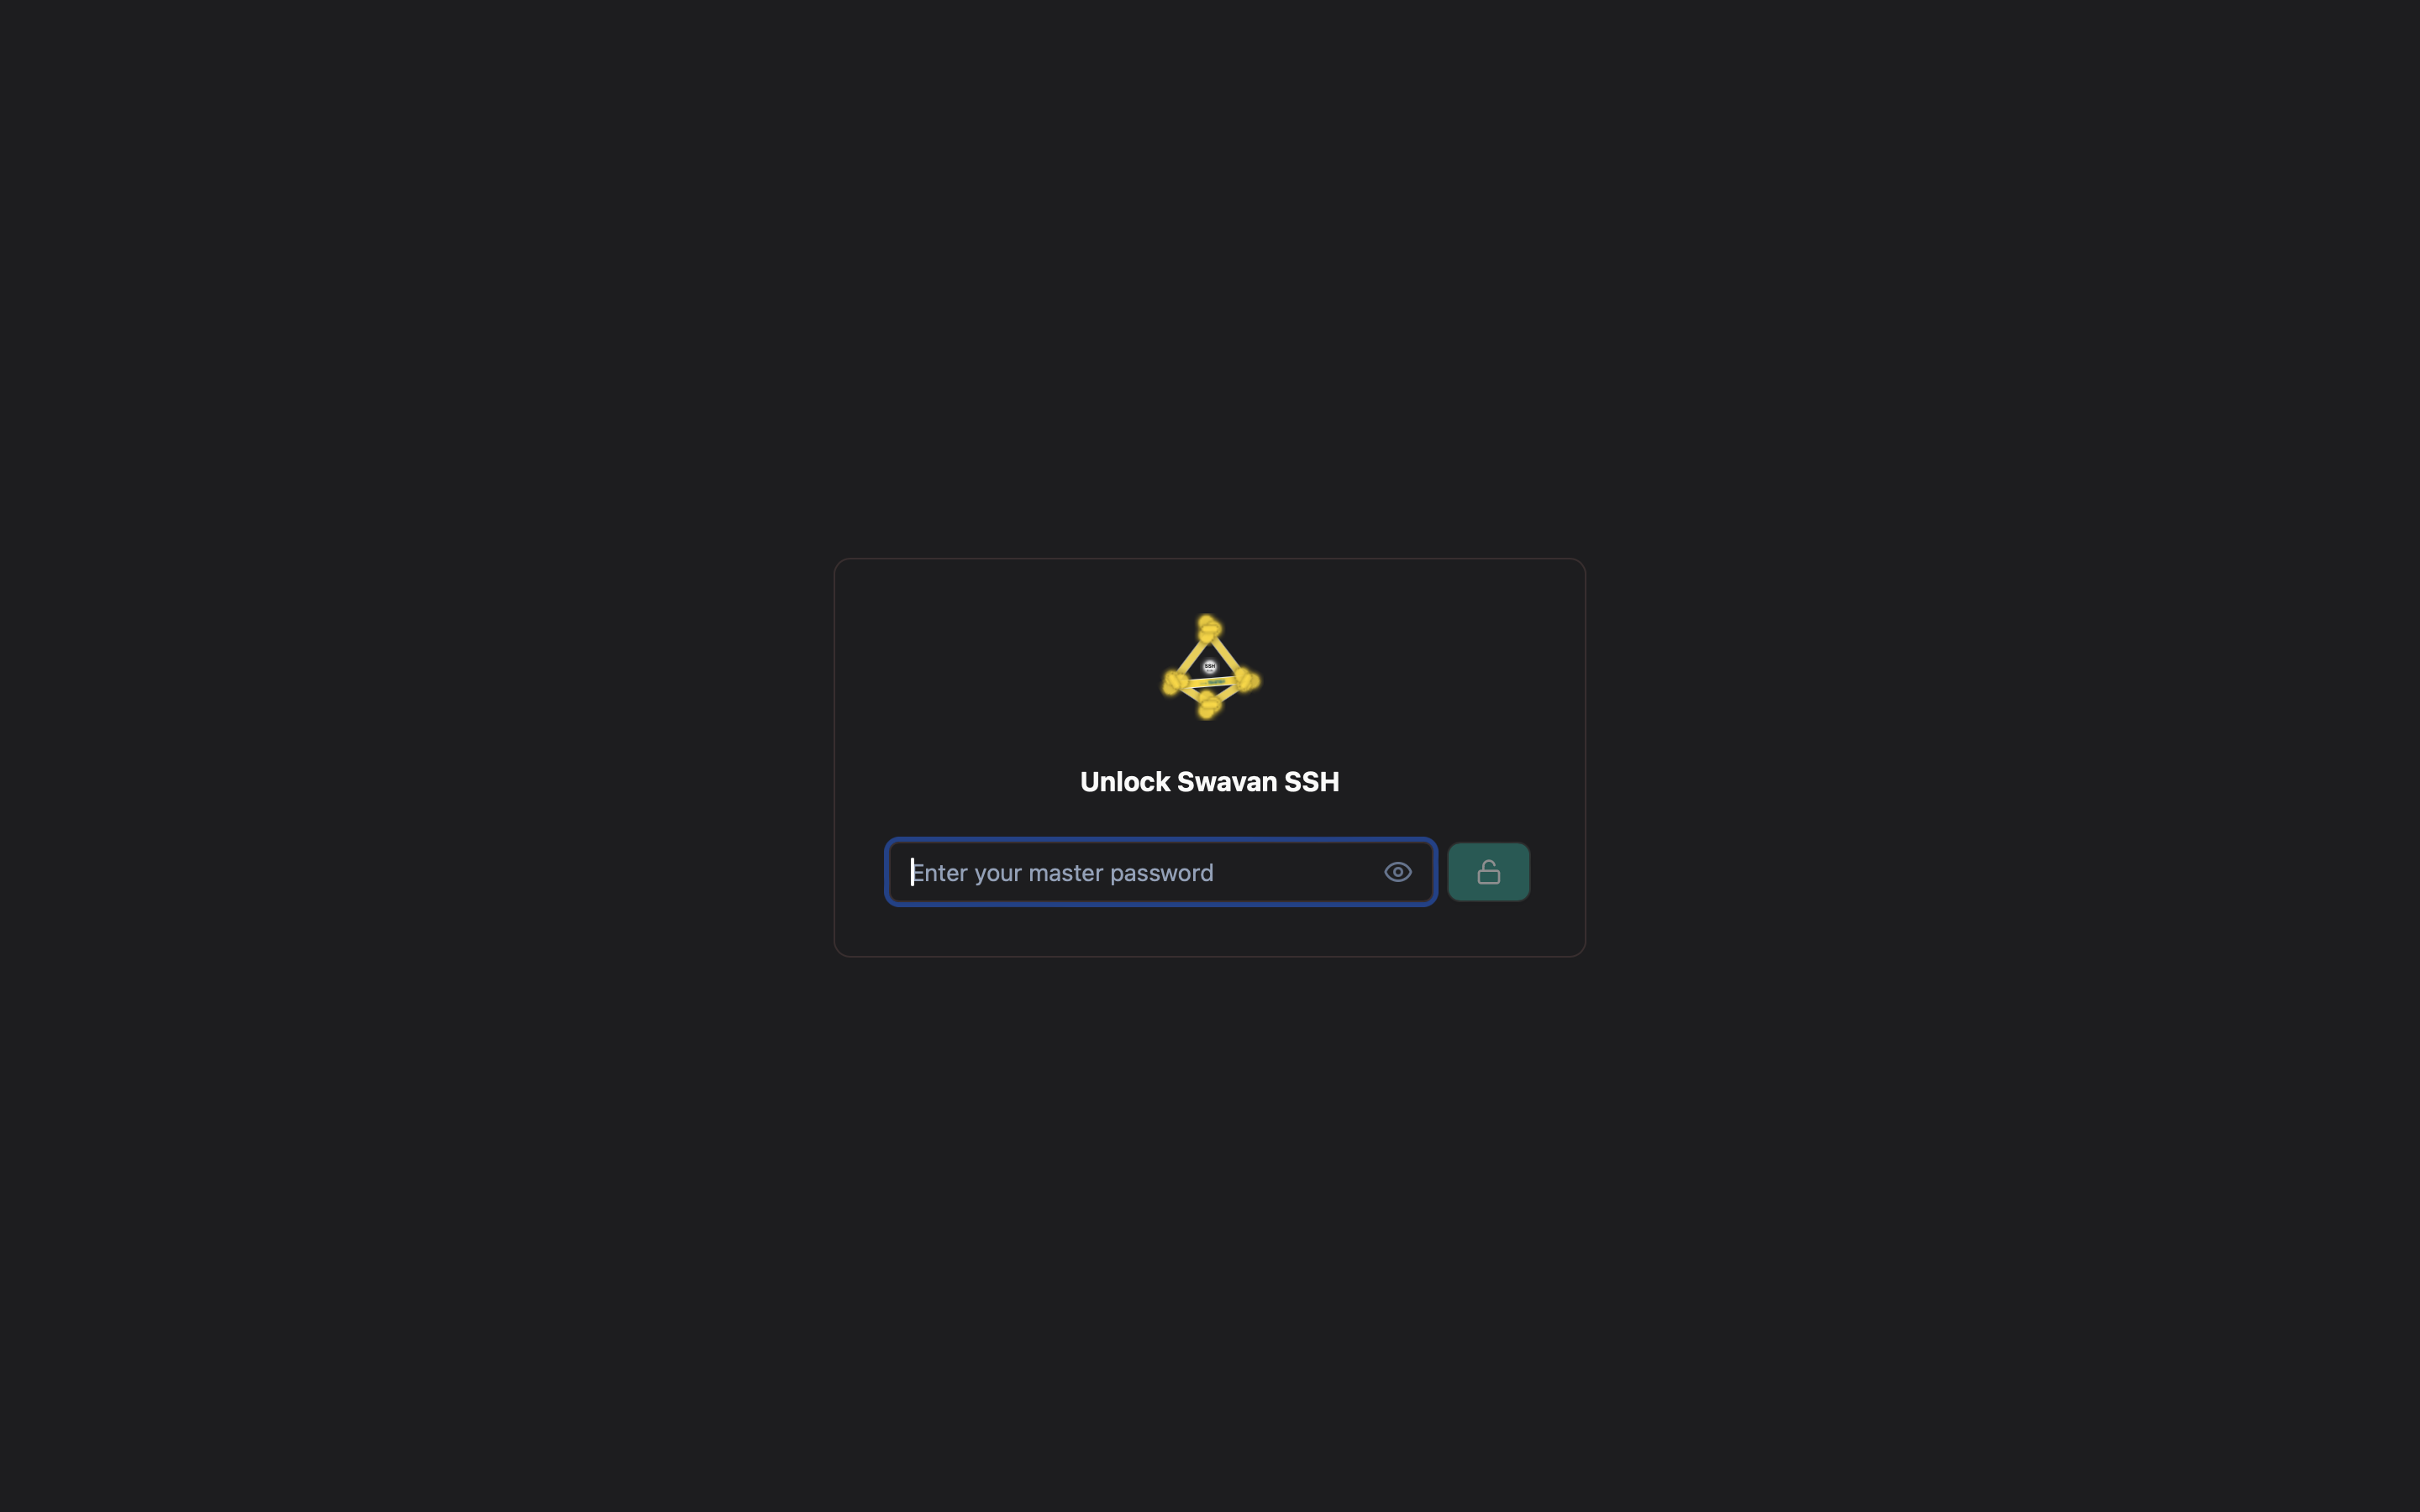
Figure 3: Unlock screen - Enter master password
Simply enter your master password to access your vault and SSH connections. This ensures that your credentials remain secure even if someone else gains access to your device.
4 Main Application Screen
After successfully unlocking your vault, you'll see the main application screen where you can access all features:
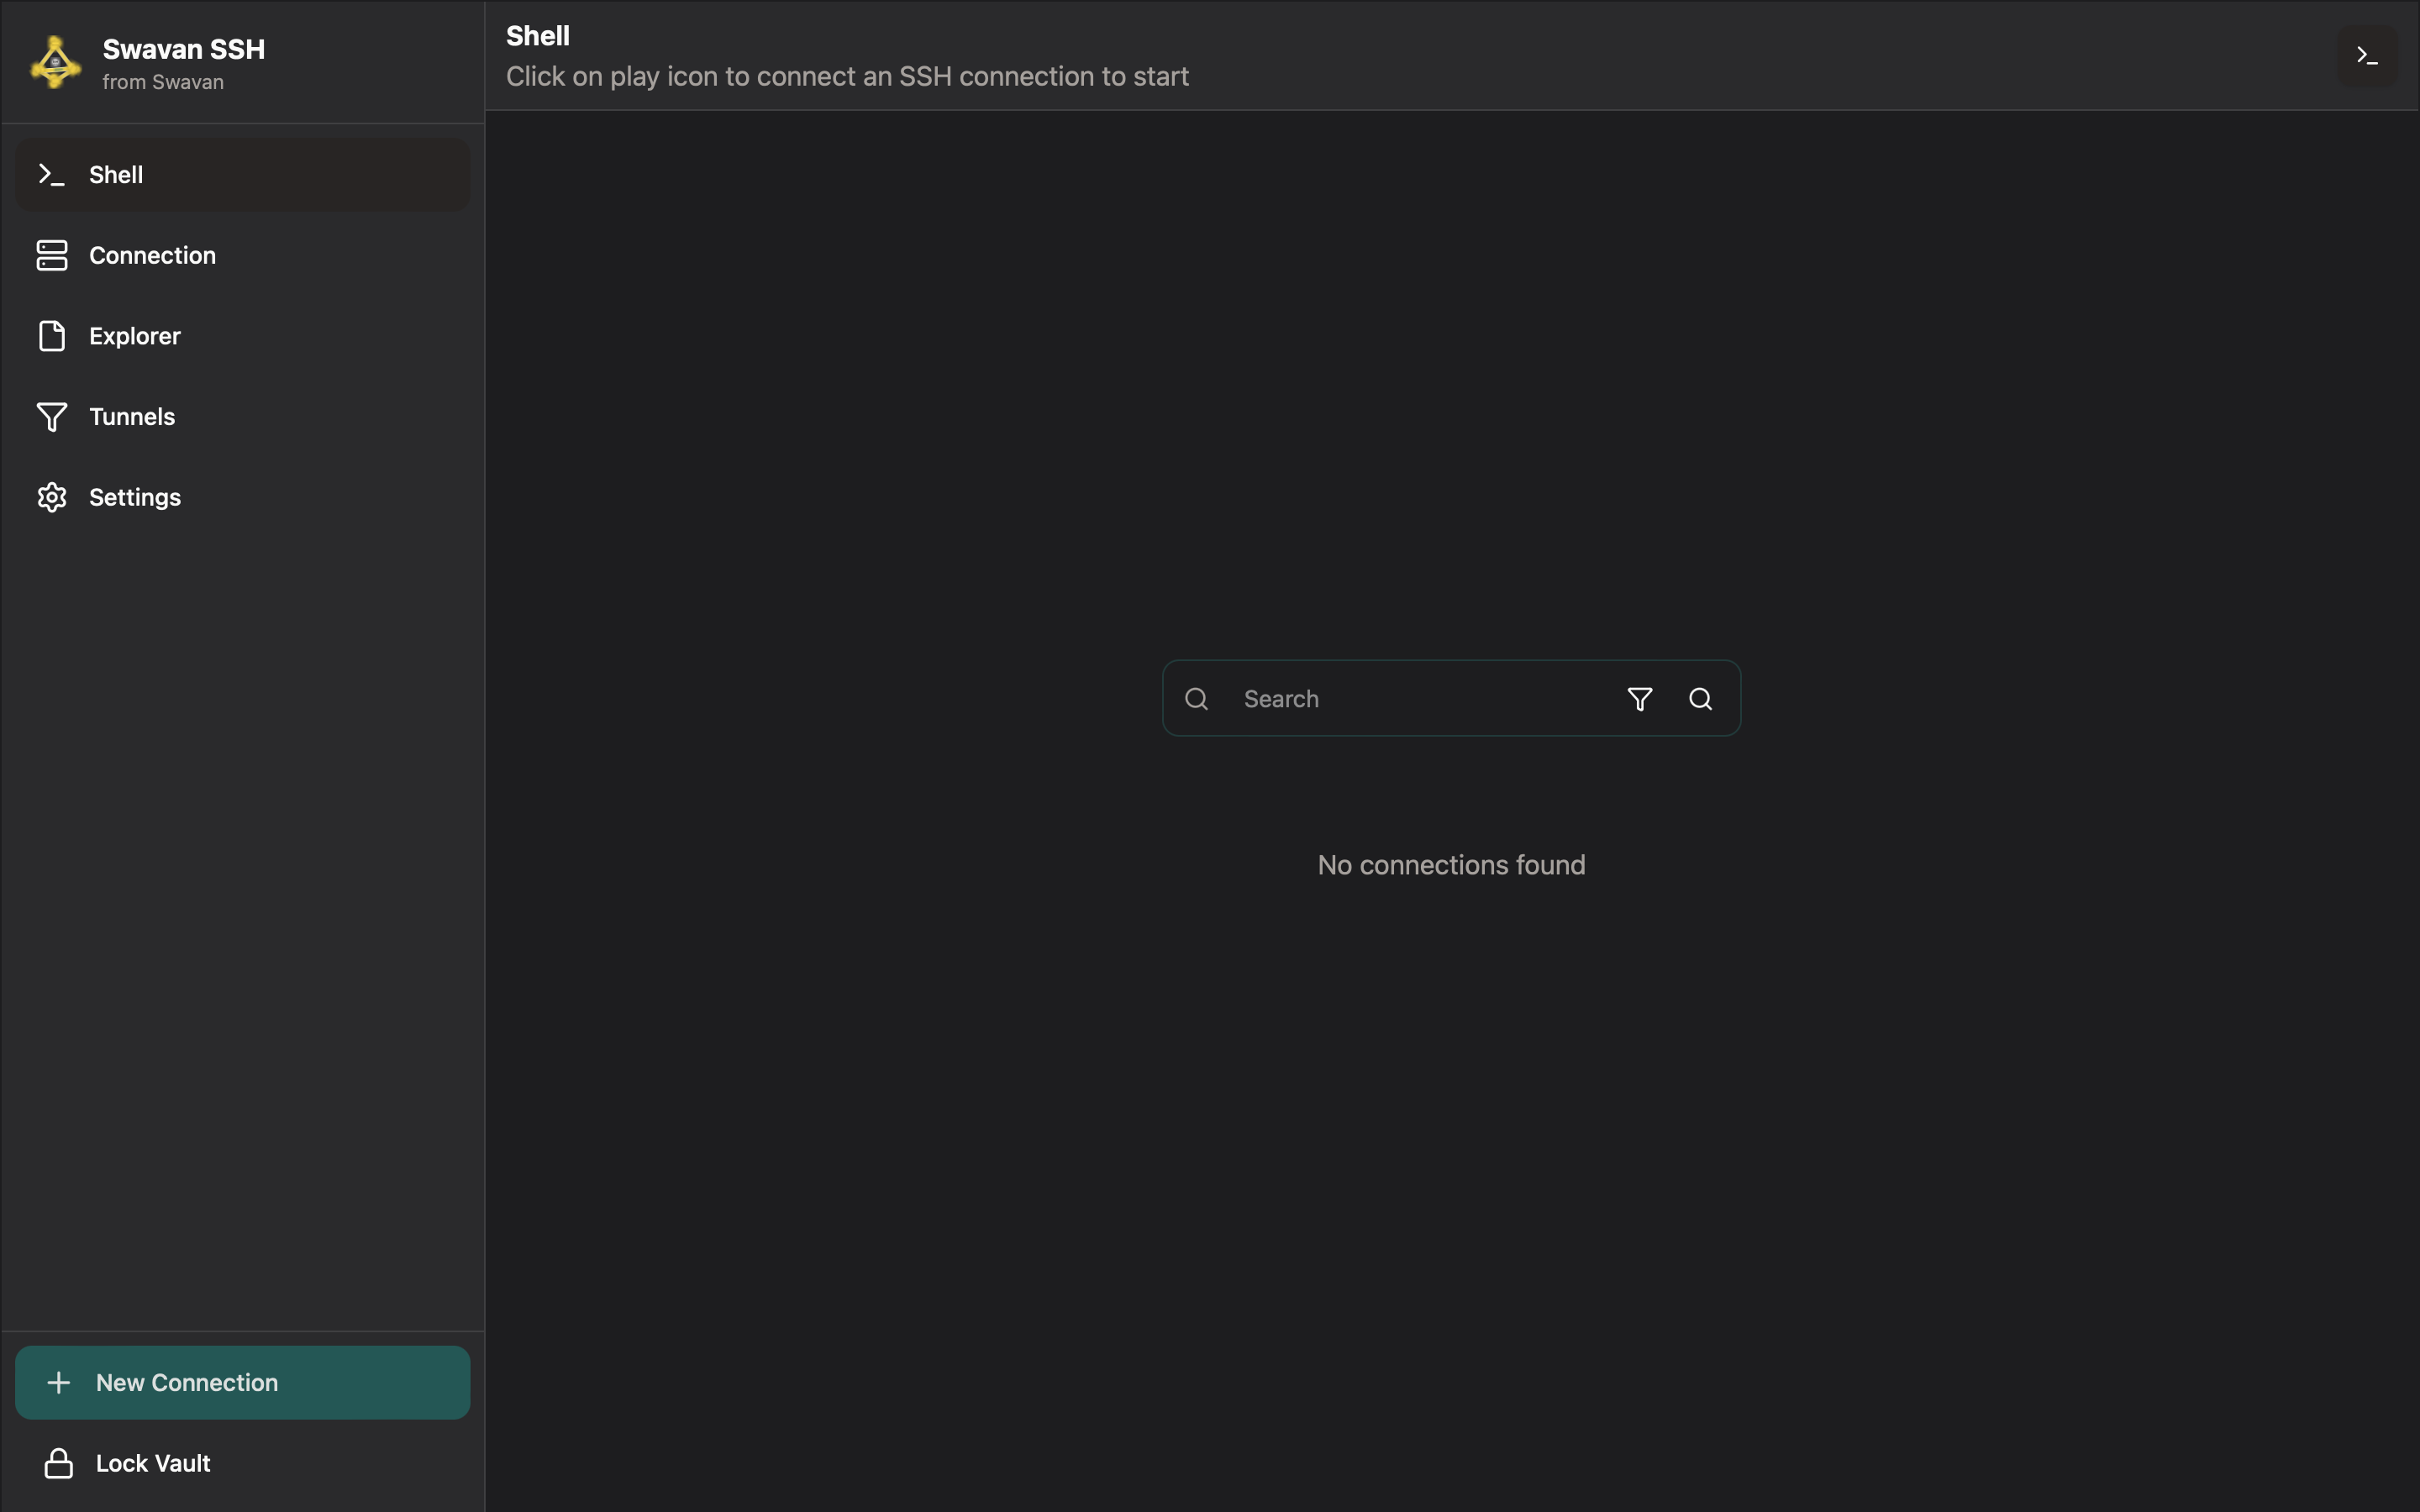
Figure 4: Main application screen after unlocking vault
From this screen, you can access:
- Shell: Terminal interface for SSH connections with xterm.js-based terminal emulation
- Connection: Manage your SSH connections with search, organization, and quick access
- Explorer: File explorer for managing files with support for 50+ file types
- Tunnels: Create and manage SSH tunnels with local and remote port forwarding
- Settings: Configure app preferences, security, and terminal customization
Shell
The Shell feature in Swavan SSH Studio provides full-featured terminal emulation with multi-session support. Experience a modern terminal with ANSI color support, tab management, and dynamic resizing.
1 Accessing the Shell
From the main application screen, click on the terminal icon located at the top-right corner of the screen. This will open the terminal interface within the app.
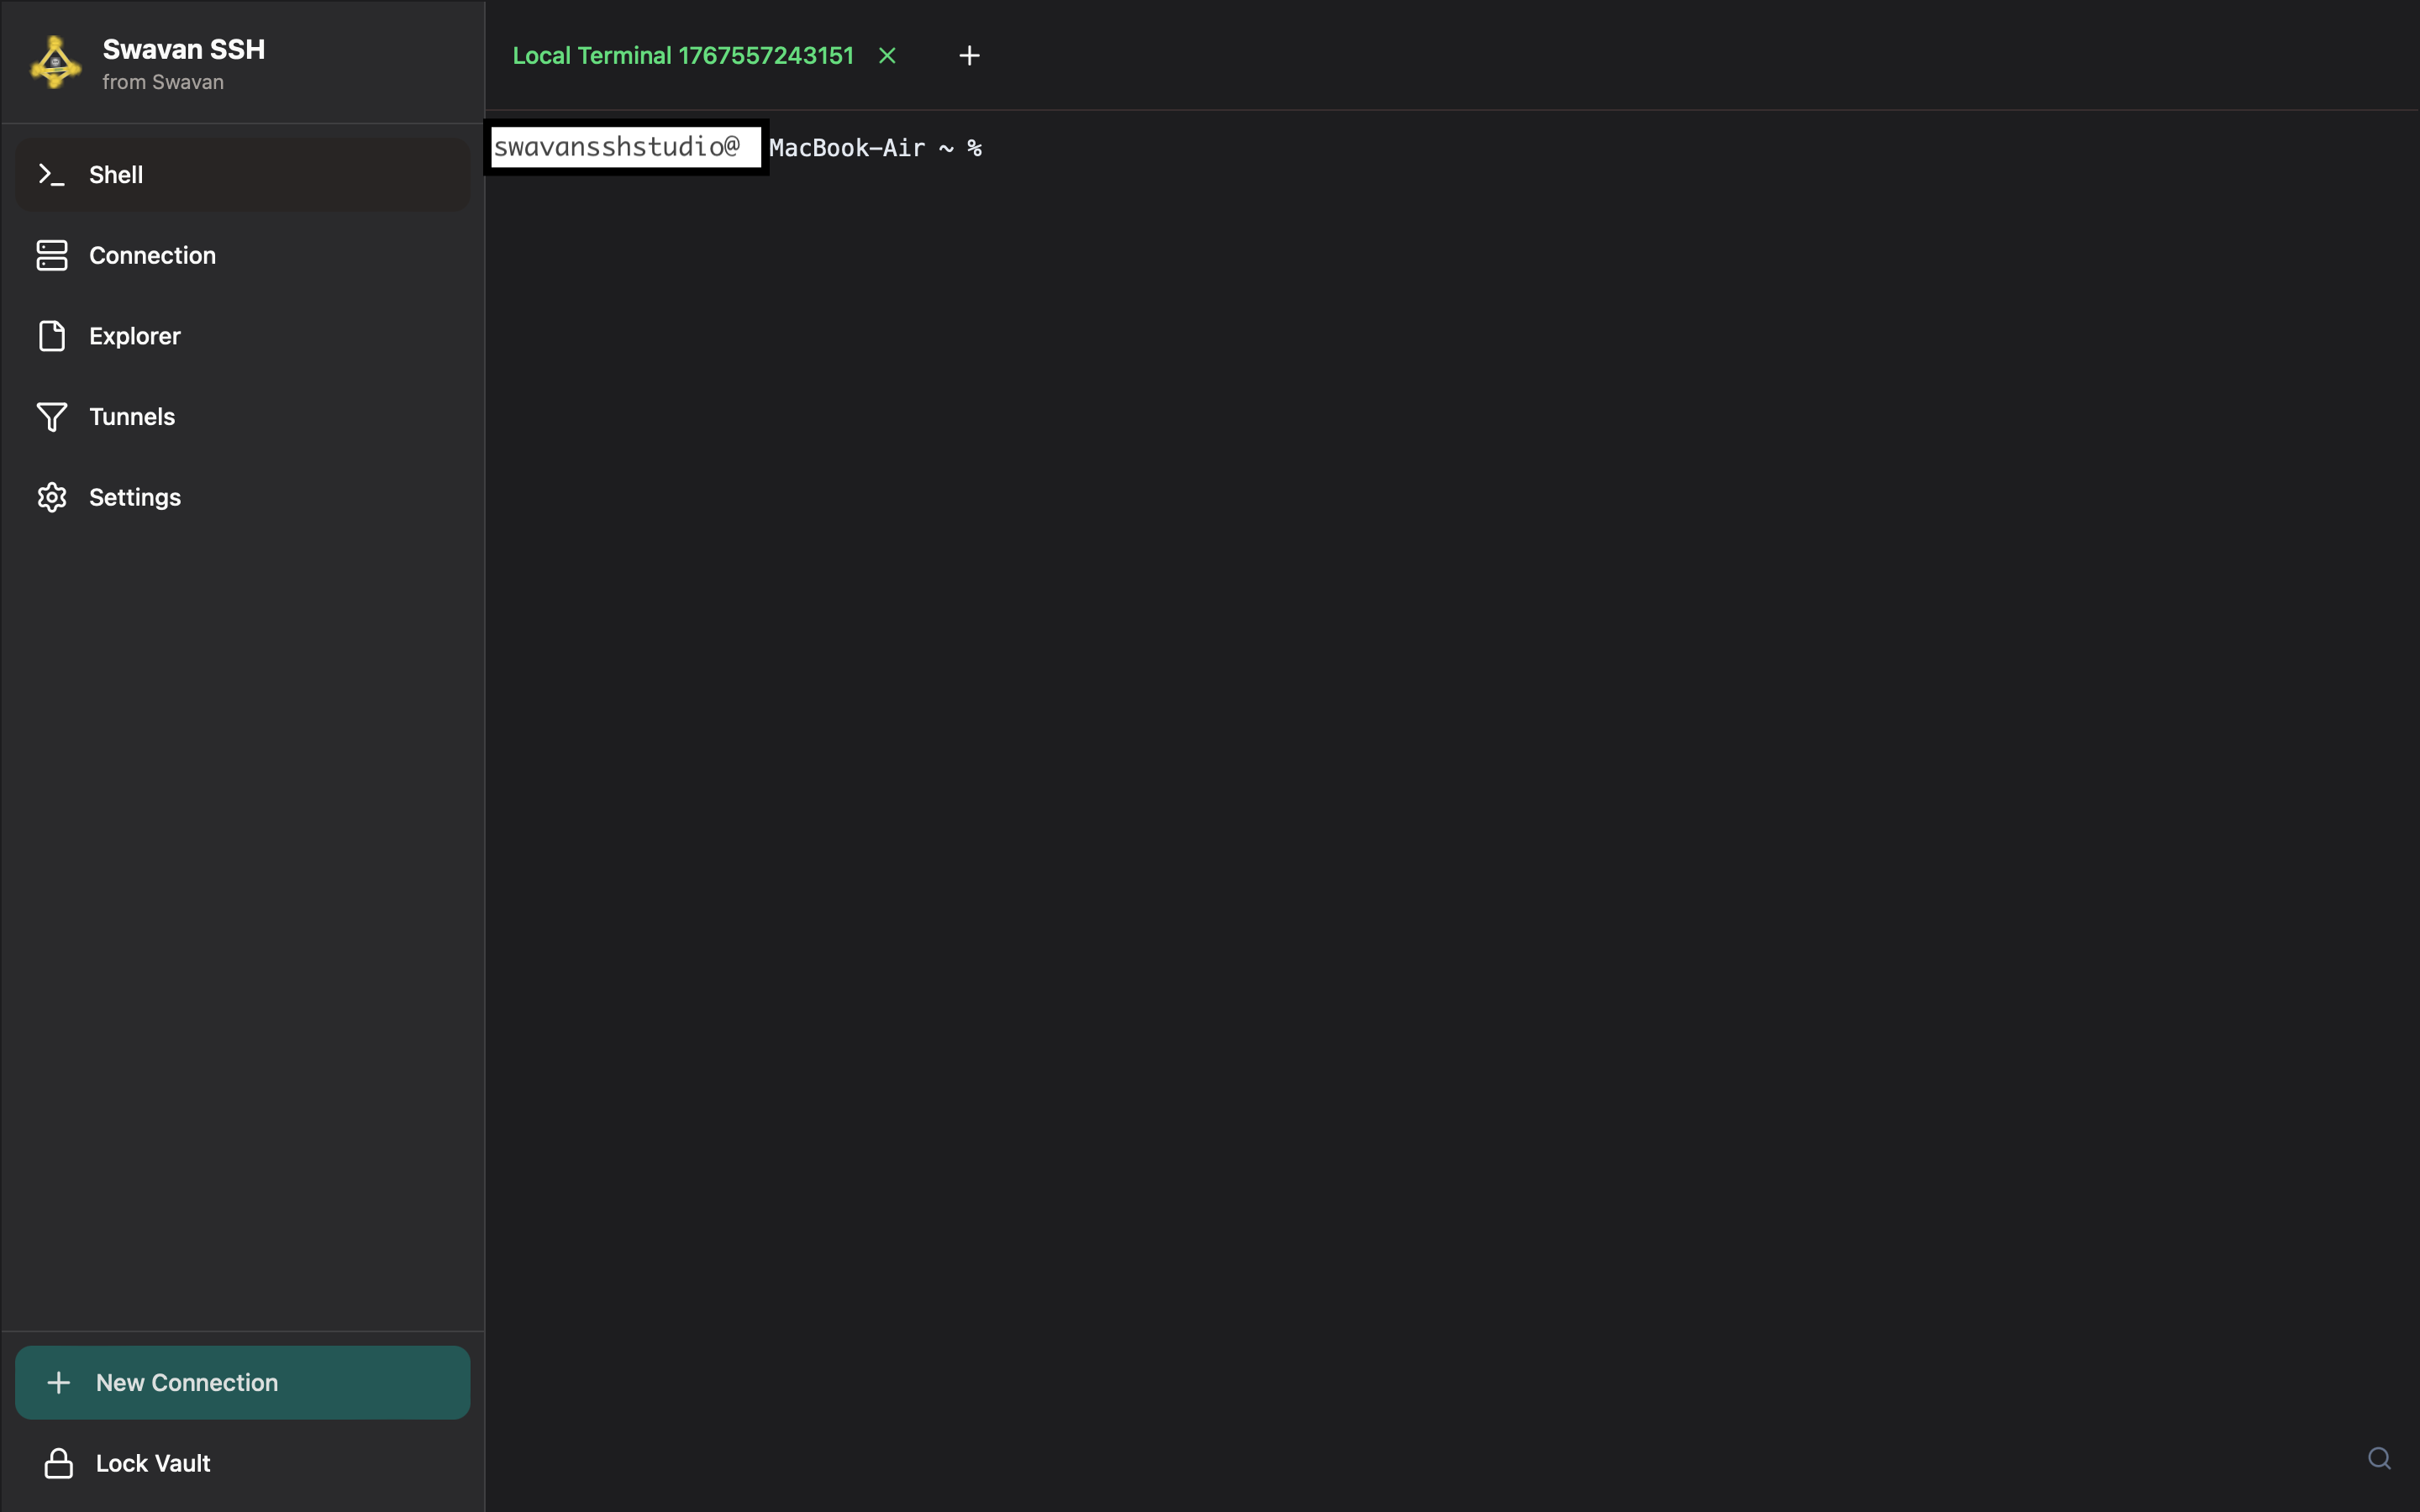
Figure 5: Terminal interface after clicking the terminal icon
The terminal interface provides a command-line environment where you can execute SSH commands and manage your remote connections with xterm.js-based terminal emulation.
Connection Management
Store, organize, and manage all your SSH connections in one secure place. Create unlimited connection profiles with search, edit, and quick access features.
1 Connection Interface
The Connections screen provides an overview of all your SSH connections. Here's what the interface looks like:
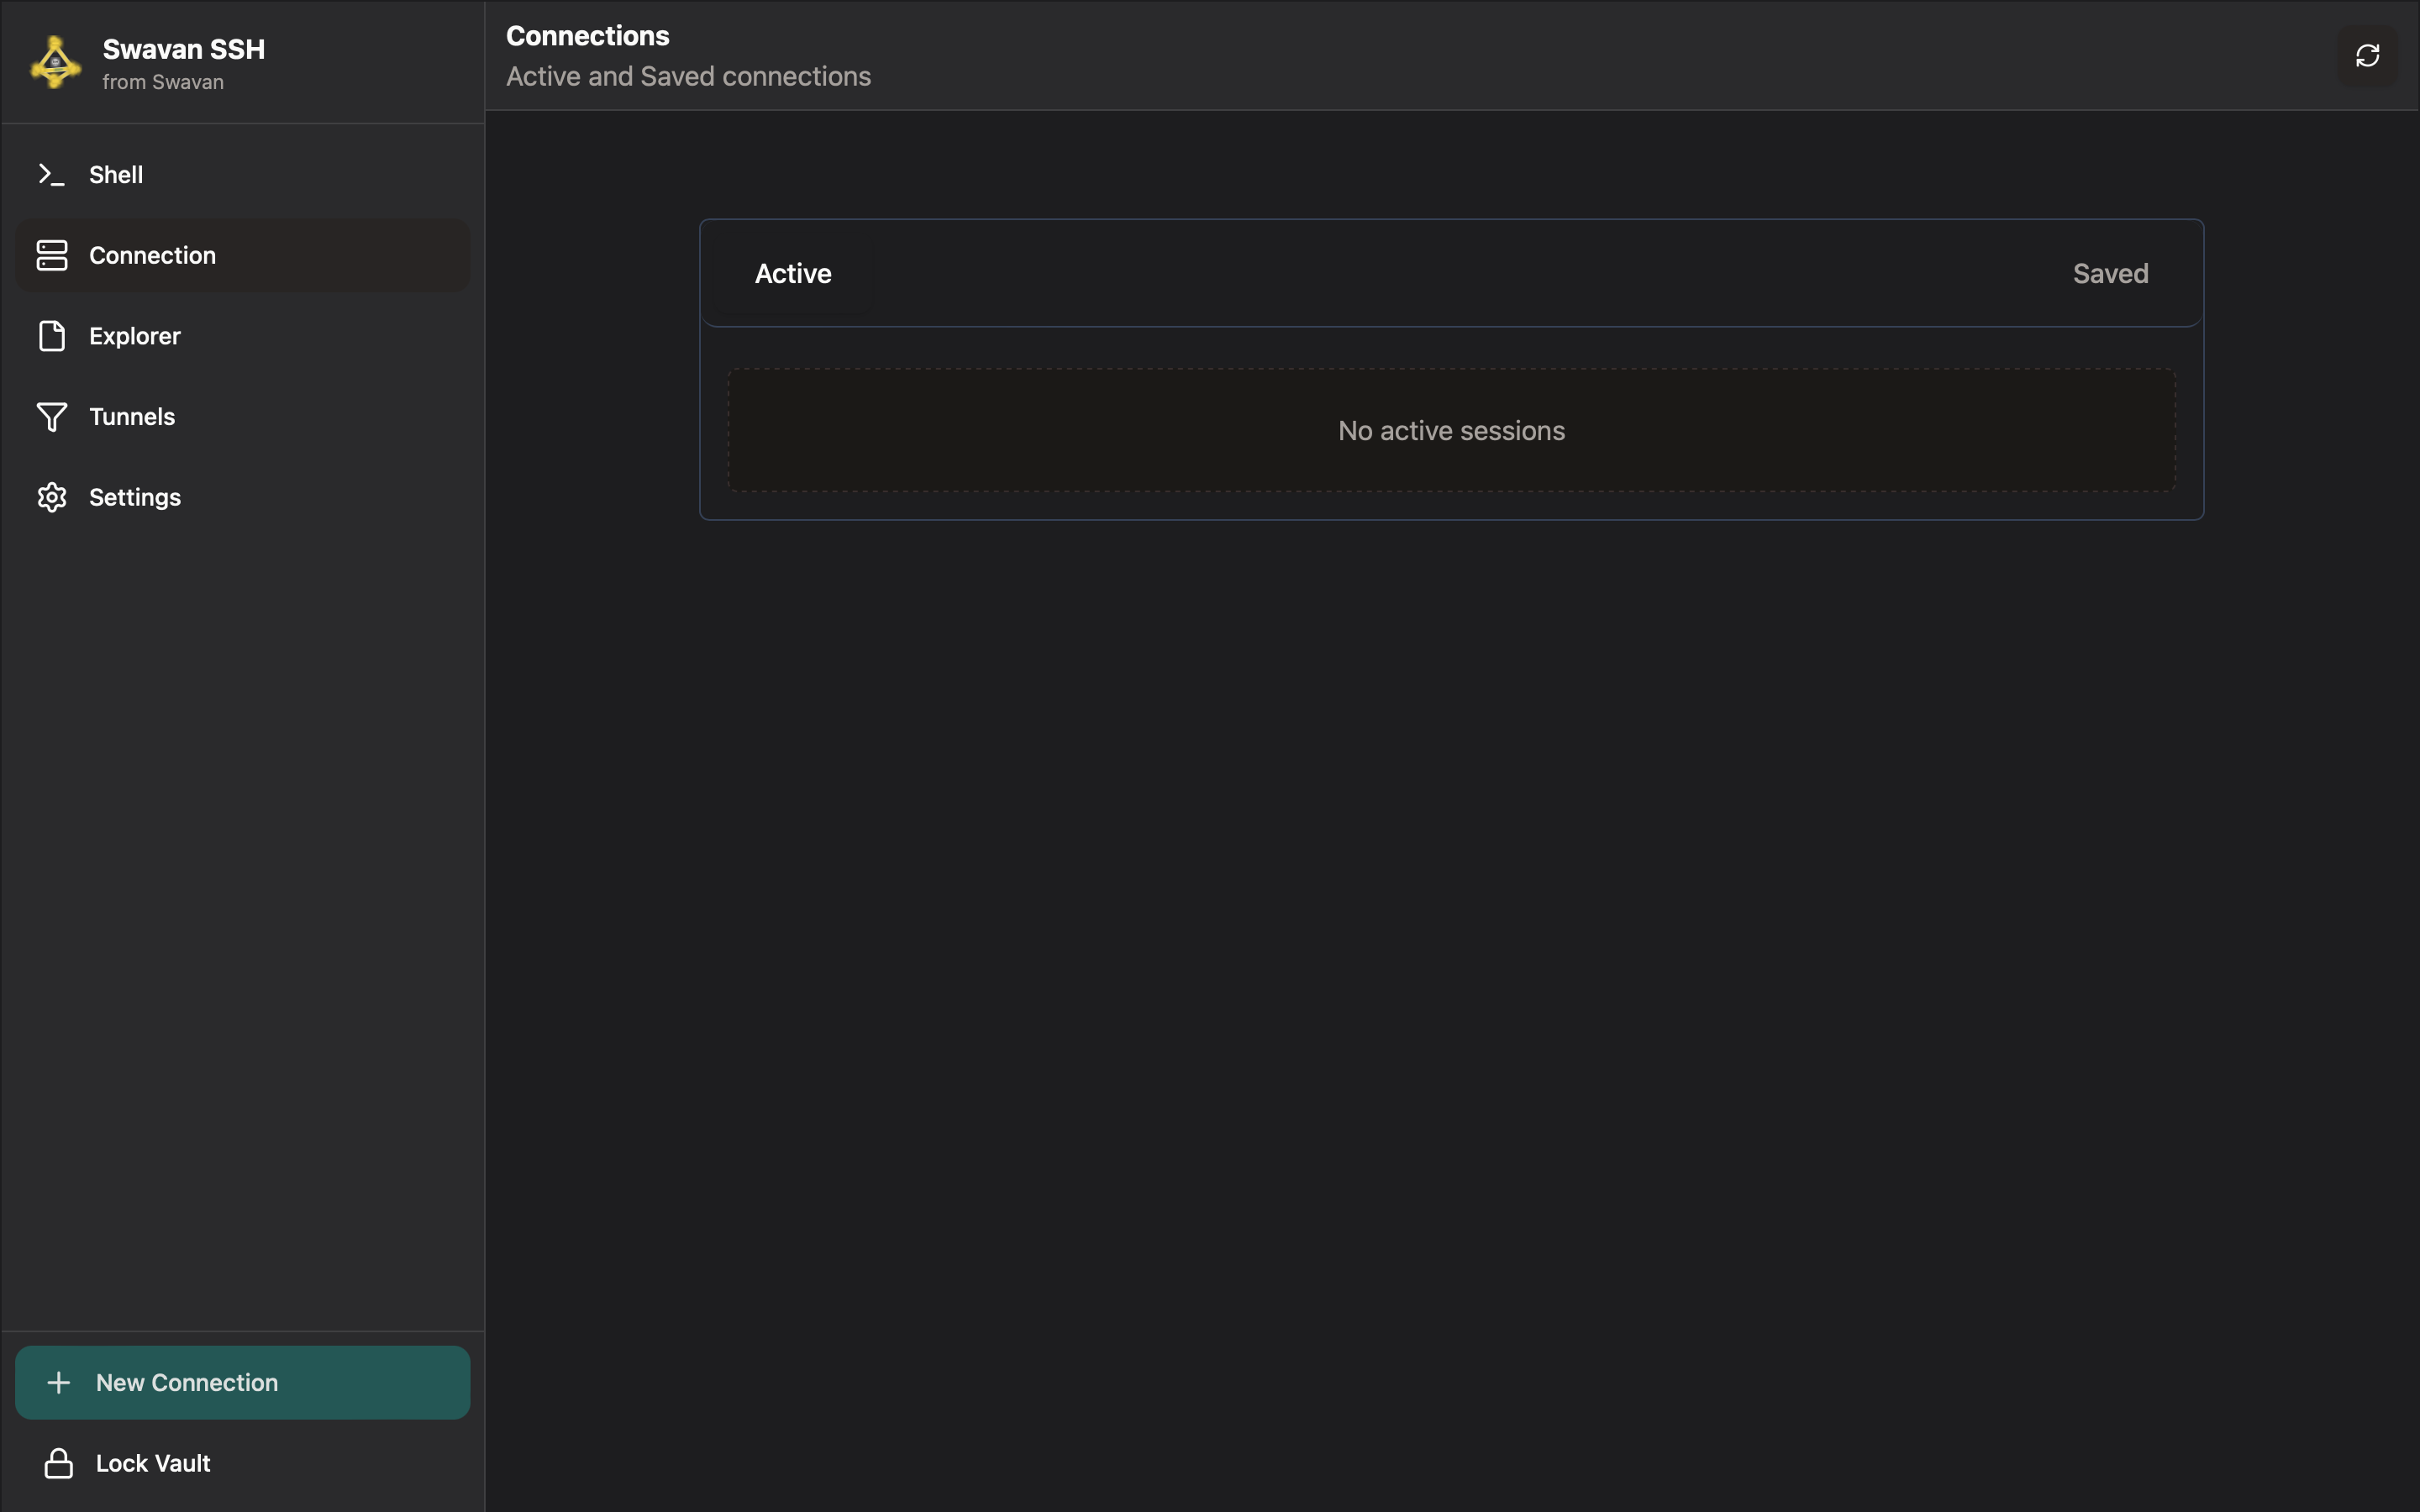
Figure 6: Connections screen showing active and saved connections
The Connections screen is divided into:
- Active Connections: Currently running SSH sessions with real-time status
- Saved Connections: Pre-configured SSH connections for quick access
- Navigation: Access to all app features (Shell, Connection, Explorer, Tunnels, Settings)
At the bottom, you'll find two important buttons:
- + New Connection: Create a new SSH connection with detailed configuration
- Lock Vault: Immediately lock the app for security when stepping away
2 Creating a New Connection
To add a new SSH connection, click the "+ New Connection" button at the bottom of the Connections screen:
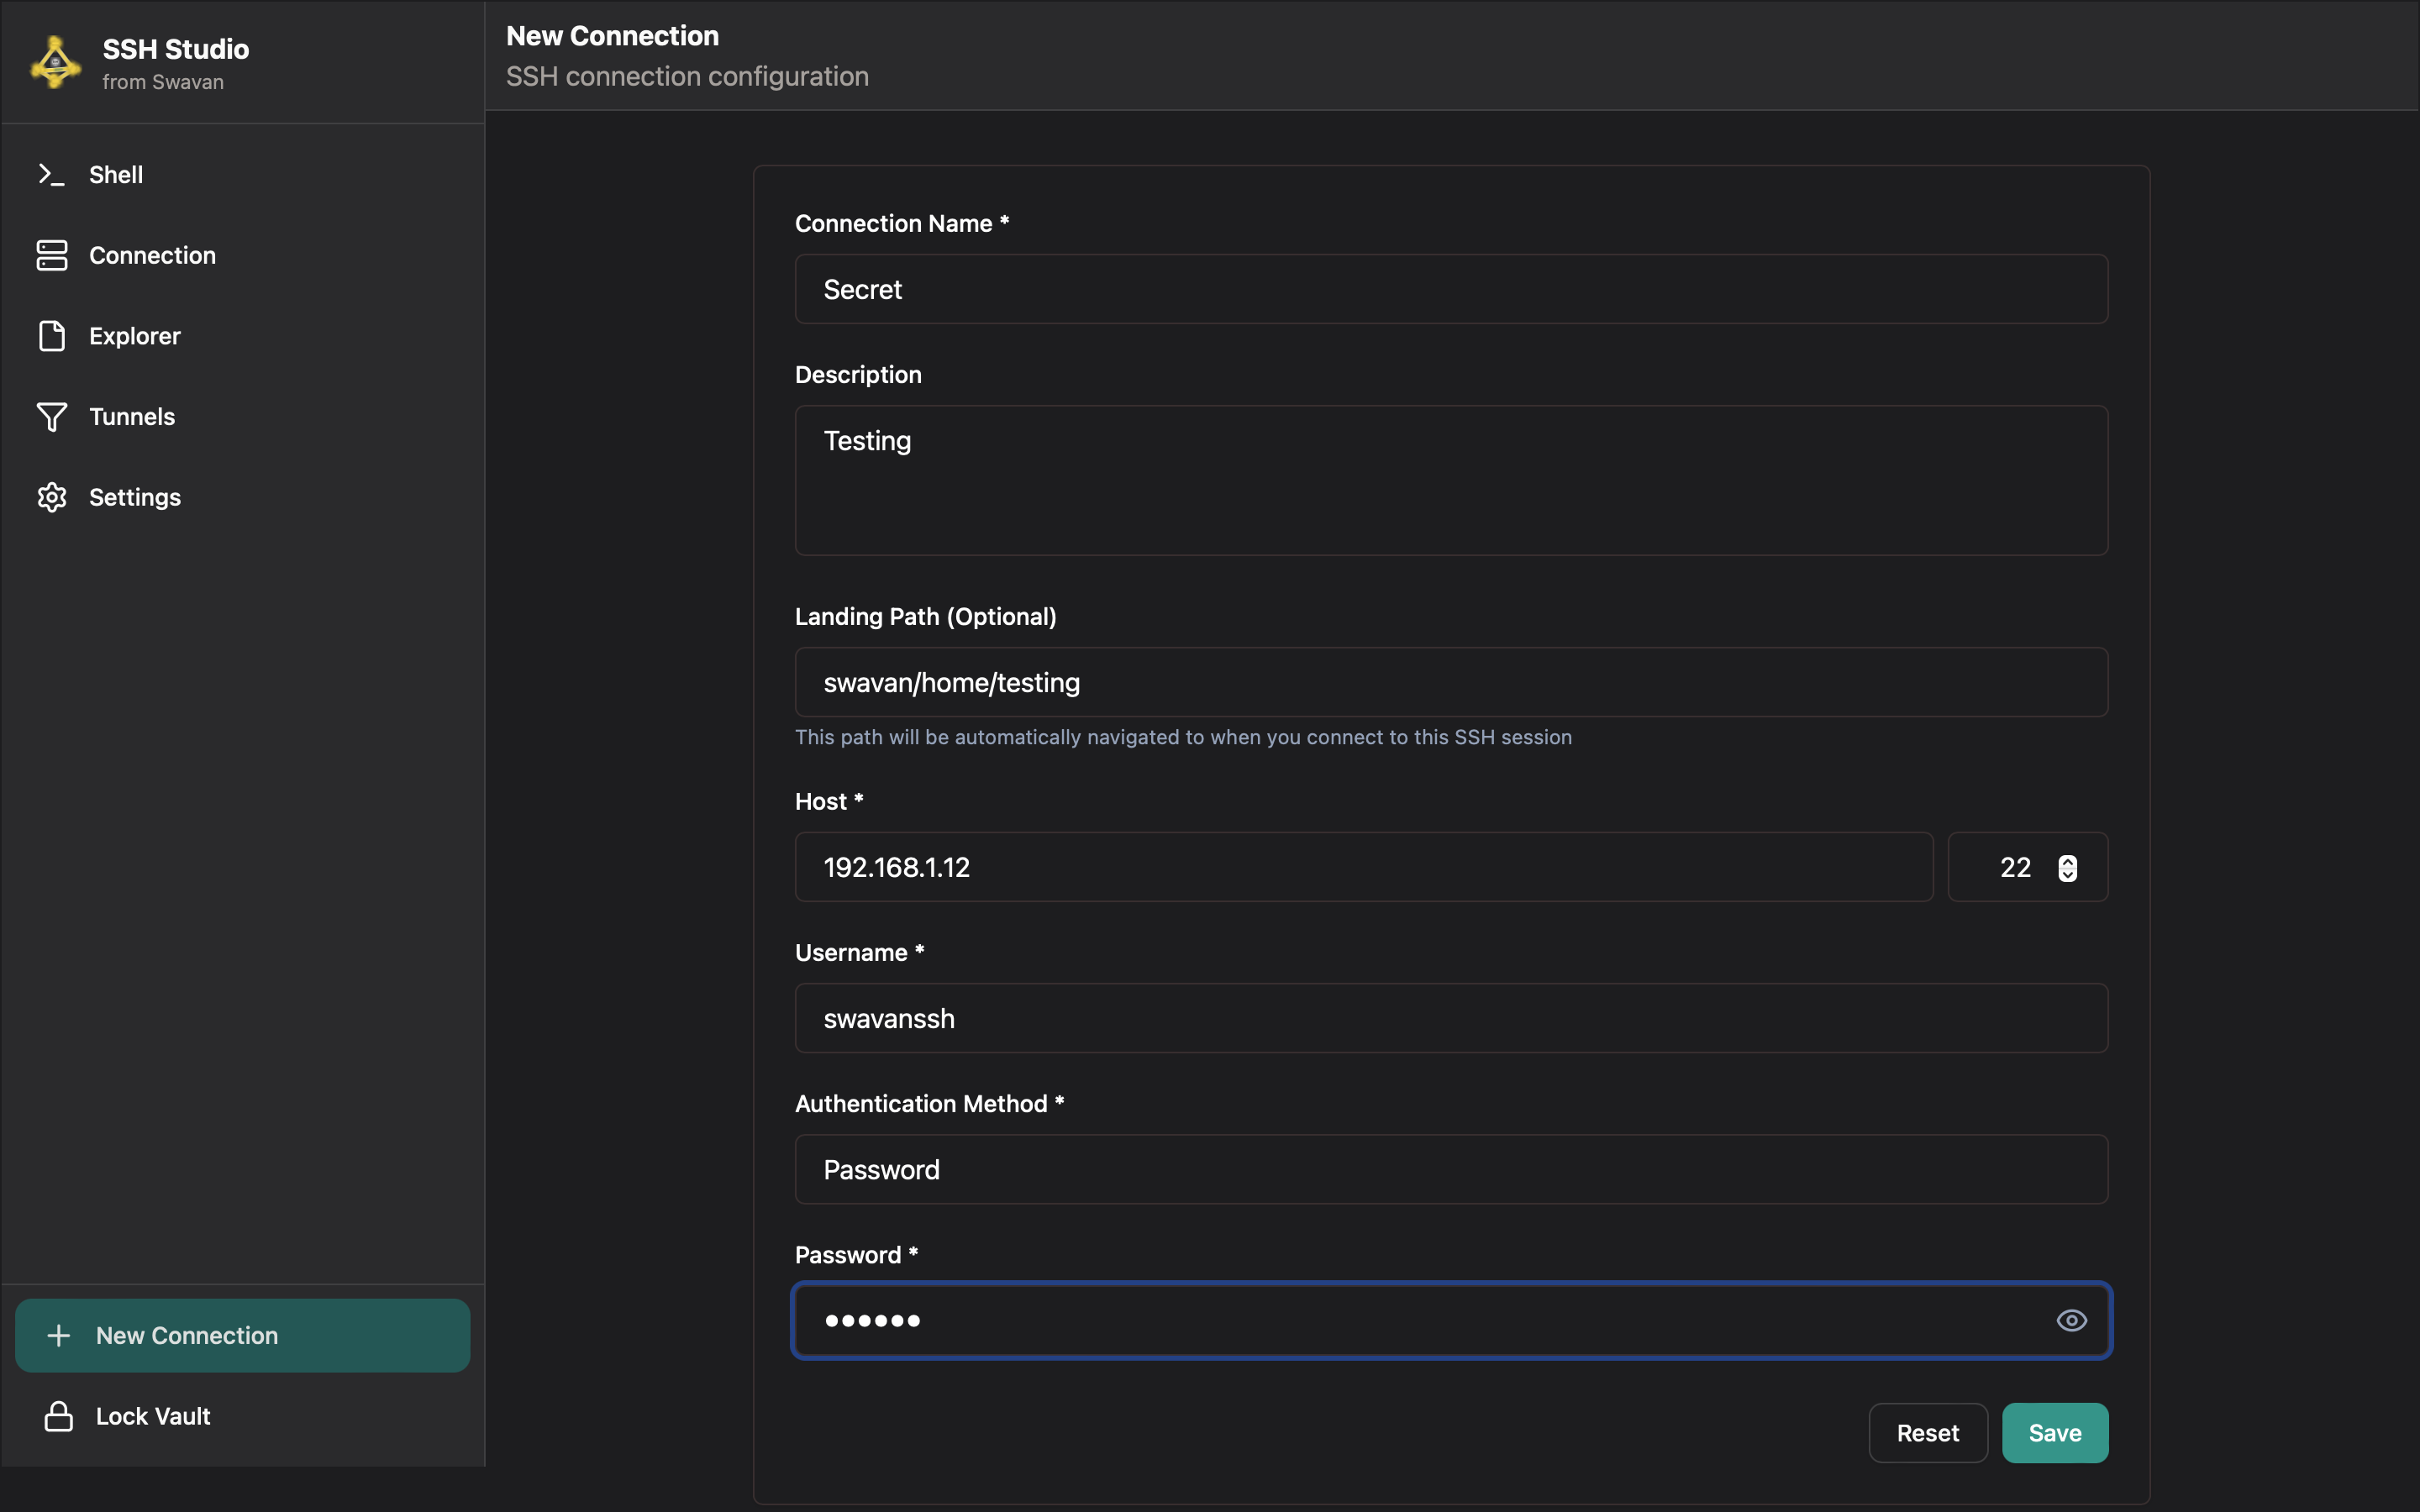
Figure 7: New connection configuration form
3 After Adding a Connection
After successfully creating a new connection, it will appear in your Connections screen:
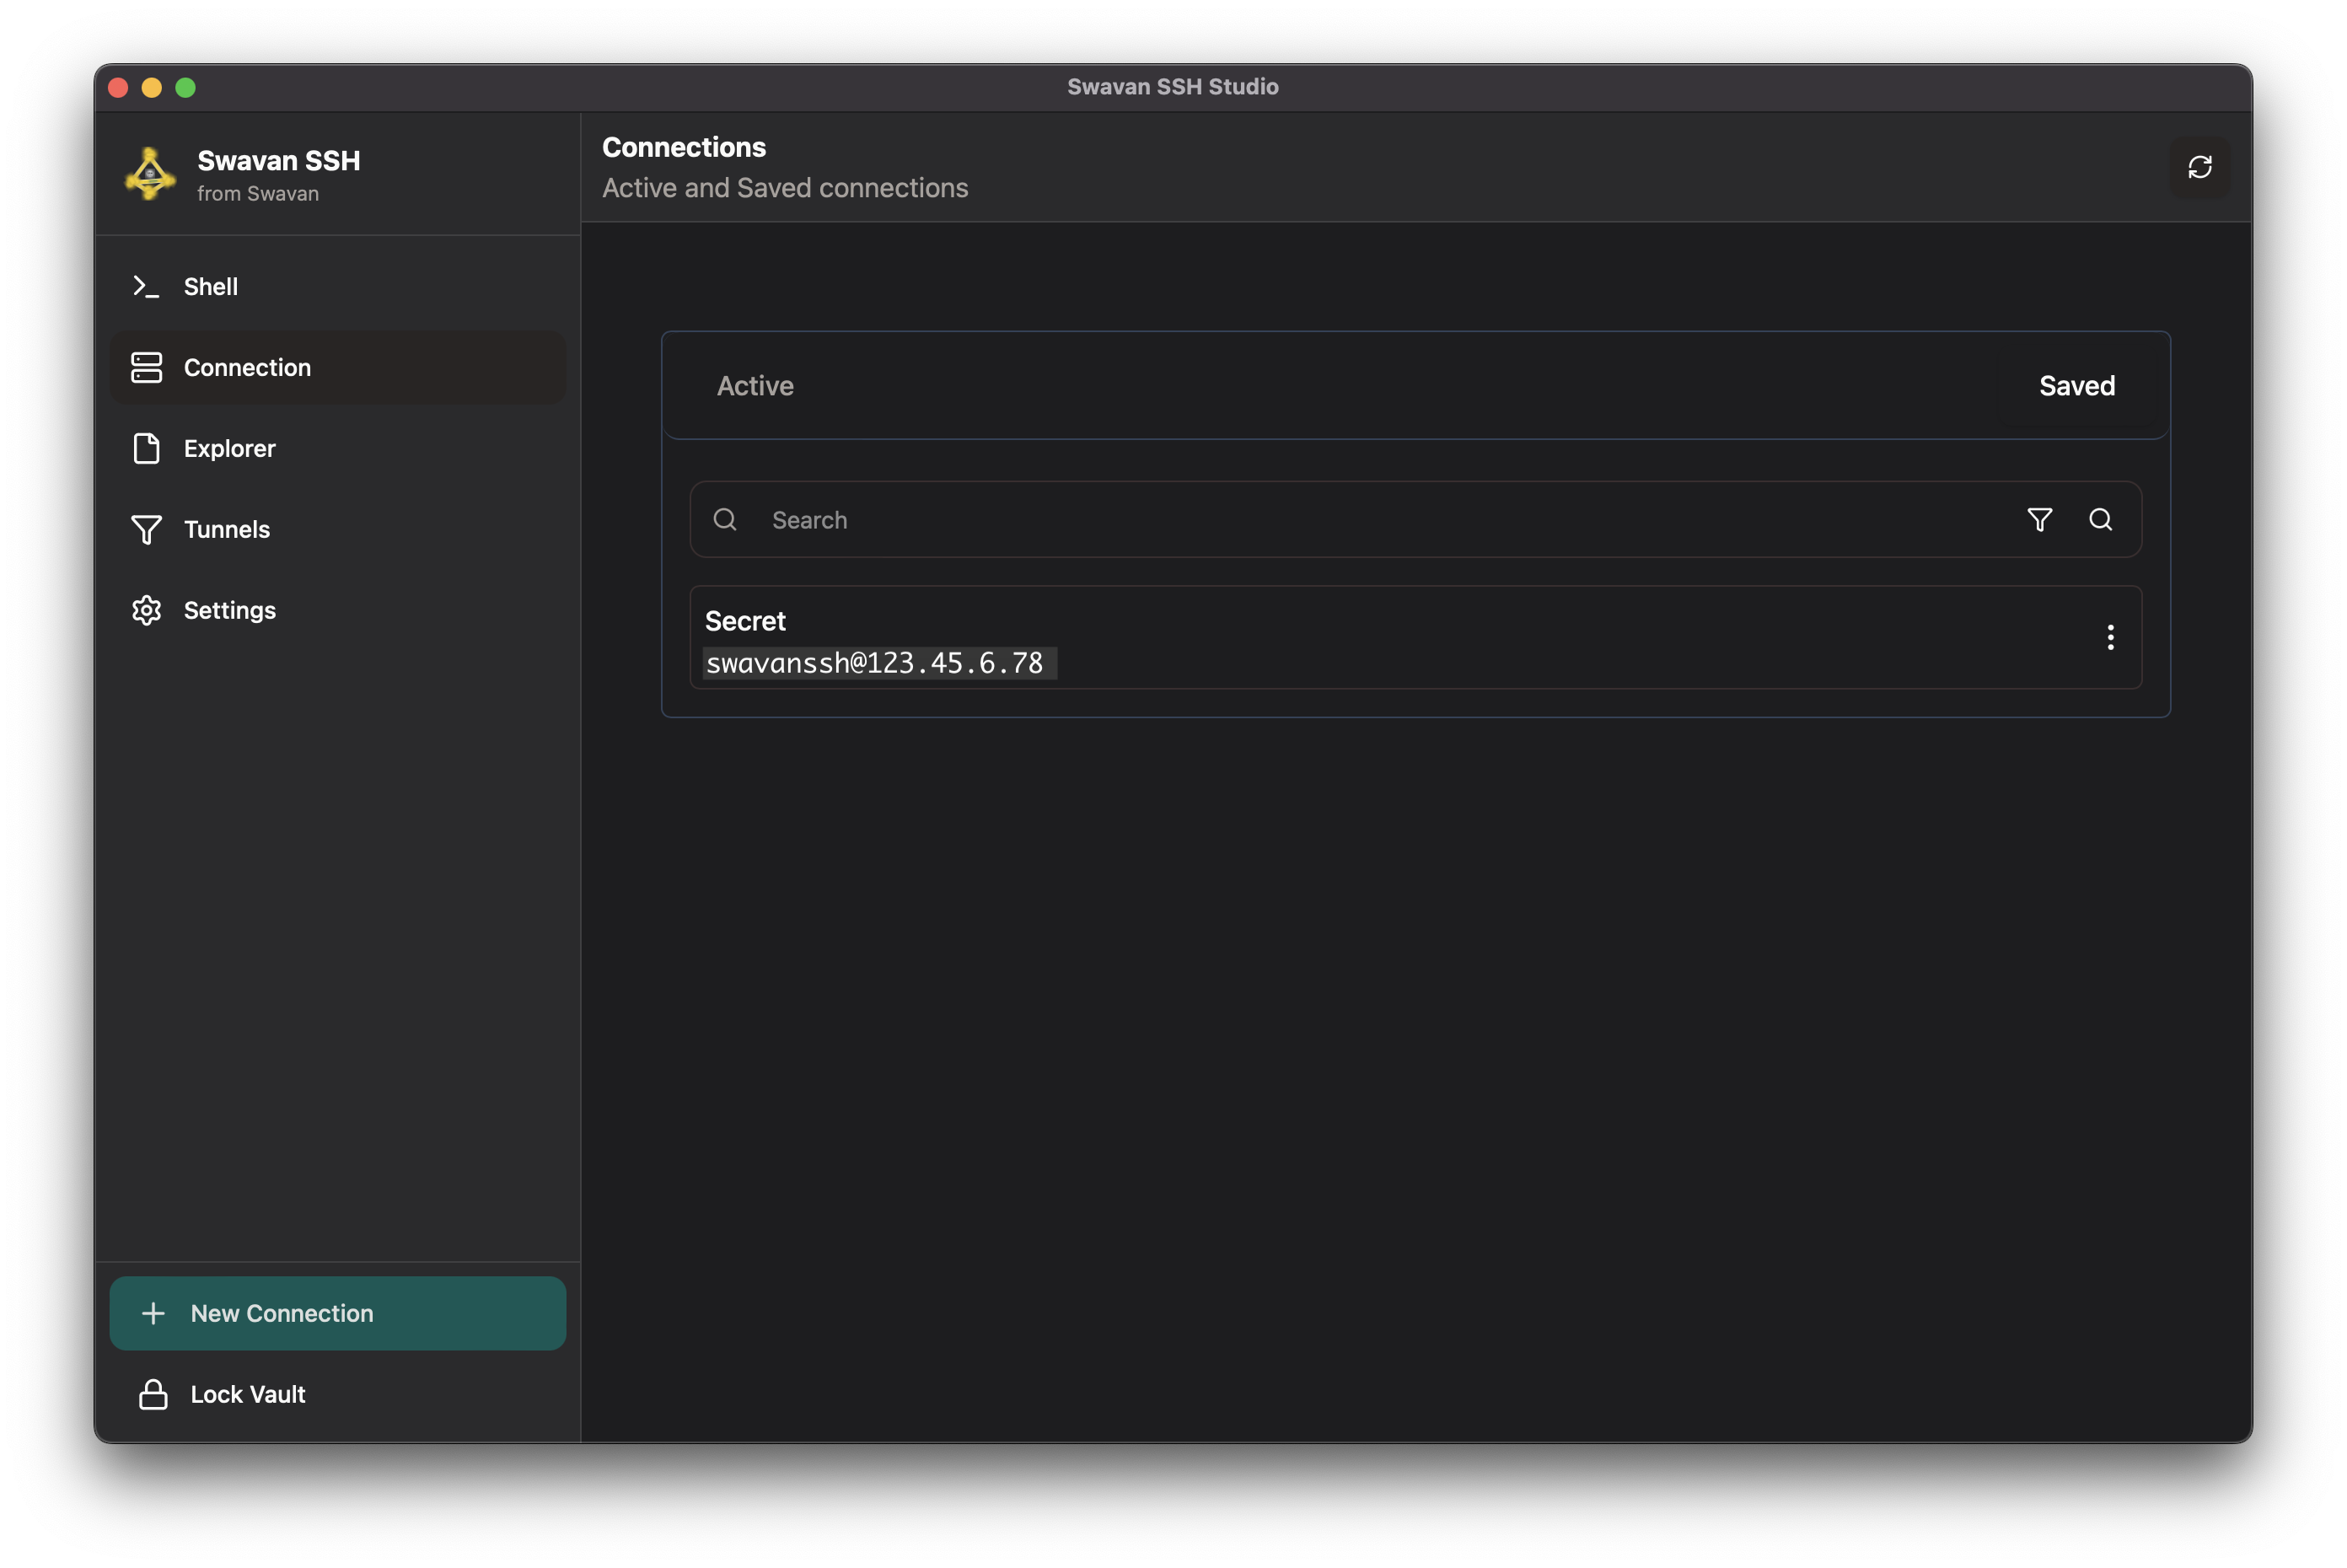
Figure 8: Connections screen showing newly added connection
From this screen, you can:
- Click on any saved connection to establish an SSH session instantly
- Use the search box to filter connections by any criteria
- Edit or delete existing connections as needed
- View which connections are currently active
- Add more connections for all your servers
- Share connections securely with other devices
File Explorer
The File Explorer feature allows you to browse, manage, and edit files on remote servers with ease. With support for 50+ file types, you can work with code, config files, and documents directly in the app.
1 Accessing File Explorer
To access the File Explorer, navigate to the Explorer section in the sidebar or click on the folder icon in a connection card while connected to a server:
You can see that there is an Open Secret button in the File Explorer because we created a file named secret while adding a new connection, and you can access the file from here.
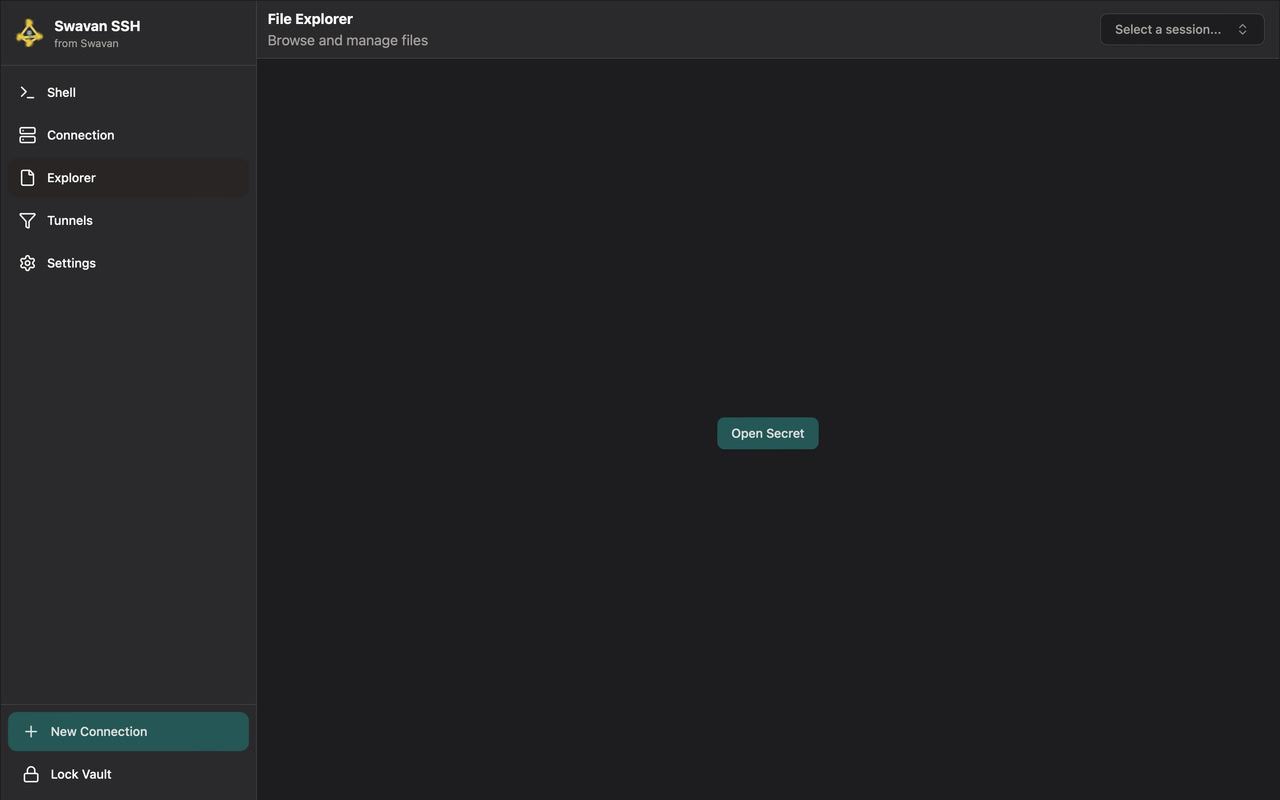
Figure 9: File Explorer access screen - Select a session
From this screen, you can:
- Select an active SSH session to browse files
- Open previously accessed secrets or directories
- Access all file management features from one interface
- Navigate between different server sessions
2 File Explorer Interface
After selecting a session, you'll see the File Explorer interface where you can browse and manage files:
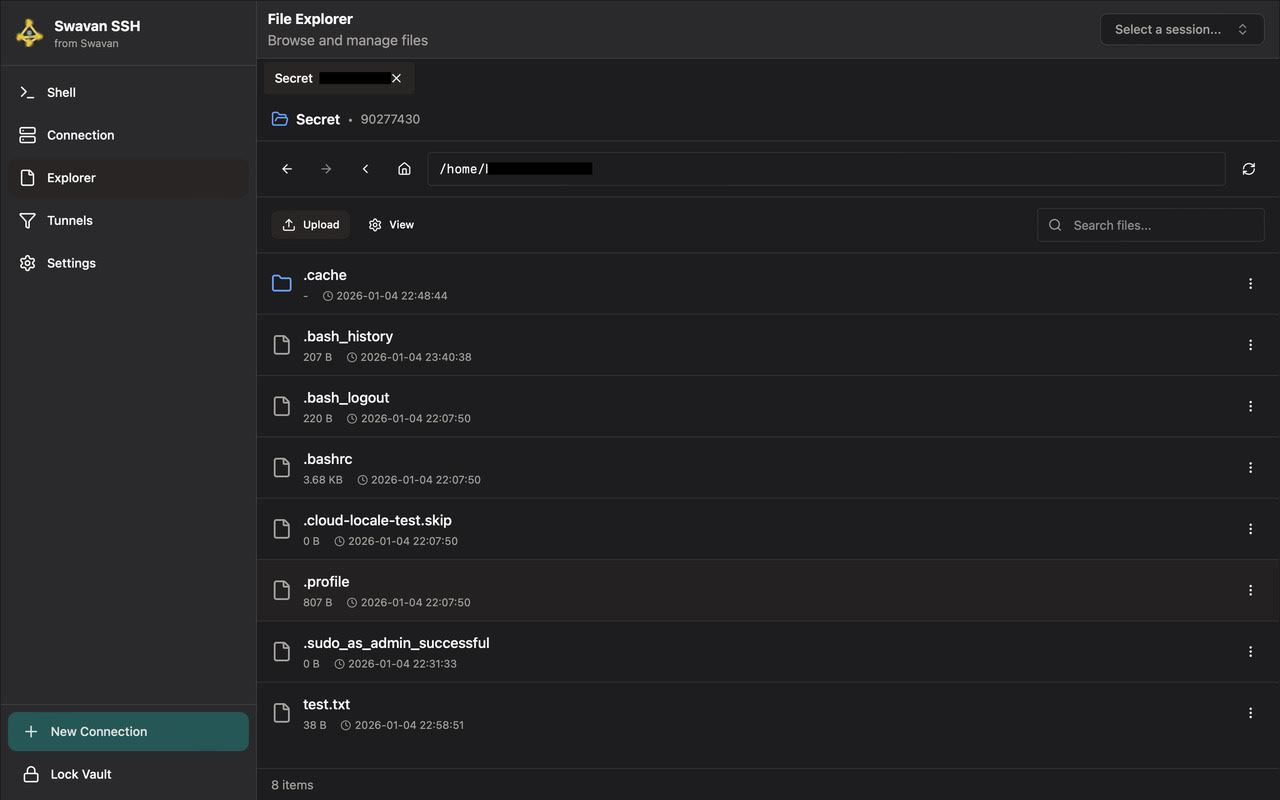
Figure 10: File Explorer interface showing files and folders
3 Opening Files
To view or edit a file, simply navigate to the file in the explorer. Here's how files appear when you access them:
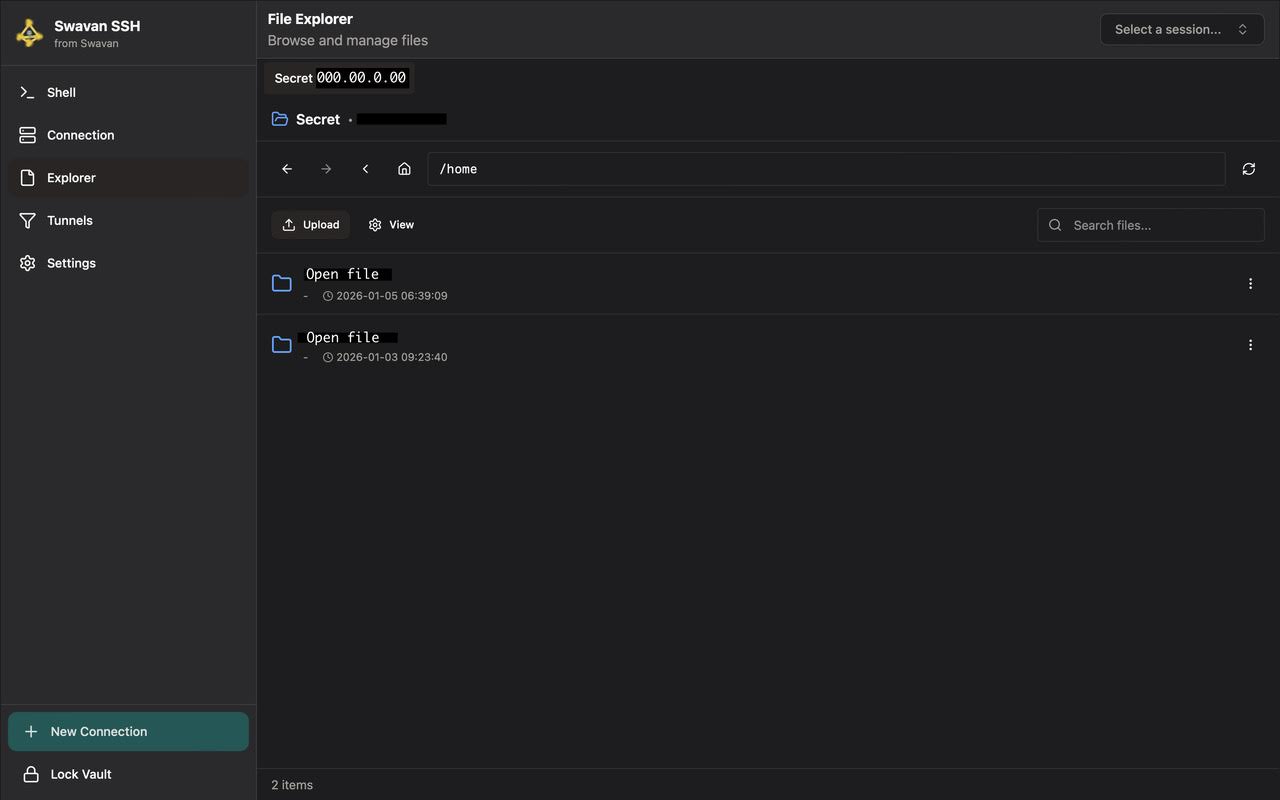
Figure 11: File view screen showing file contents
When viewing files, you can:
- Browse file contents with syntax highlighting for 50+ file types
- See file metadata including size and modification date
- Navigate through different files in the same directory
- Use search functionality to find specific files
4 Uploading Files
To upload files to the remote server, click the Upload button in the File Explorer:
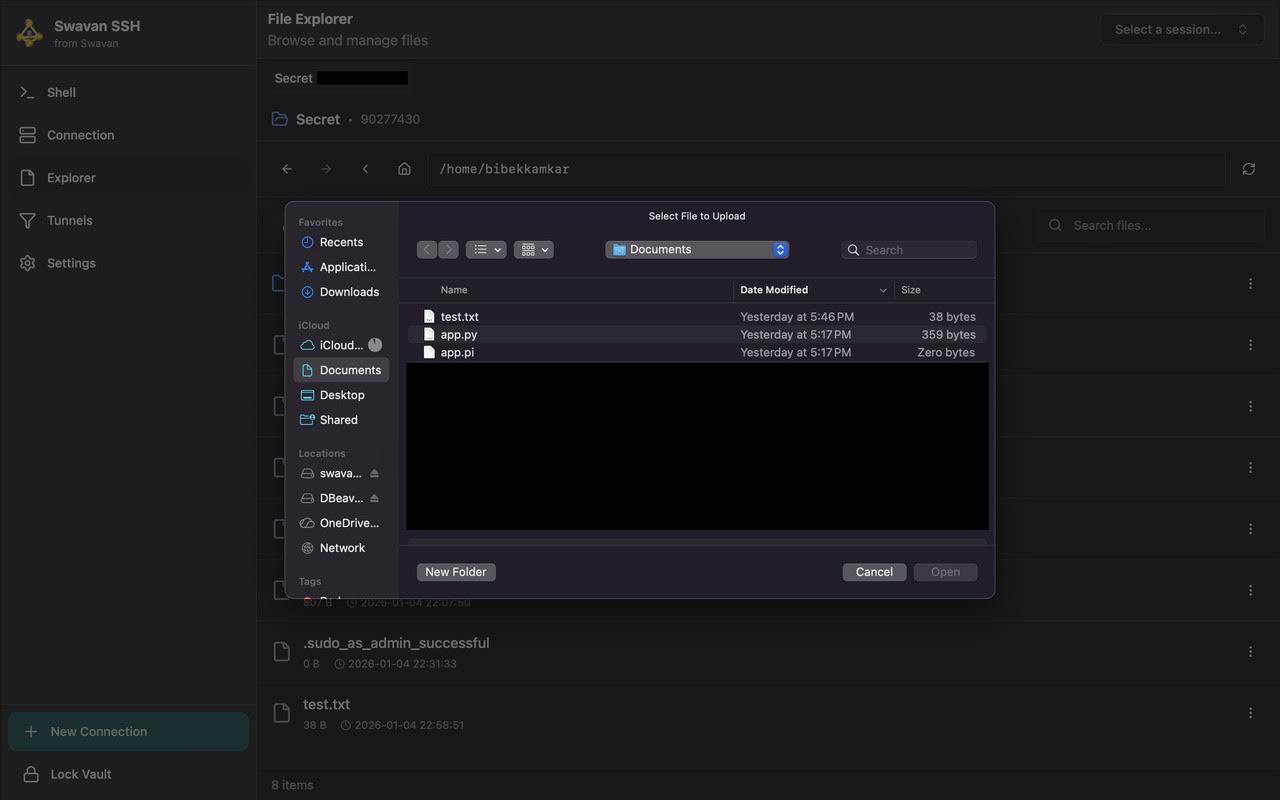
Figure 12: Upload file dialog - Select files from local system
The upload dialog allows you to:
- Browse local files and folders from your computer
- Select multiple files for batch upload
5 After File Upload
After successfully uploading files, they appear in the File Explorer with all other files:
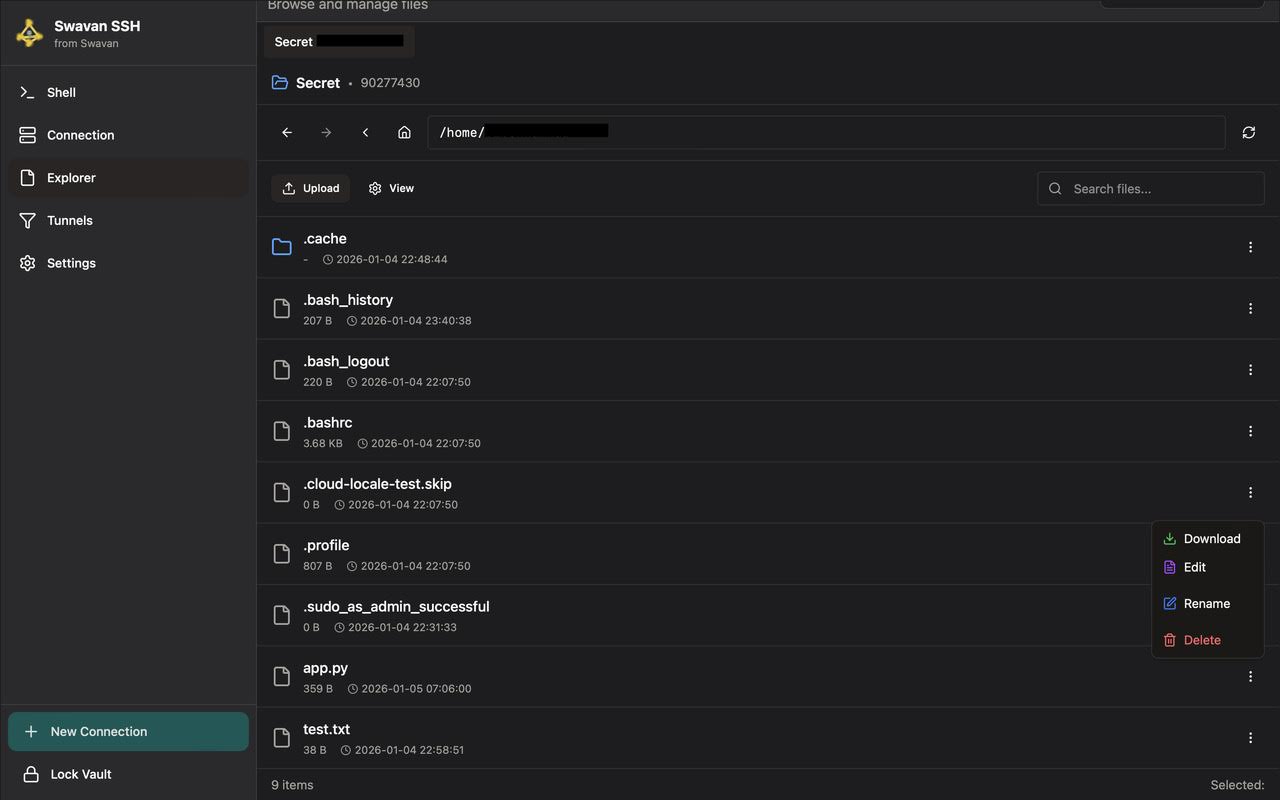
Figure 13: File Explorer showing newly uploaded files
Uploaded files are fully integrated with the file system and you can:
- Edit uploaded files directly in the app
- Rename, move, or delete uploaded files
- Download files back to your local system
6 Editing Files
Swavan SSH Studio includes a powerful built-in editor for remote files. To edit a file, simply open it:
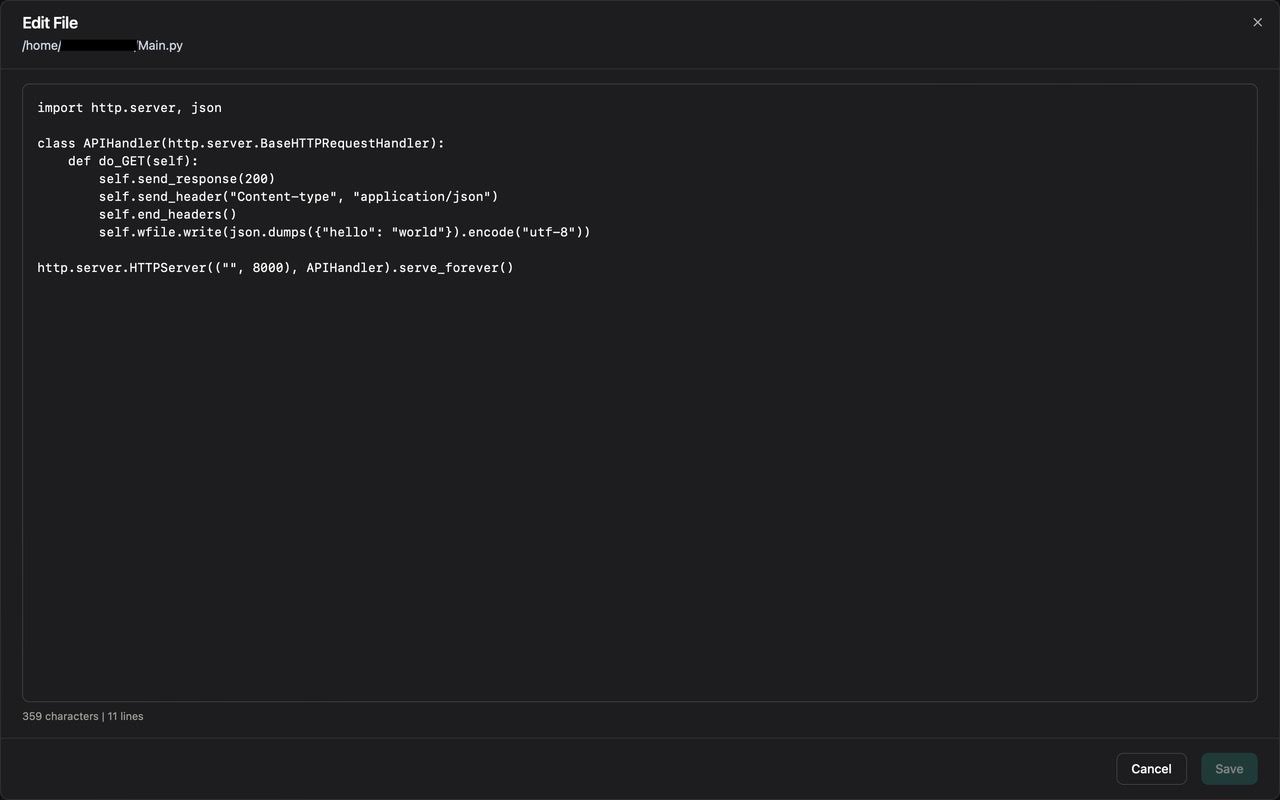
Figure 14: File editor with syntax highlighting
7 Renaming Files
To rename a file, use the rename option in the file context menu:
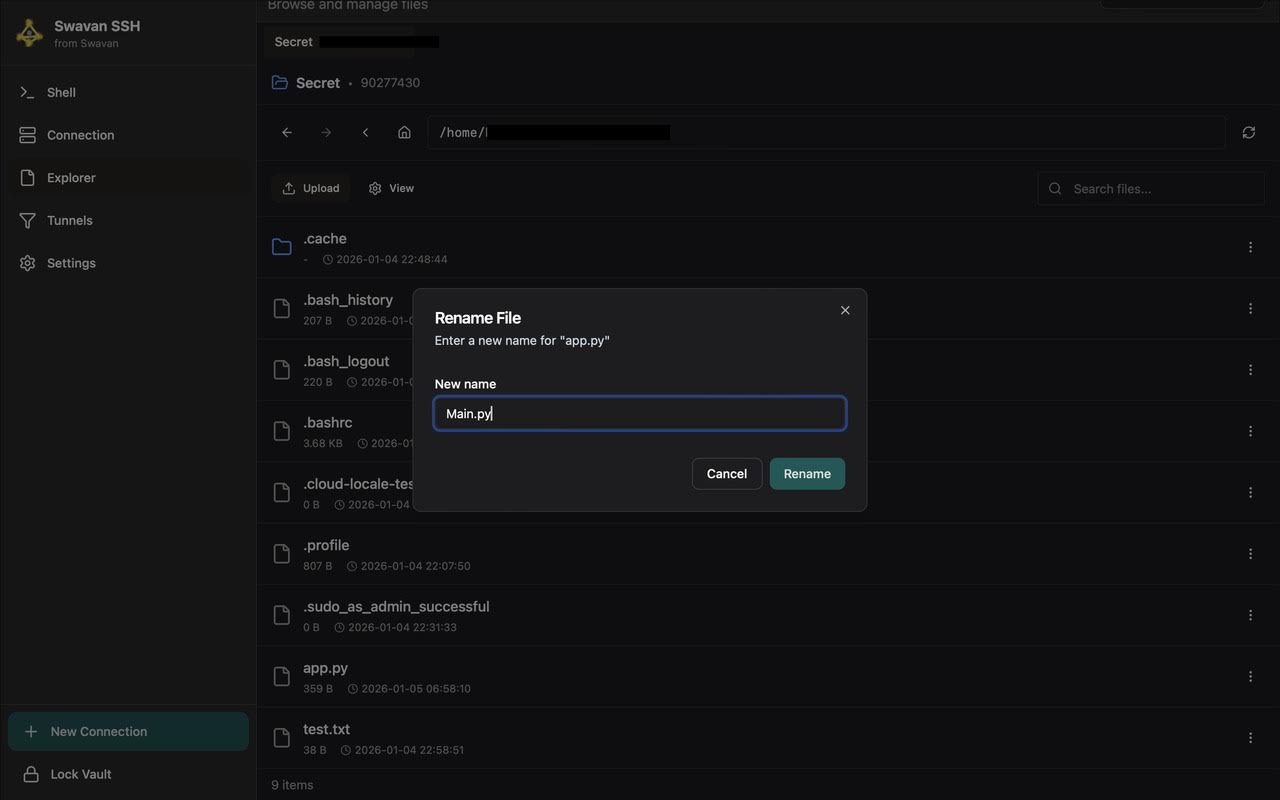
Figure 15: Rename file dialog - Enter new filename
The rename feature allows you to:
- Change file names while preserving extensions
- Rename multiple files sequentially
8 Deleting Files
To delete files, use the delete option in the file context menu. The app provides a confirmation dialog for safety:
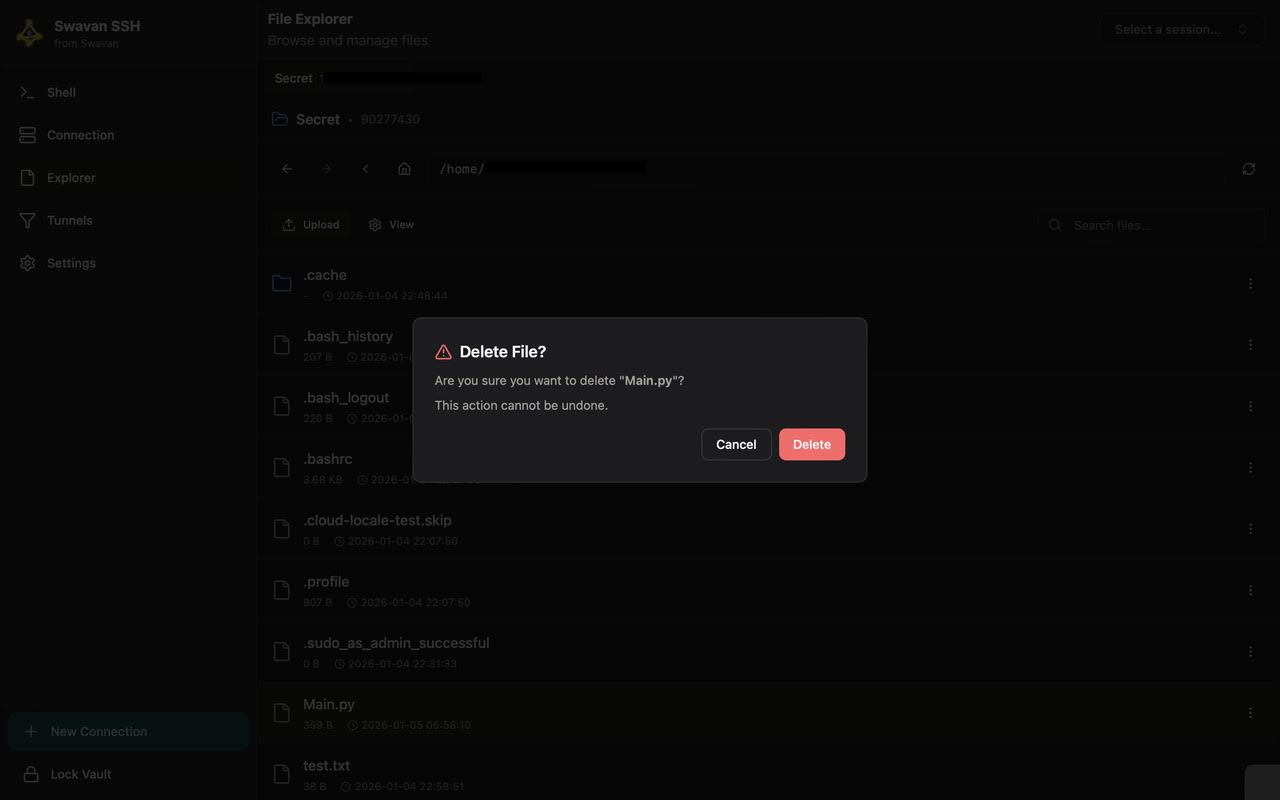
Figure 16: Delete file confirmation dialog
Tunnels
1 Tunnels Interface
The Tunnels screen provides an overview of all your SSH tunnels. Here's what the interface looks like:
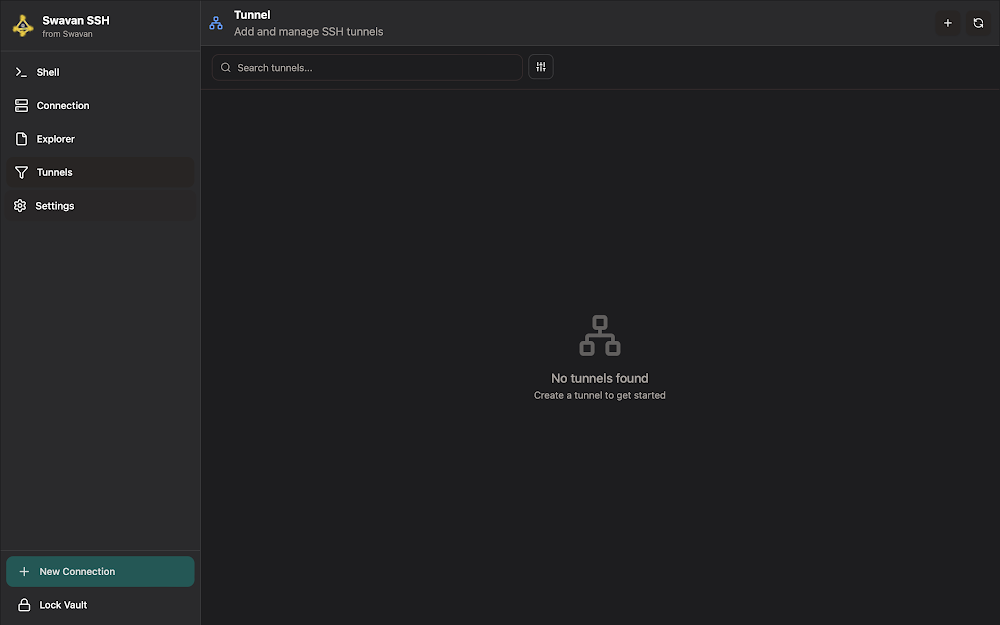
Figure 17: Tunnels screen showing empty tunnel list
The Tunnels interface includes:
- Search Functionality: Search for existing tunnels by name or type
- Tunnel List: View all configured tunnels with status indicators
- Empty State: Guidance when no tunnels are configured
- Navigation: Access to all app features from the sidebar
- Create Tunnel: Add button to create new tunnels
2 Creating a Tunnel
To create a new SSH tunnel, click the add button. You'll see three tunnel types available:
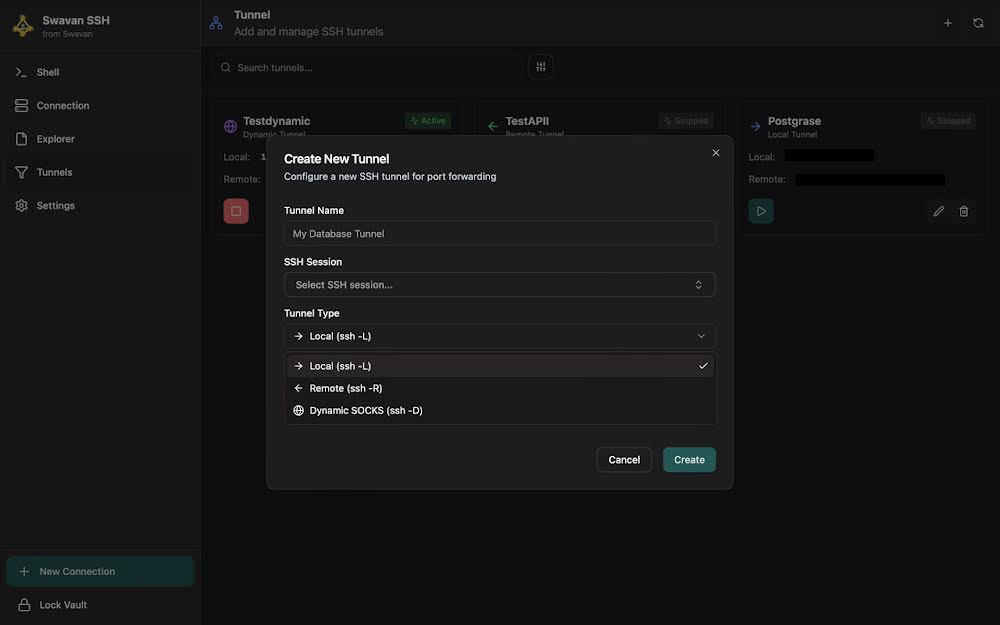
Figure 18: Create tunnel dialog showing three tunnel types
Three tunnel types are available:
To create a tunnel, configure these settings:
- Tunnel Name: Descriptive name for your tunnel (e.g., "My Database Tunnel")
- SSH Session: Select the SSH connection to use for the tunnel
- Tunnel Type: Choose between Local, Remote, or Dynamic SOCKS
- Port Configuration: Set local and remote ports based on tunnel type
3 Tunnel Created
After creating a local tunnel, it appears in your tunnel list. Here's how it looks when active:
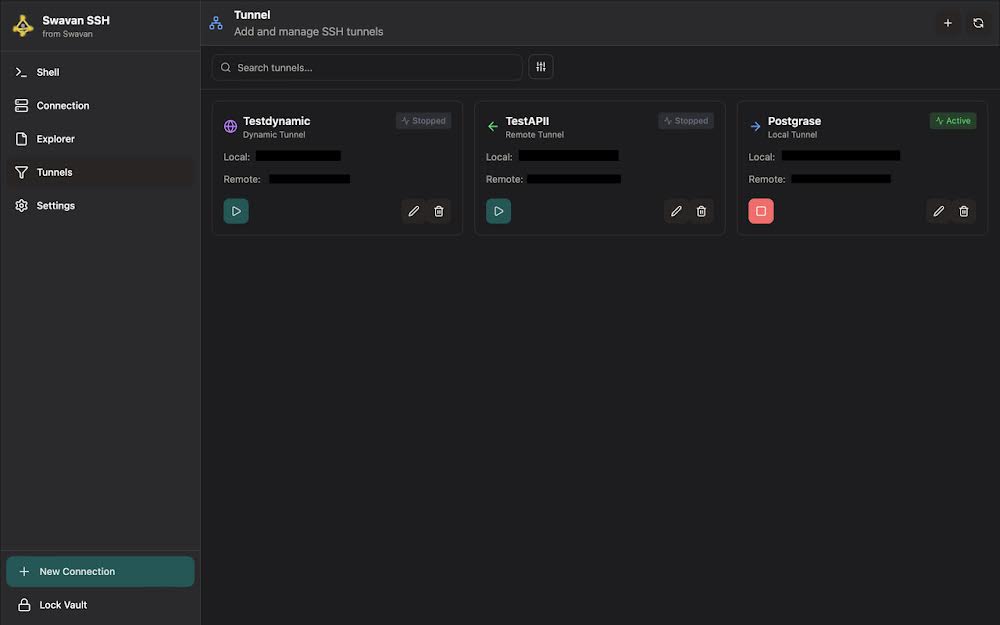
Figure 19: Tunnels screen showing active local tunnel
Your created tunnels will appear with:
- Tunnel Name: The name you assigned during creation
- Tunnel Type: Clear indication (Local, Remote, or Dynamic)
- Status Indicator: Visual indication showing if tunnel is active/running
- Port Information: Display of configured local and remote ports
- Action Controls: Start/stop buttons and configuration options
4 Testing with Database (Tunnel Active)
With an active local tunnel, you can access remote services. Here's a database running through the tunnel:
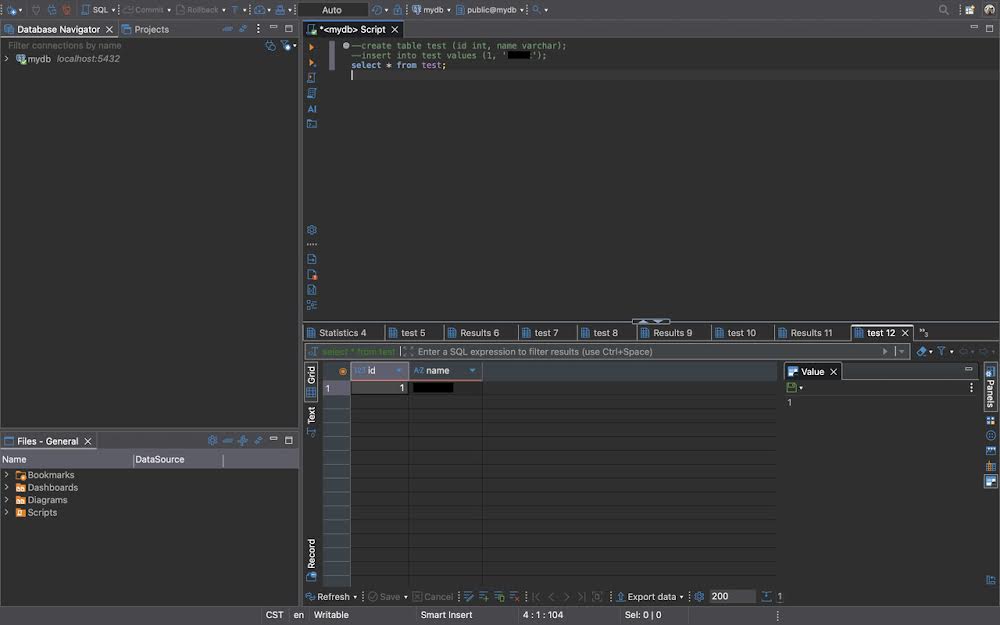
Figure 20: Database successfully running through active local tunnel
When the tunnel is active:
- Service Access: Remote services become accessible on local ports
- Encrypted Connection: All traffic is encrypted through the SSH tunnel
- Transparent Operation: Applications connect as if service is running locally
- Performance Monitoring: Real-time status and connection monitoring
- Multiple Services: Run multiple services through different tunnel ports
5 Stopping the Tunnel
When you stop a tunnel, it becomes inactive in the tunnel list:
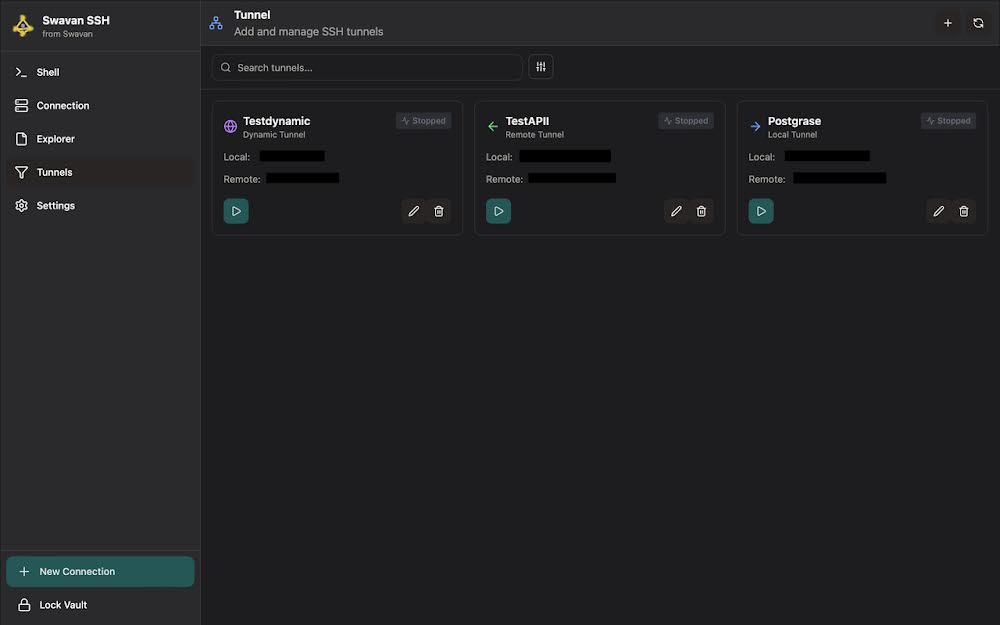
Figure 21: Tunnels screen showing stopped local tunnel
Stopping a tunnel:
- Immediate Effect: Tunnel connection terminates immediately
- Status Change: Visual indicator shows tunnel as stopped/inactive
- Service Interruption: Services using the tunnel become inaccessible
- Resource Release: Ports are freed up for other uses
- Easy Restart: Can be restarted with a single click
6 Testing with Database (Tunnel Stopped)
When the tunnel is stopped, attempting to access services through it results in errors:
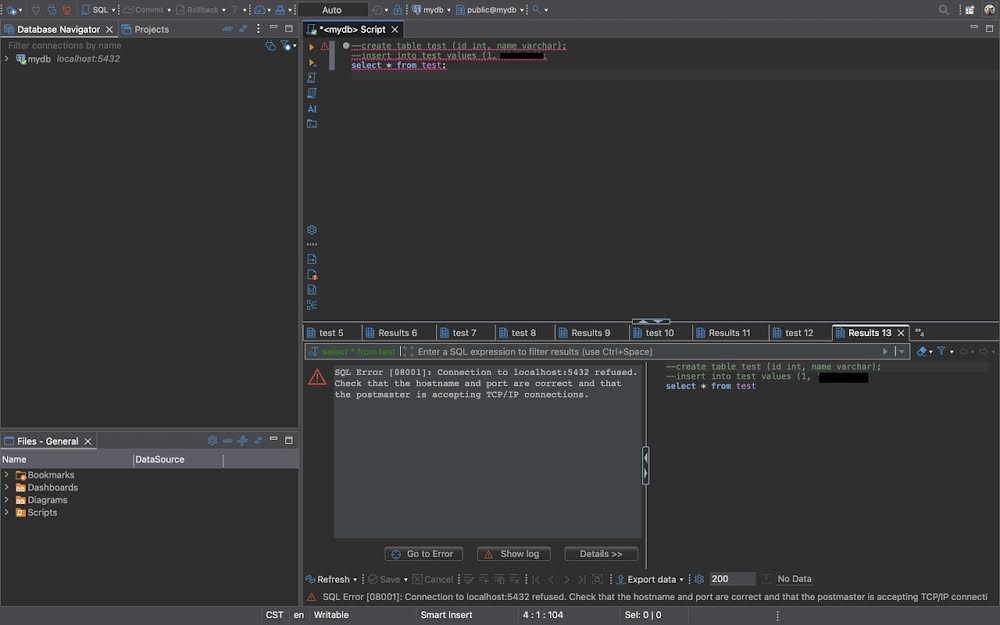
Figure 22: Database connection error when tunnel is stopped
Without an active tunnel:
- Connection Refused: Applications cannot connect to the local port
- Service Unavailable: Remote services are inaccessible from local machine
- Clear Error Messages: Applications show specific connection errors
- Security: Services remain protected behind the SSH barrier
- Troubleshooting: Error messages help identify tunnel issues
Remote Tunnel Testing
Remote tunnels (SSH -R) allow you to expose local services to remote servers. This section demonstrates how to create, test, and verify remote tunnel functionality.
1 Creating Remote Tunnel
First, create a remote tunnel in Swavan SSH Studio with the following configuration:
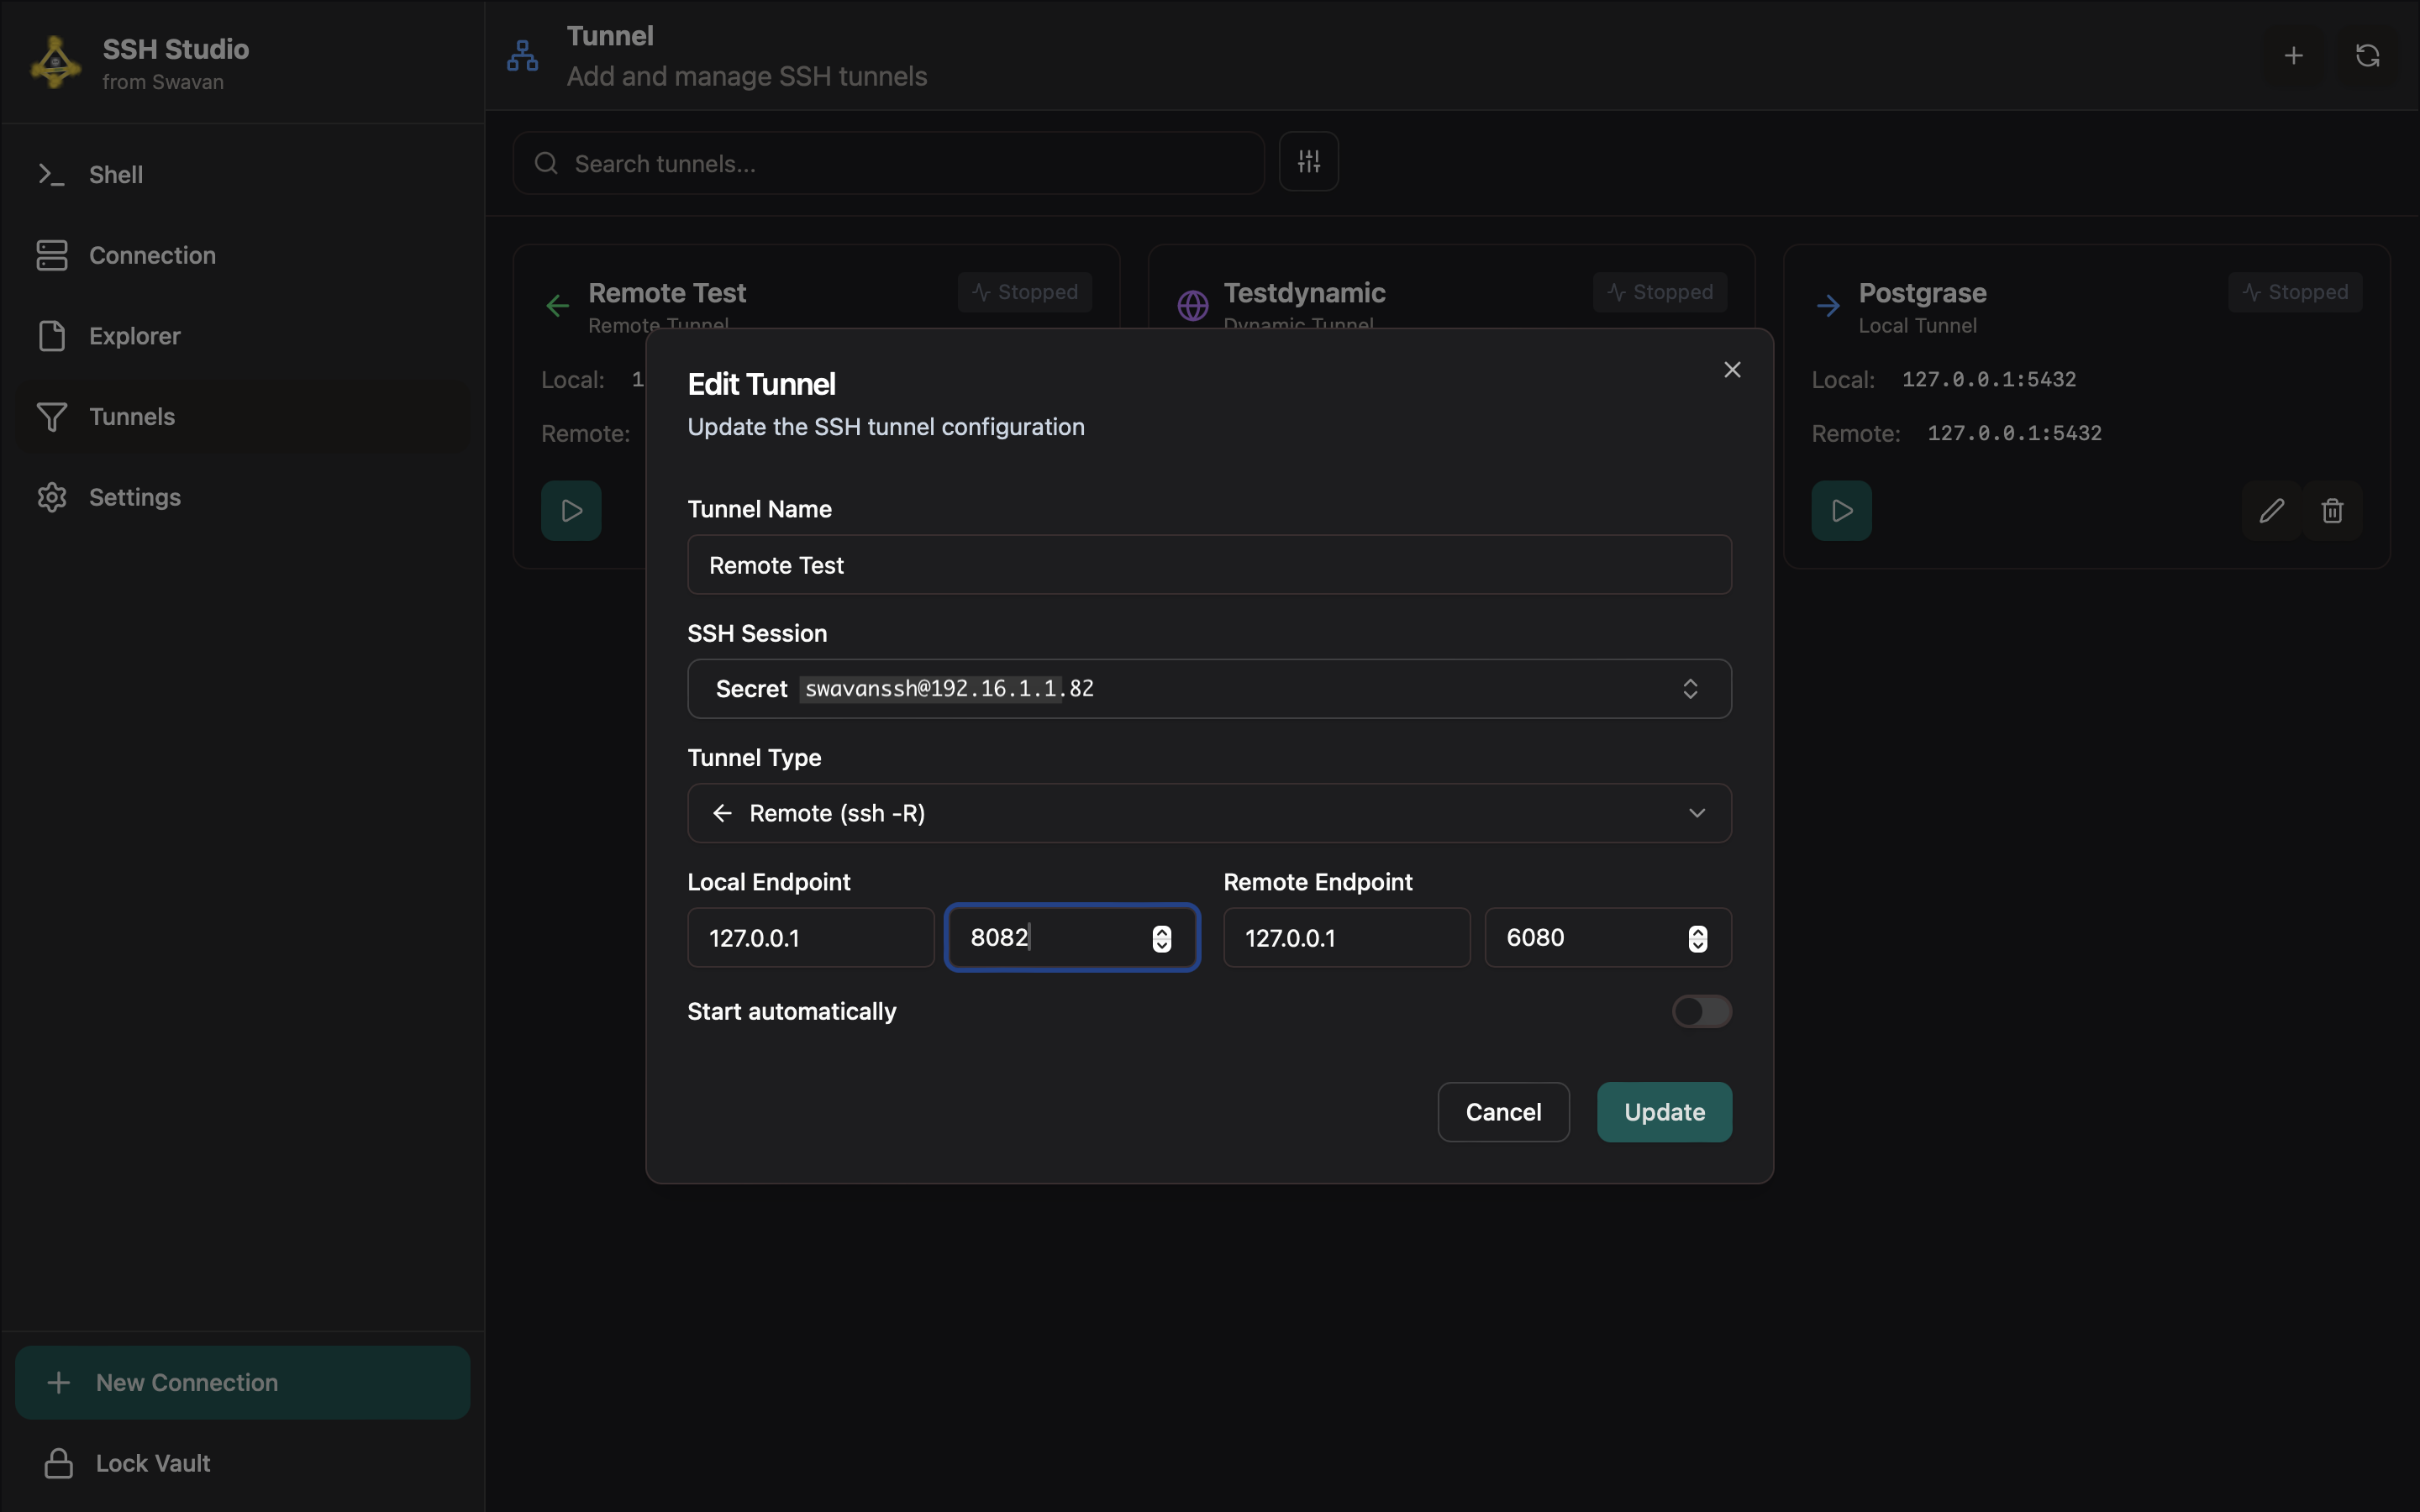
Figure 39: Remote tunnel configuration in Swavan SSH Studio
Tunnel configuration details:
2 Setting Up Local Web Server
On your local machine (MacBook), set up a simple web server to test the tunnel:
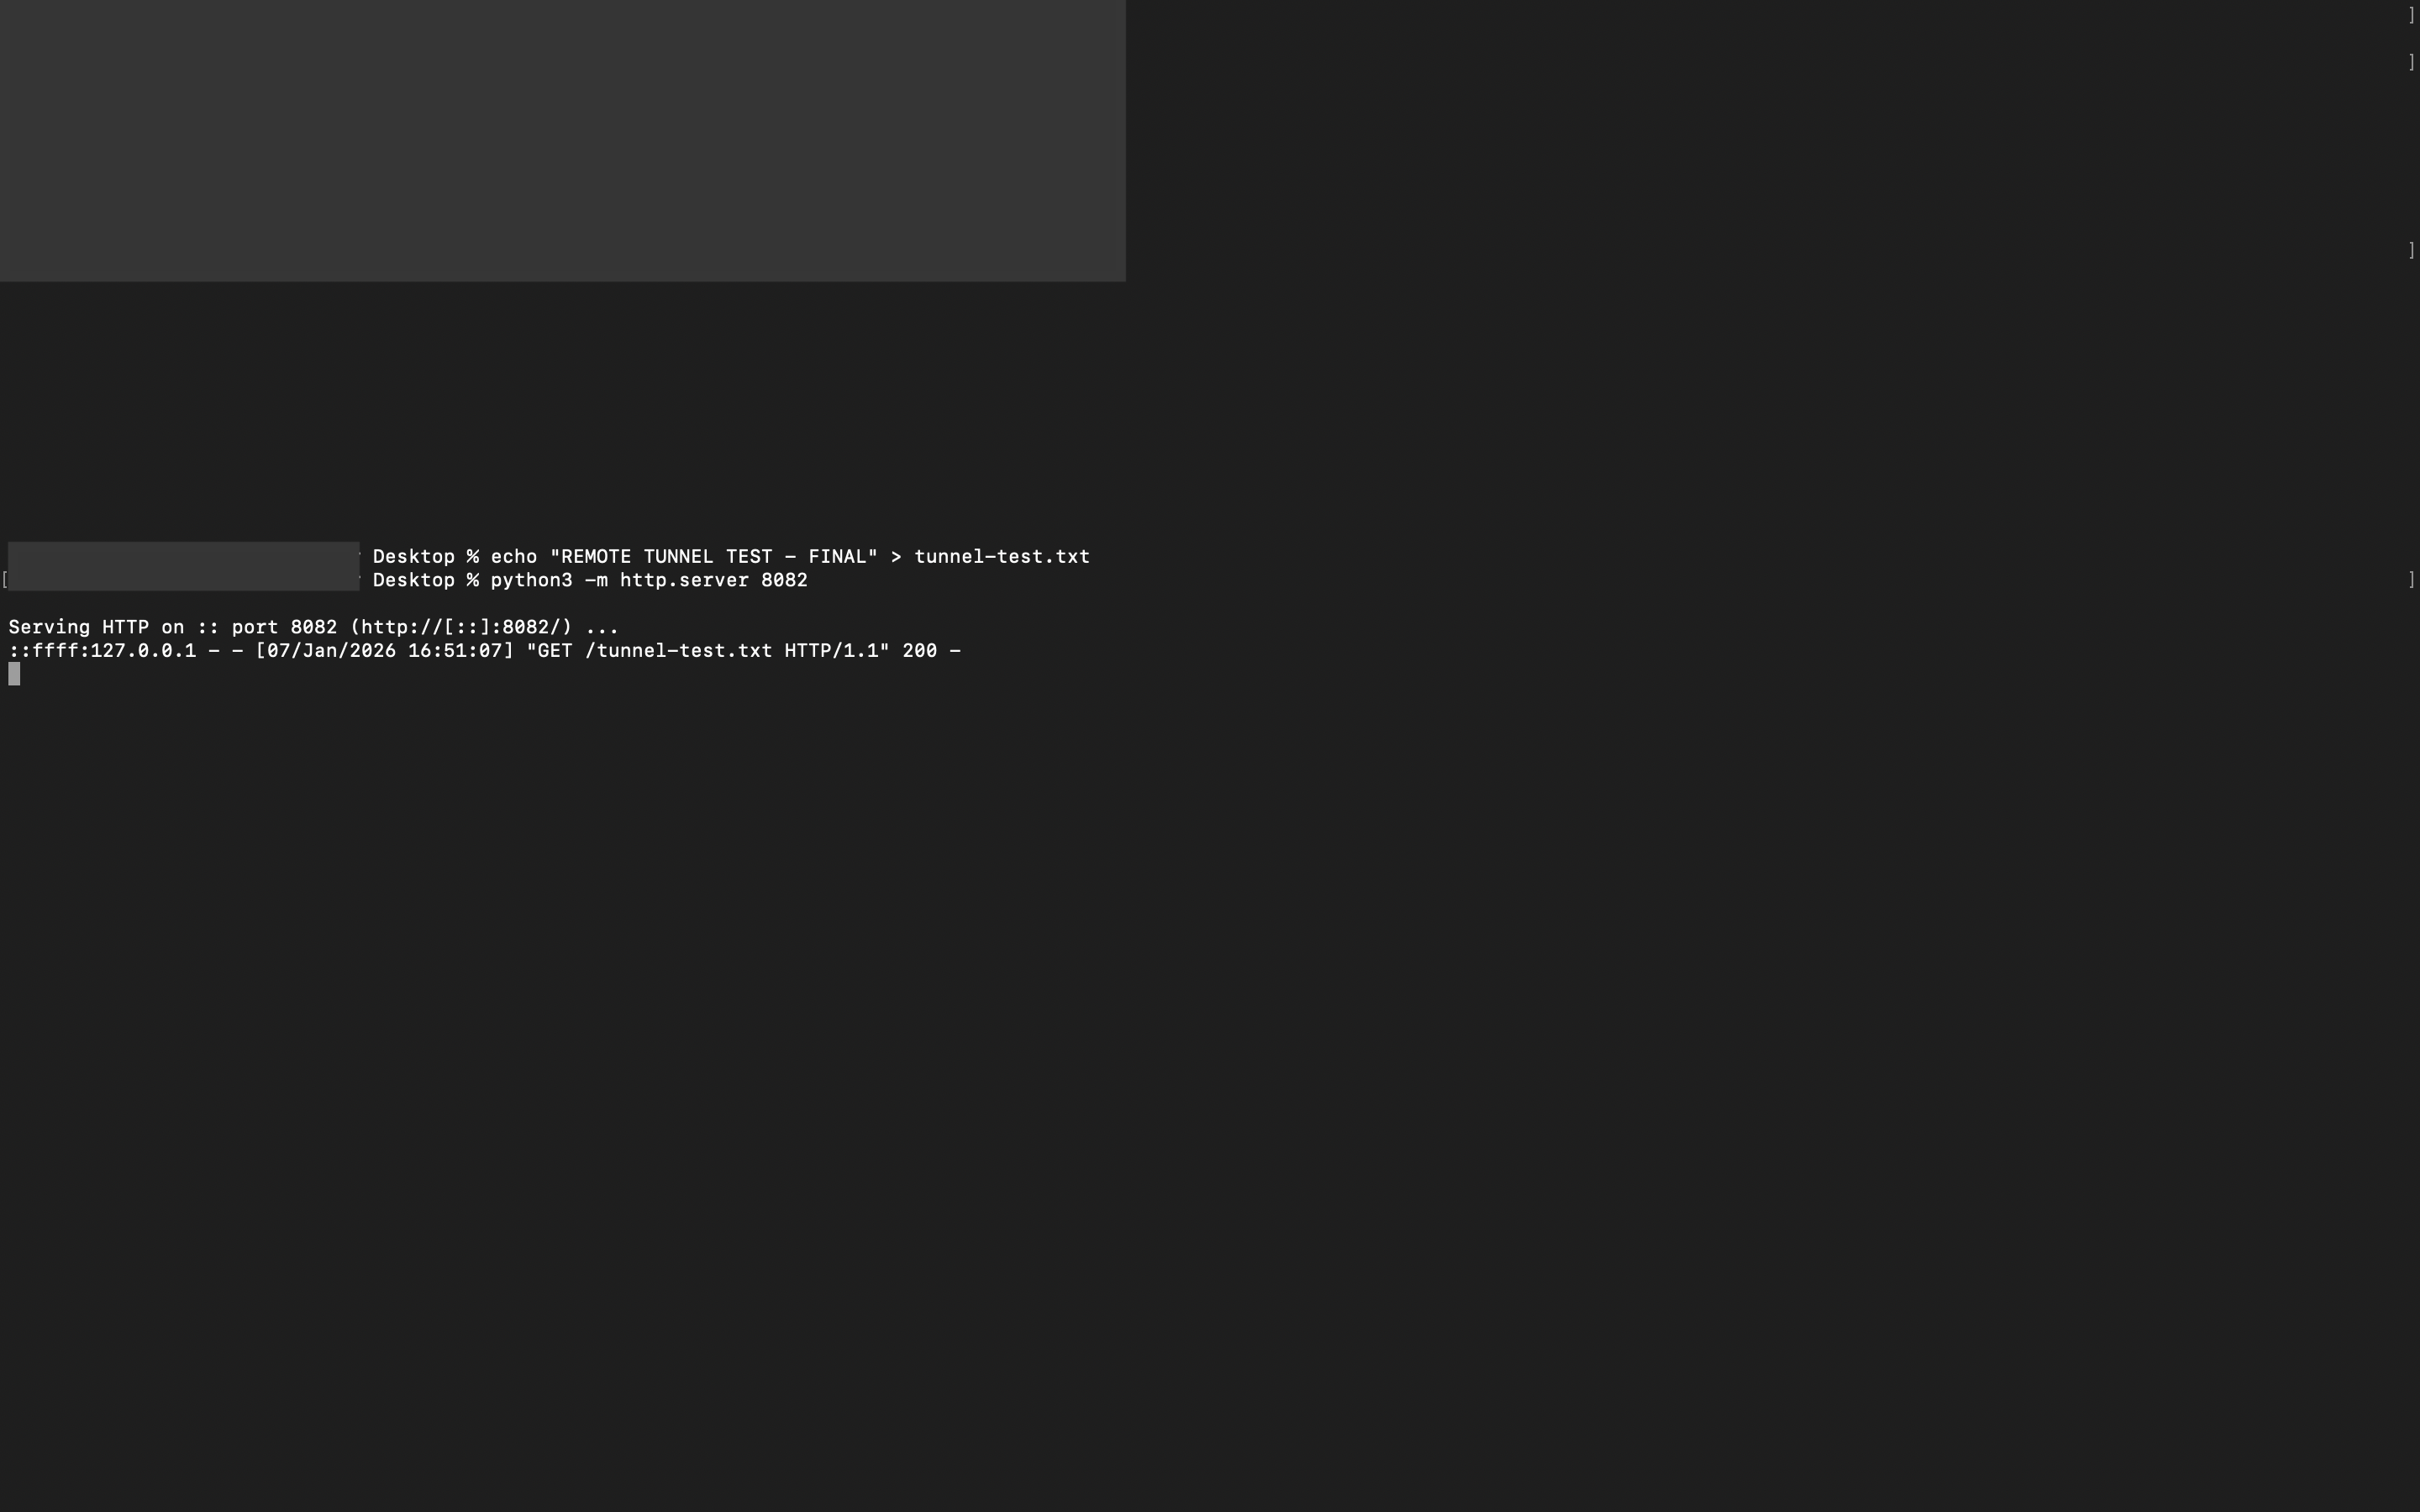
Figure 40: Setting up local web server on port 8082
Local server setup commands:
3 Verifying Local Server
Before testing the remote tunnel, verify the local server is working correctly:
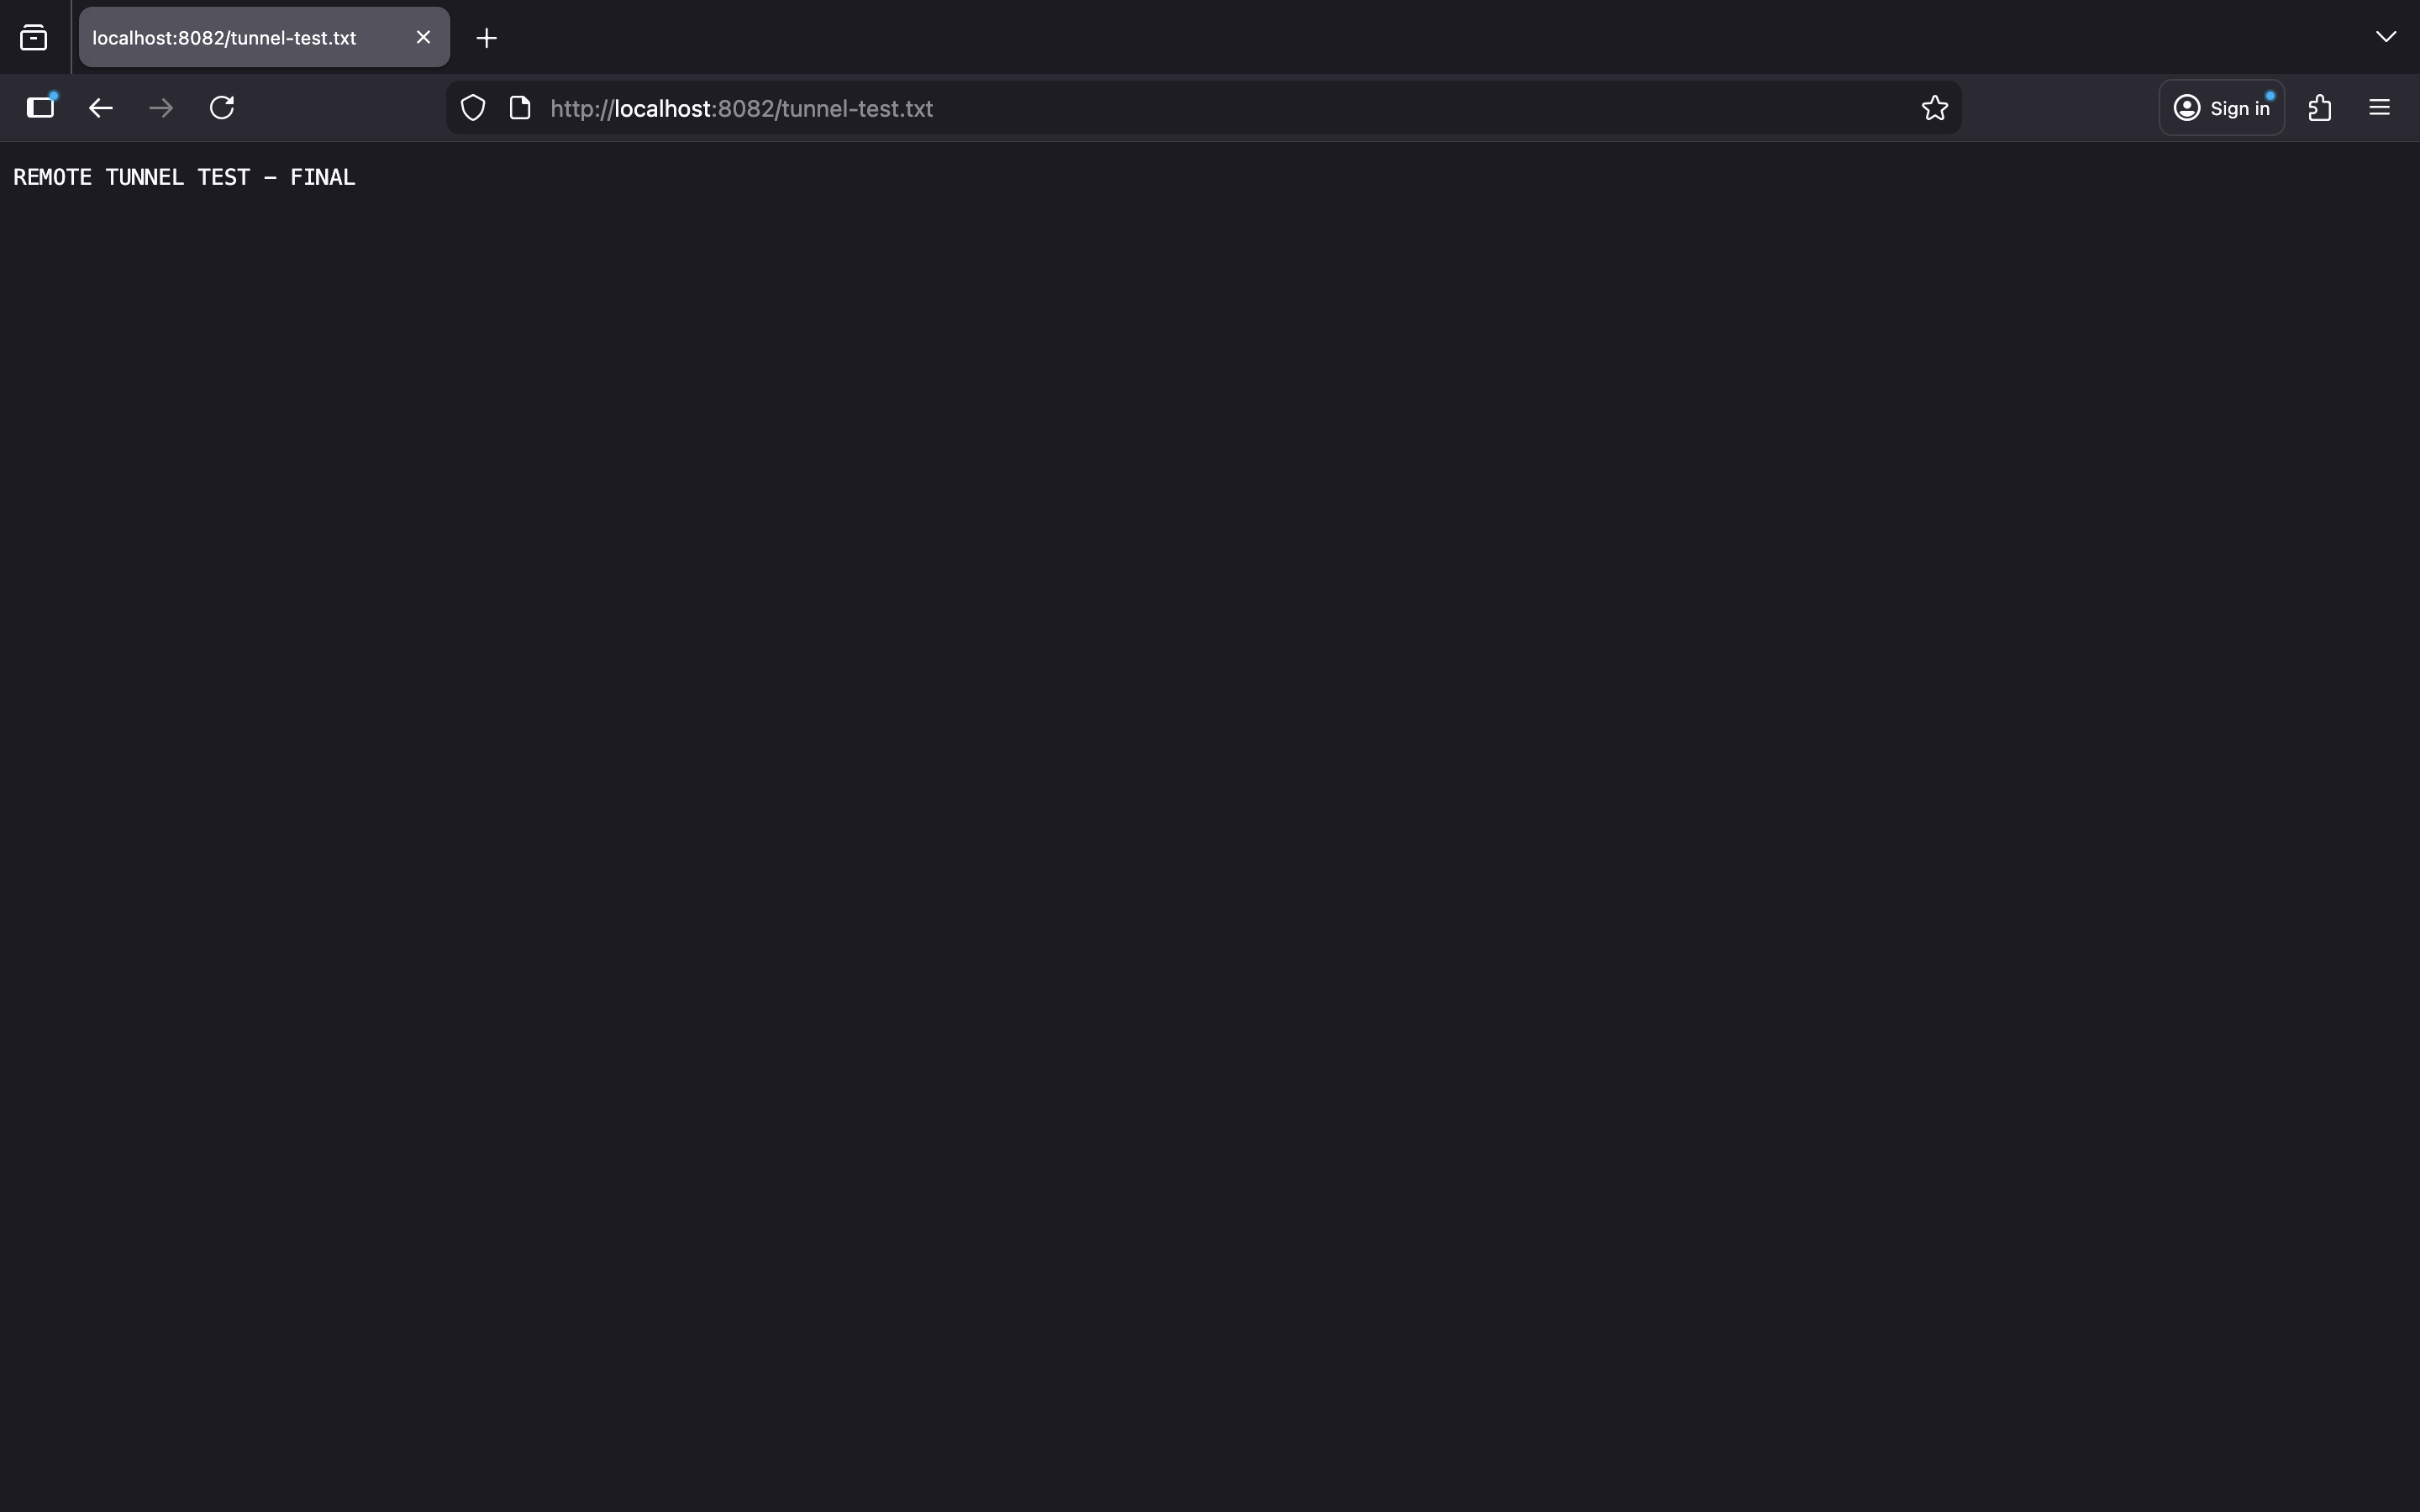
Figure 41: Browser showing local server content
Access the local server in your browser:
- URL:
http://localhost:8082/tunnel-test.txt - Expected Content: "REMOTE TUNNEL TEST - FINAL"
- Verification: Confirm the server responds correctly before testing the tunnel
- Server Status: Terminal should show "200 OK" responses for successful requests
4 Testing Remote Tunnel (Active)
With the tunnel active and local server running, test from the remote server:
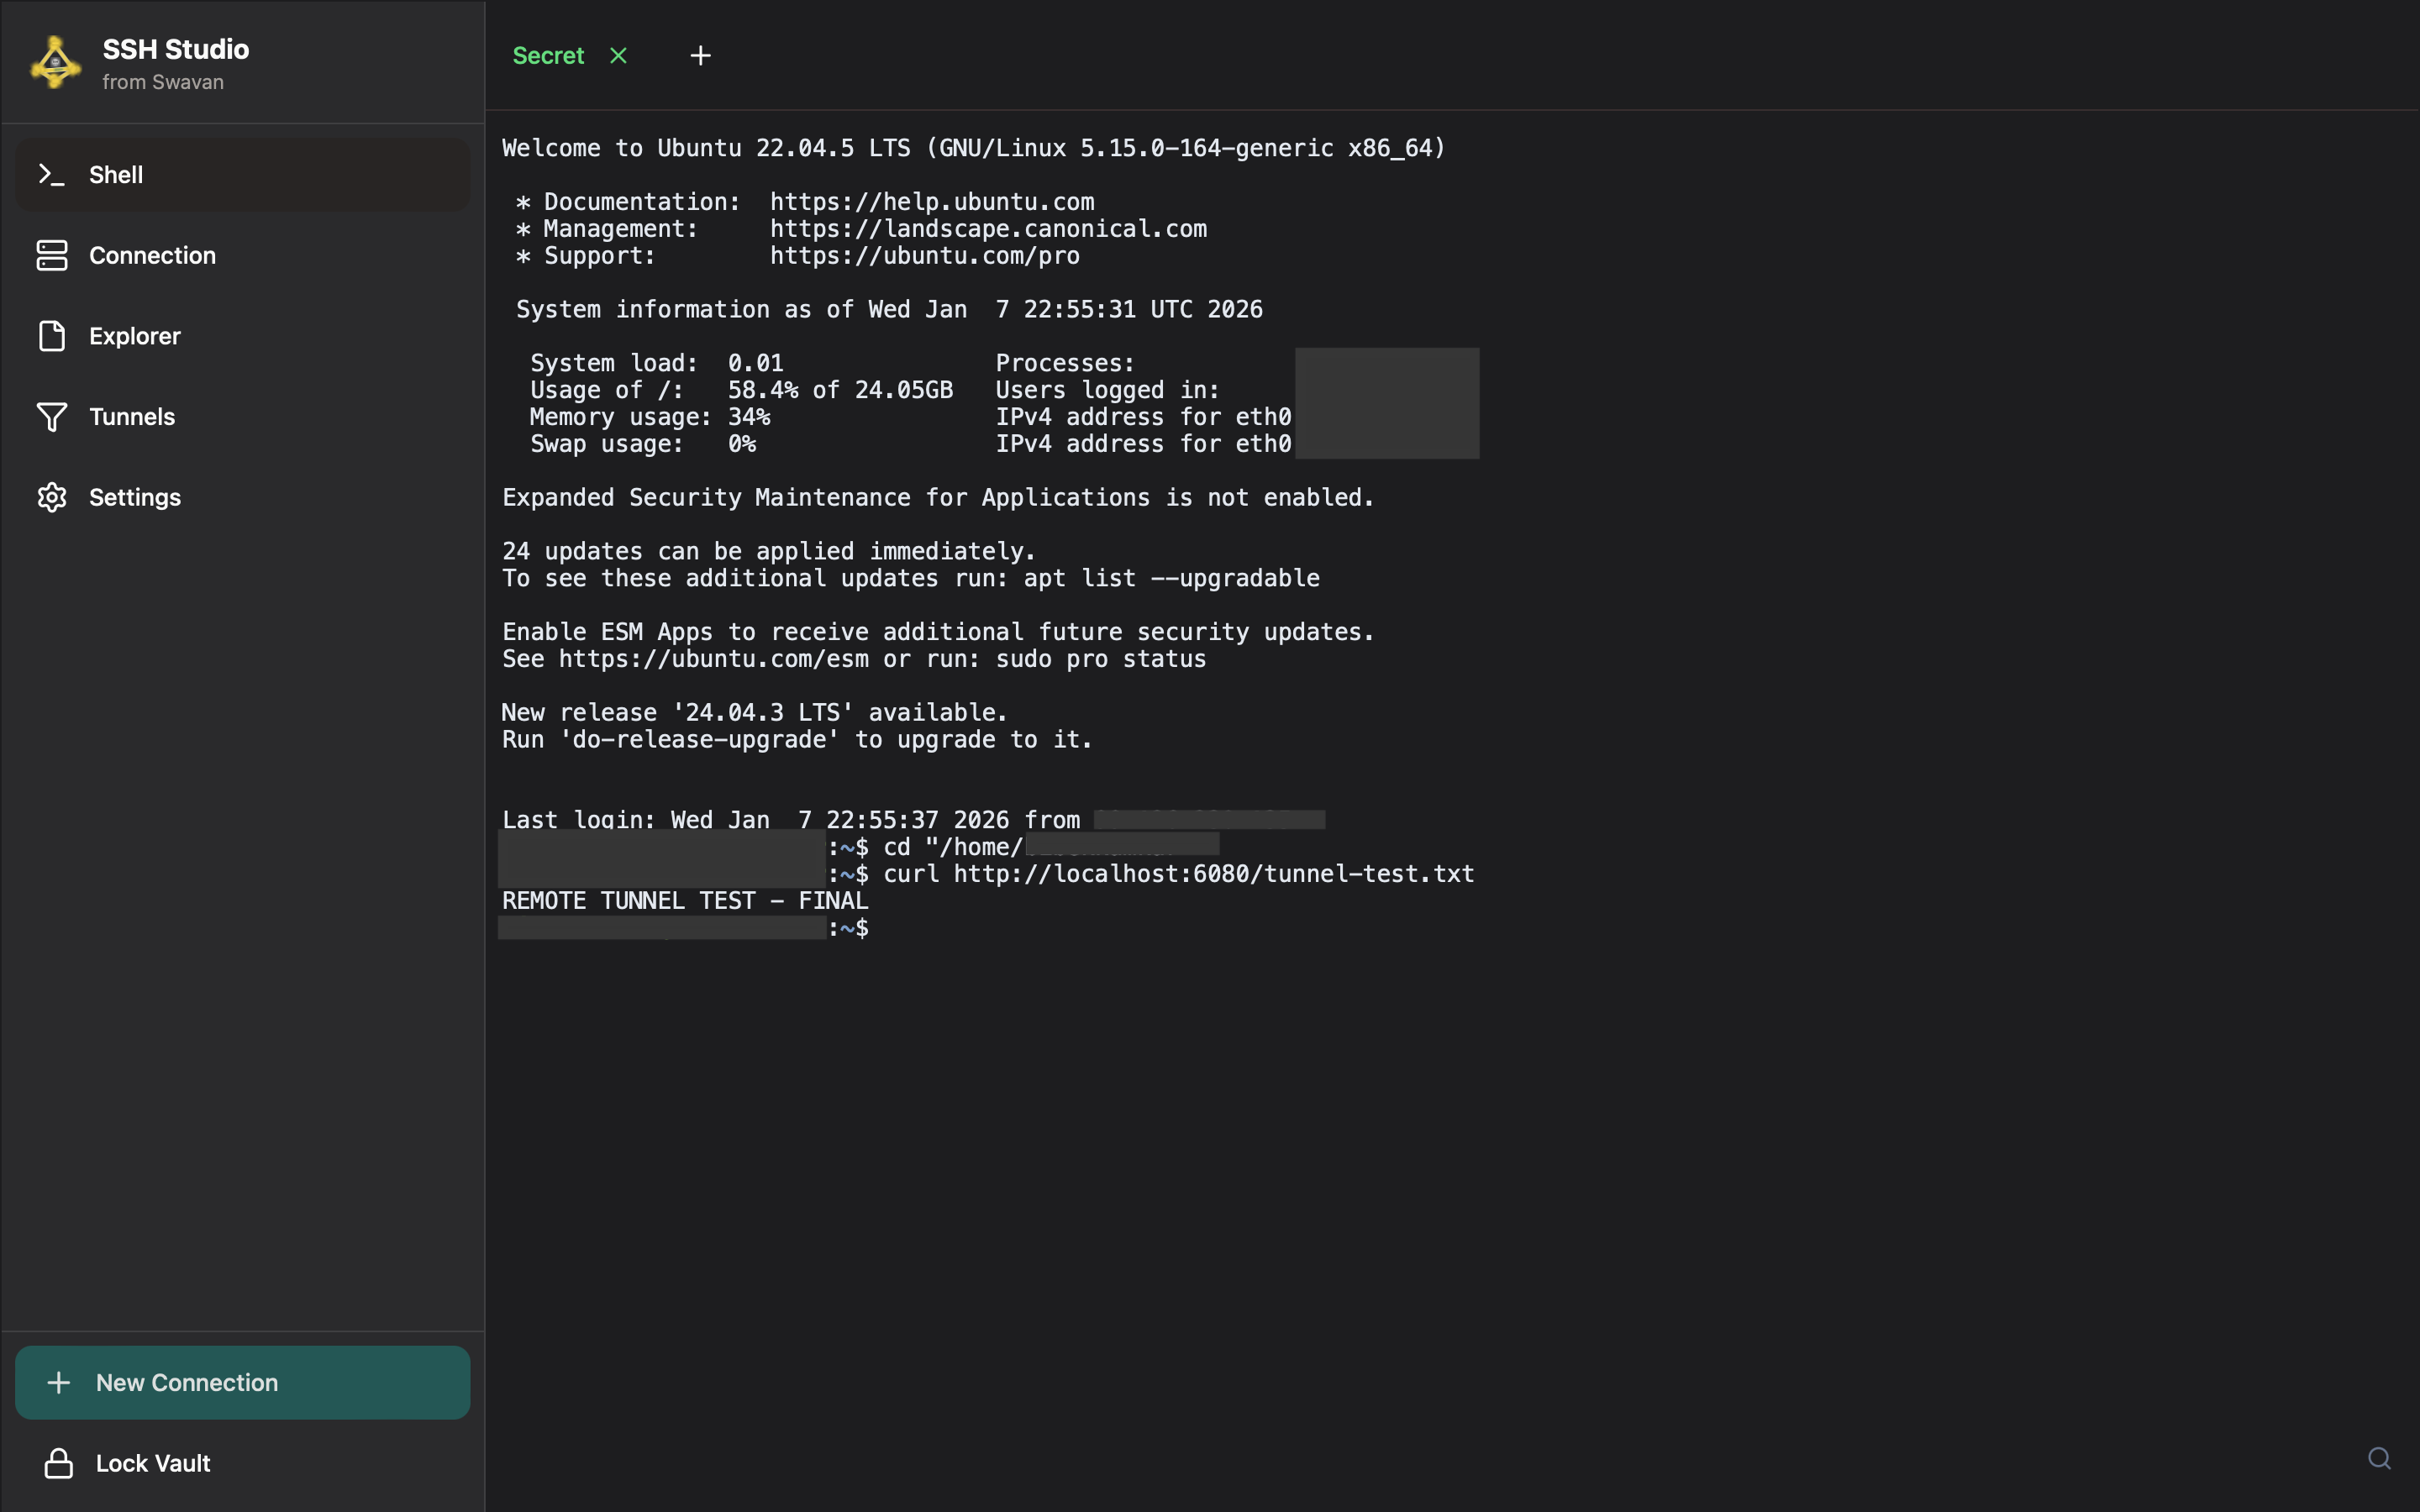
Figure 42: Remote tunnel working - Successful connection
Successful tunnel operation indicators:
- Command:
curl http://localhost:6080/tunnel-test.txt - Successful Output: Shows content from local server
- Tunnel Path: Remote 6080 → SSH Tunnel → Local 8082
- Data Flow: Request travels through encrypted SSH connection
- Verification: Content matches what's served locally
localhost:6080 on the remote server, the SSH tunnel forwards the request to localhost:8082 on your local machine, then returns the response through the encrypted tunnel.
5 Stopping the Remote Tunnel
To demonstrate tunnel dependency, stop the remote tunnel in Swavan SSH Studio:
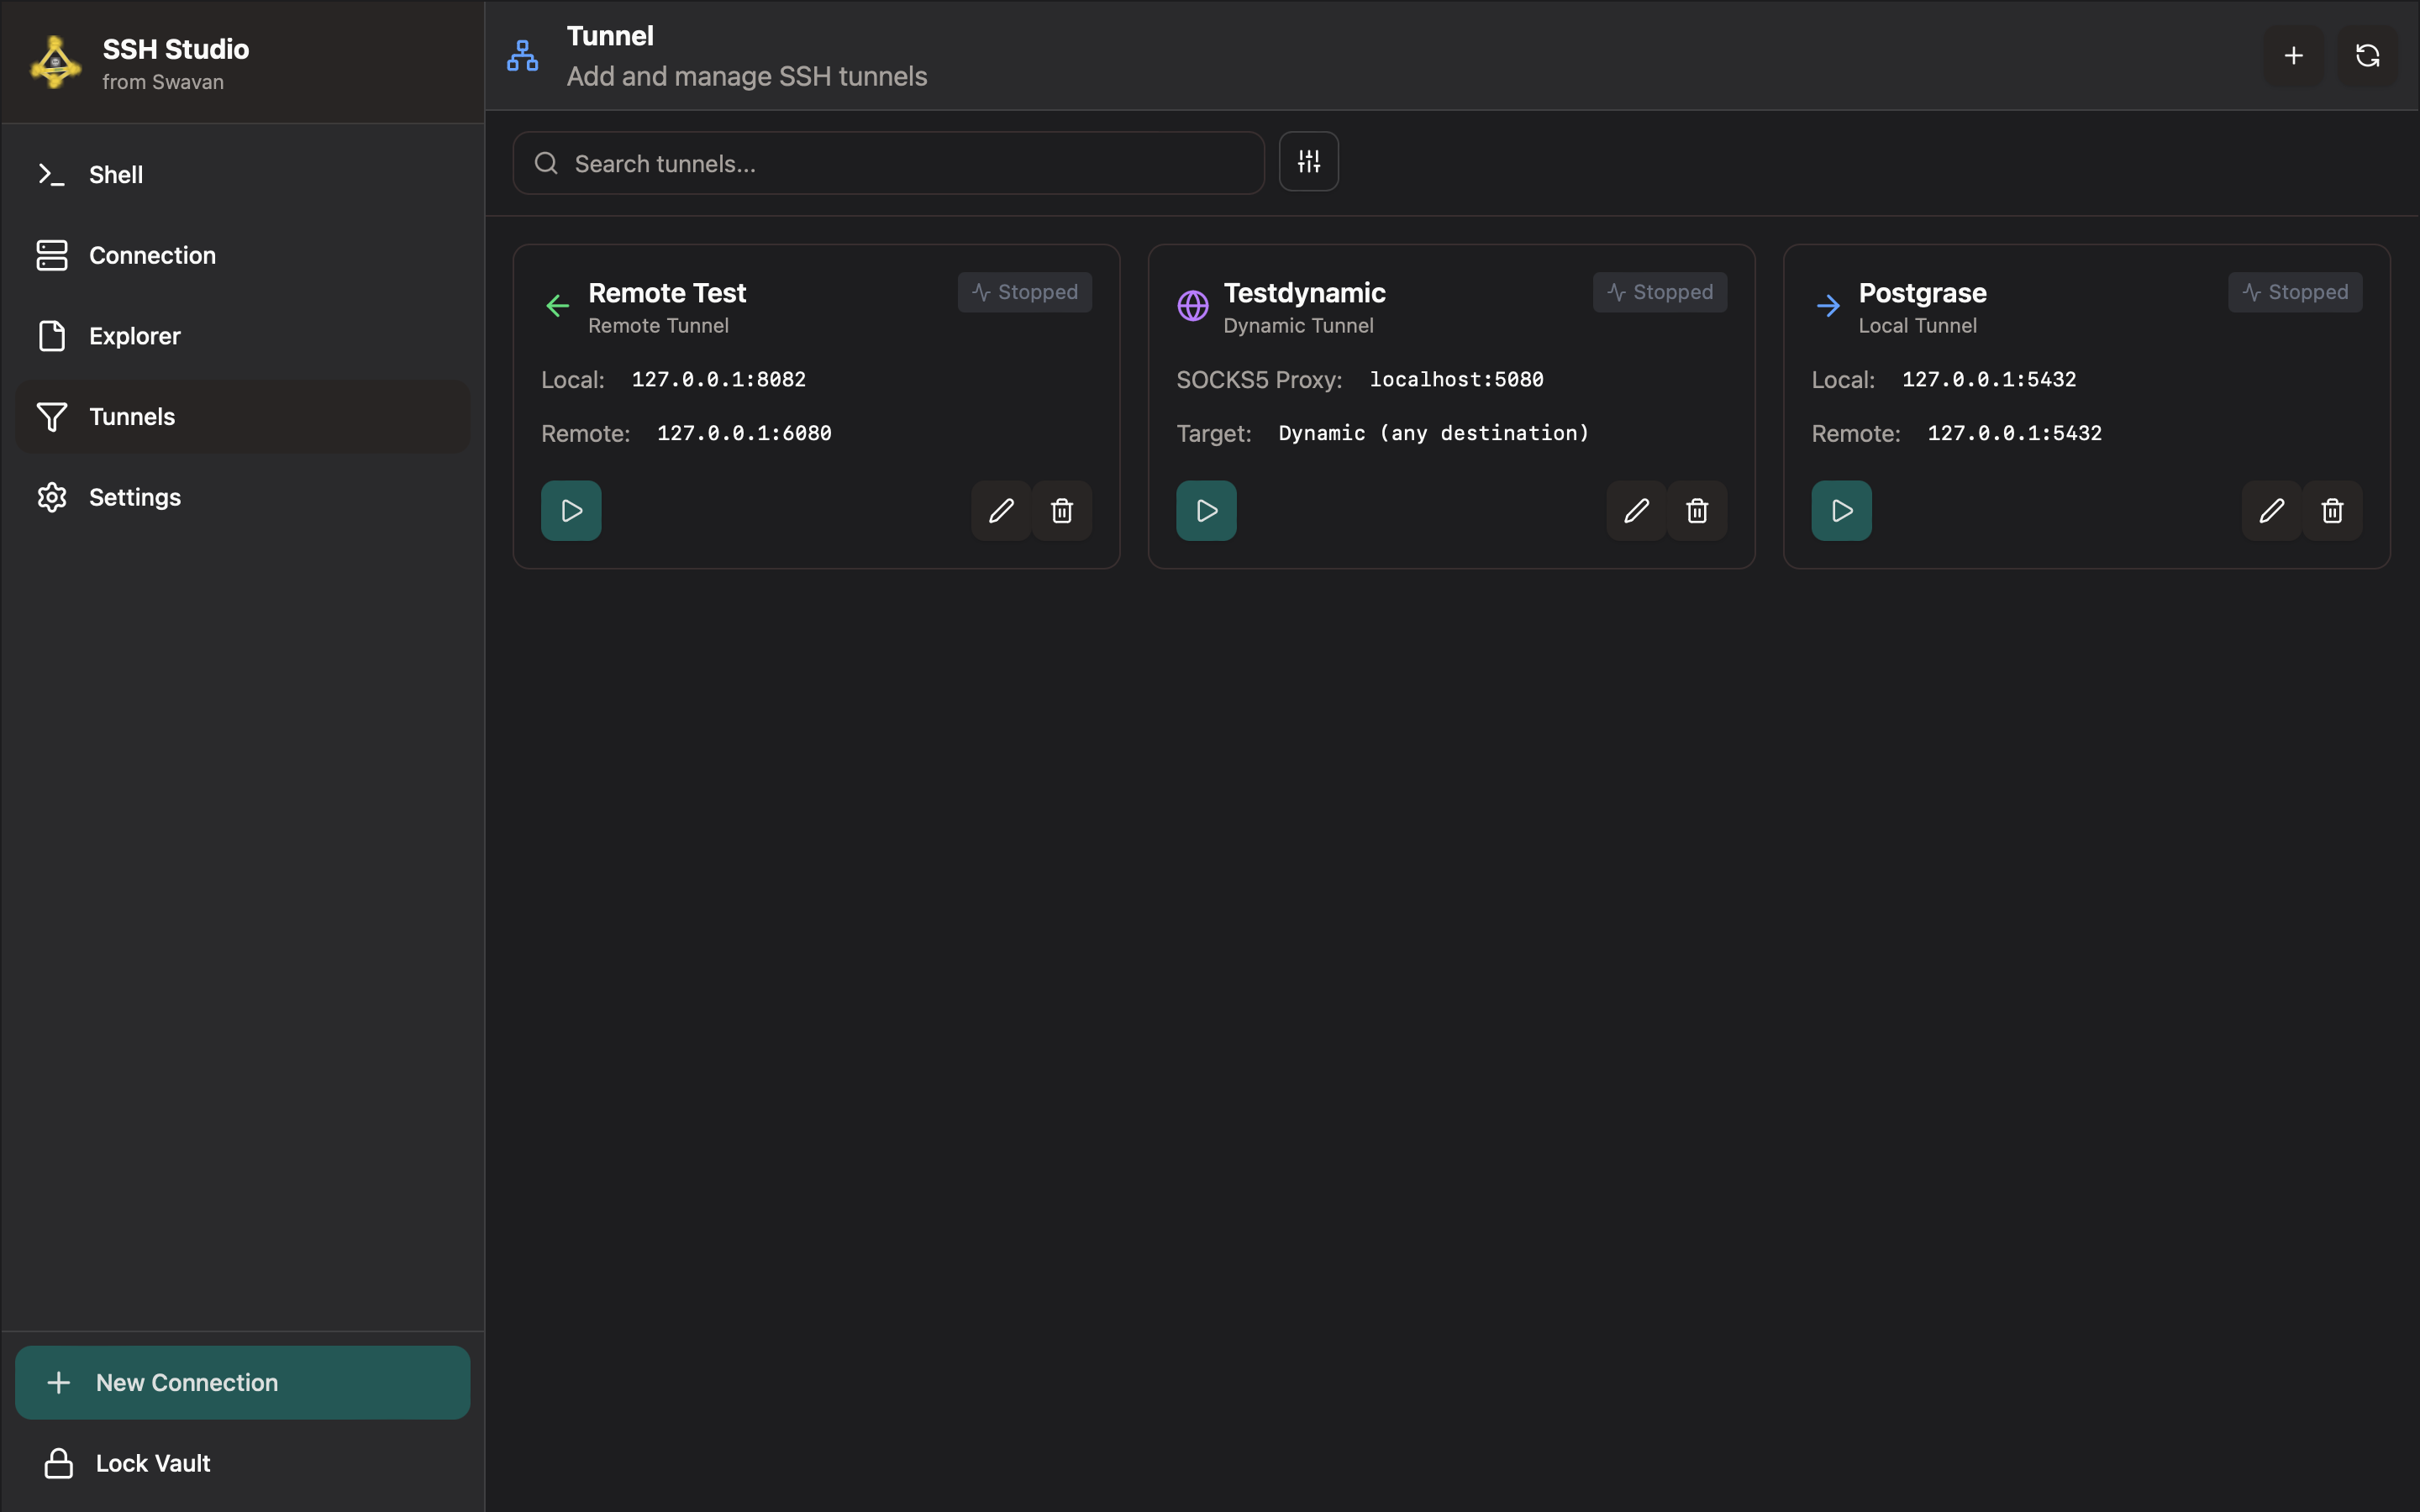
Figure 43: Remote tunnel stopped in Swavan SSH Studio
Tunnel stopped state:
- Status Change: "Active" → "Stopped"
- Connection Termination: SSH tunnel connection closed
- Port Release: Remote port 6080 no longer forwarded
- Configuration Preserved: Tunnel settings remain for restart
- Quick Restart: Can be restarted with single click
6 Testing with Tunnel Stopped
With the tunnel stopped, attempt to access the service from the remote server:
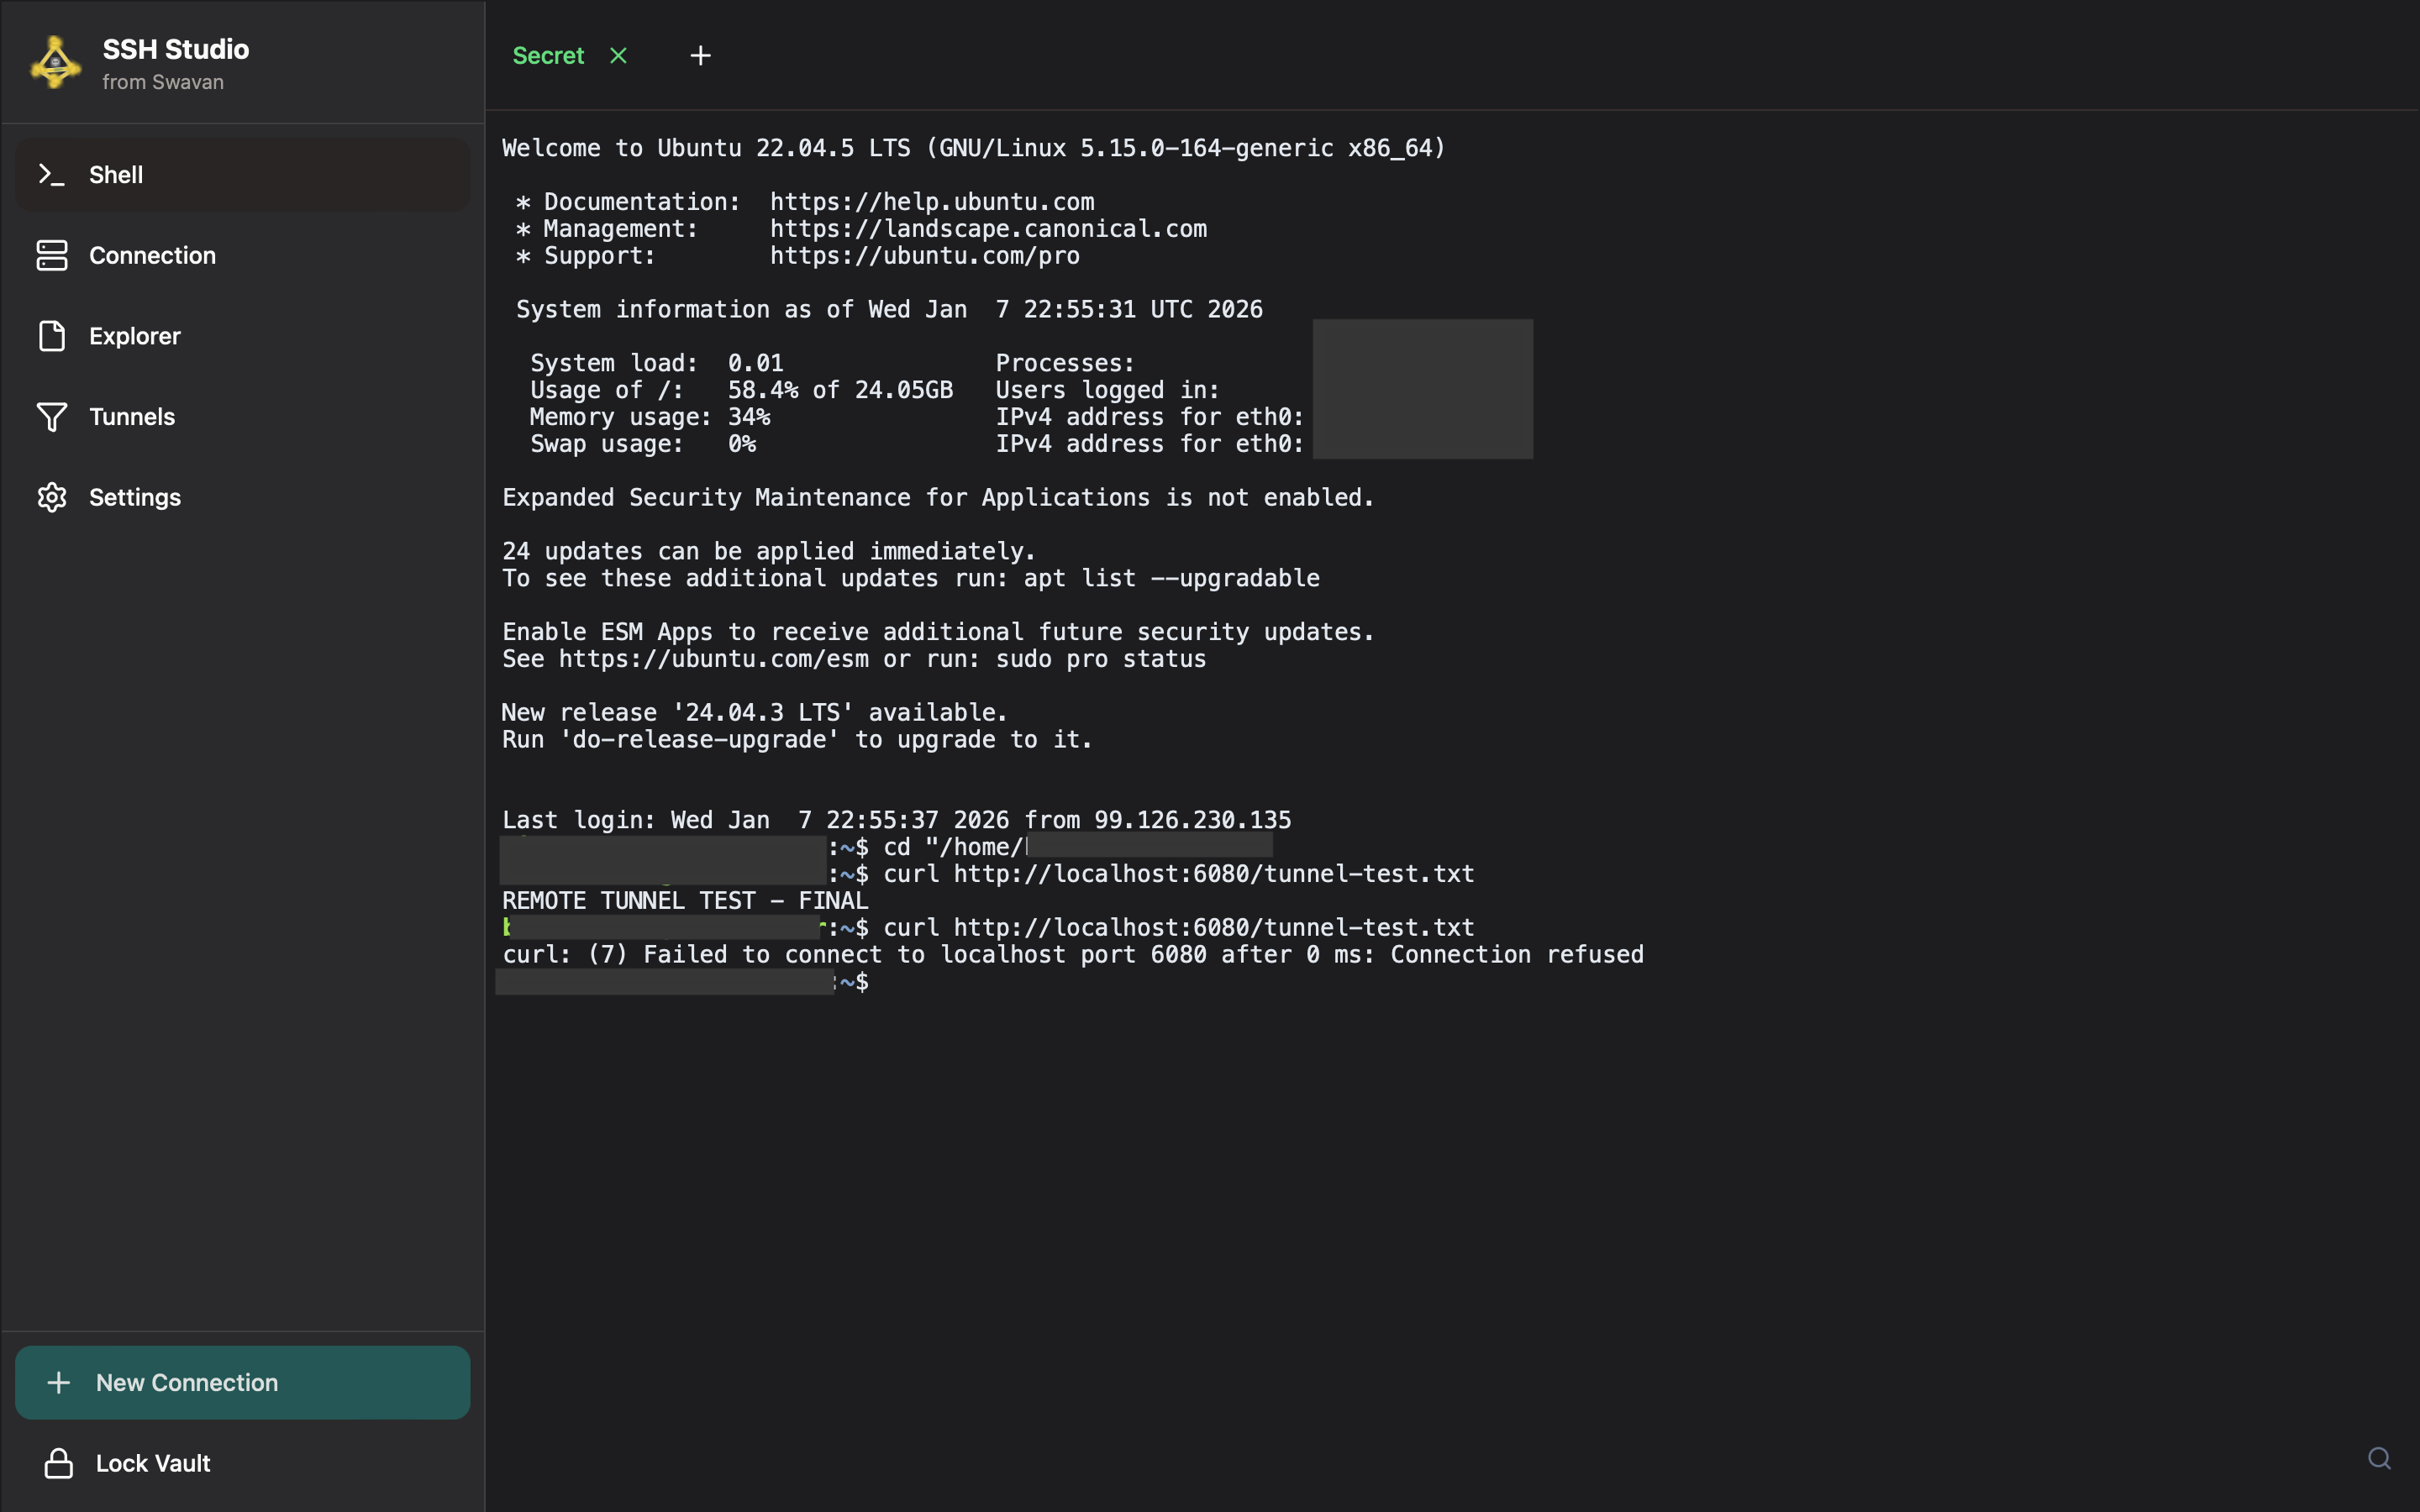
Figure 44: Connection error when tunnel is stopped
- Error Type: Connection refused
- Cause: No SSH tunnel forwarding port 6080
- Port Status: Port 6080 not listening on remote server
- Expected Behavior: Services dependent on tunnel become inaccessible
- Troubleshooting: Restart tunnel to restore connectivity
4 Dynamic SOCKS Tunnel
Dynamic SOCKS tunnels create a proxy server for routing all types of traffic through SSH:
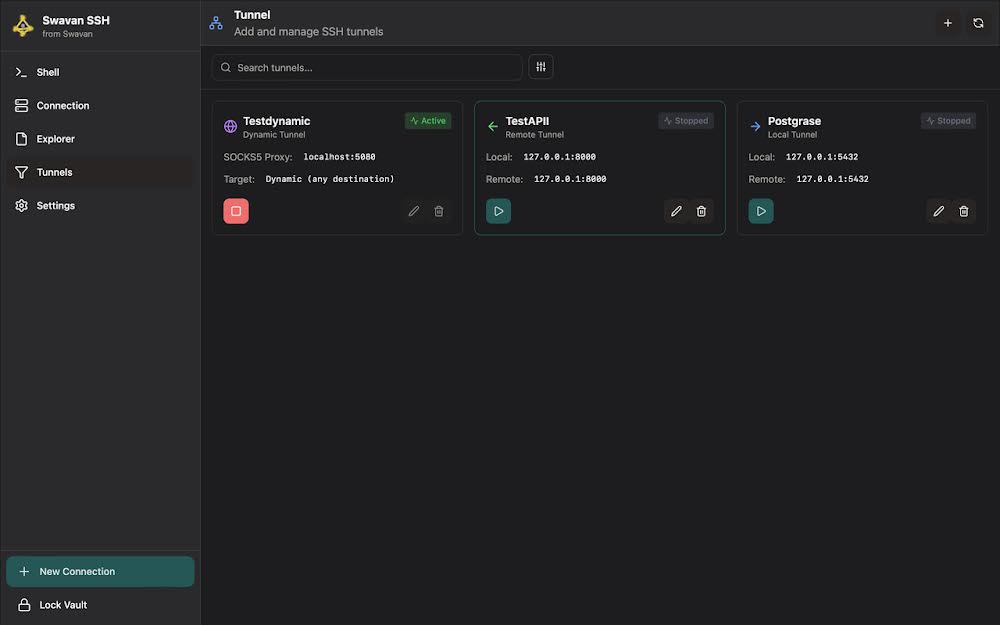
Figure 26: Dynamic SOCKS tunnel configuration
Dynamic SOCKS tunnel features:
- Proxy Type: SOCKS5 proxy server
- Target: Dynamic - routes all traffic through SSH connection
- Application Level: Works at application level, not just port forwarding
5 Configuring Browser Proxy
To use the dynamic SOCKS tunnel, configure your browser to use the proxy:
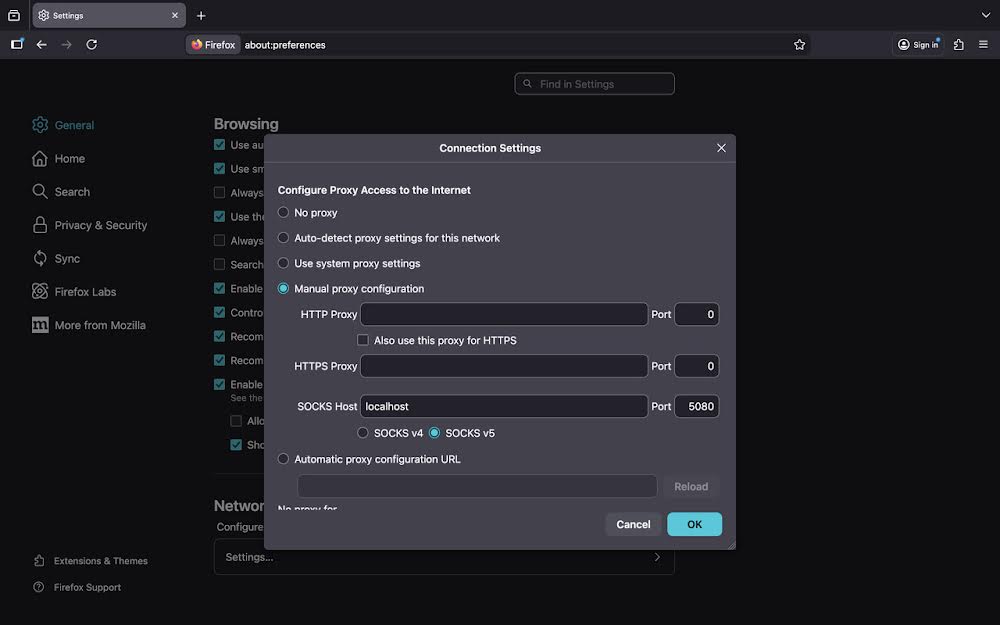
Figure 27: Browser proxy configuration settings
Proxy configuration settings:
- Manual Proxy: Enable manual proxy configuration
- SOCKS Host: localhost (or 127.0.0.1)
- Port: 5080 (matches tunnel configuration)
6 Testing Dynamic SOCKS Tunnel
With the proxy configured and tunnel active, web traffic routes through the SSH connection:
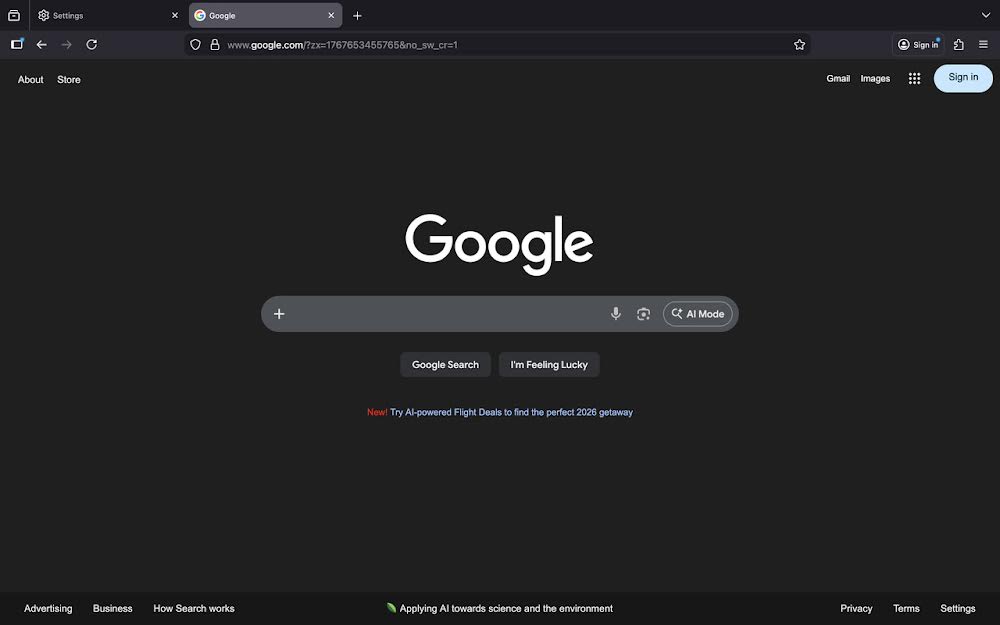
Figure 28: Website loading successfully through SOCKS proxy
Successful SOCKS proxy operation:
- Internet Access: Websites load normally through the proxy
- Encrypted Traffic: All web traffic encrypted through SSH tunnel
7 Stopping Dynamic SOCKS Tunnel
When you stop the dynamic SOCKS tunnel, it becomes inactive:

Figure 29: Dynamic SOCKS tunnel stopped/inactive
Stopped tunnel state:
- Inactive Status: Tunnel shows as stopped in the interface
- Port Closed: SOCKS proxy port no longer listening
8 Browser Error When Tunnel Stopped
With the tunnel stopped but browser still configured to use the proxy, websites fail to load:
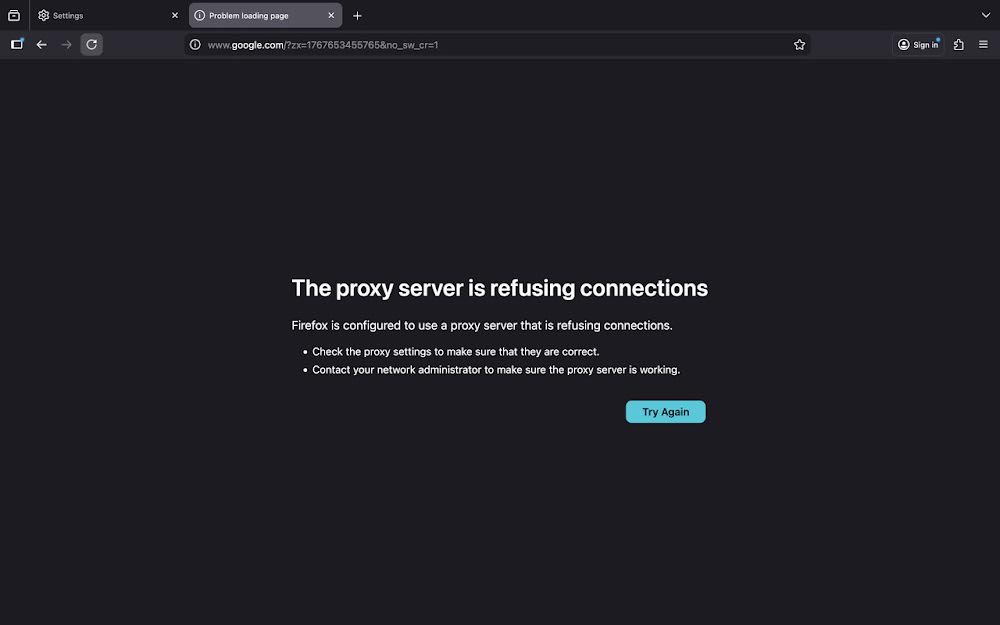
Figure 30: Browser error when SOCKS proxy is unavailable
Proxy connection errors:
- Connection Refused: Browser cannot connect to proxy server
- Clear Error Message: Firefox indicates "proxy server is refusing connections"
- Troubleshooting Guidance: Suggestions to check proxy settings
- Network Impact: All web traffic affected when proxy is unavailable
- User Action Required: Either restart tunnel or disable proxy settings
Settings
1 Settings Interface
The Settings screen provides access to all configuration options. Here's the main settings interface:
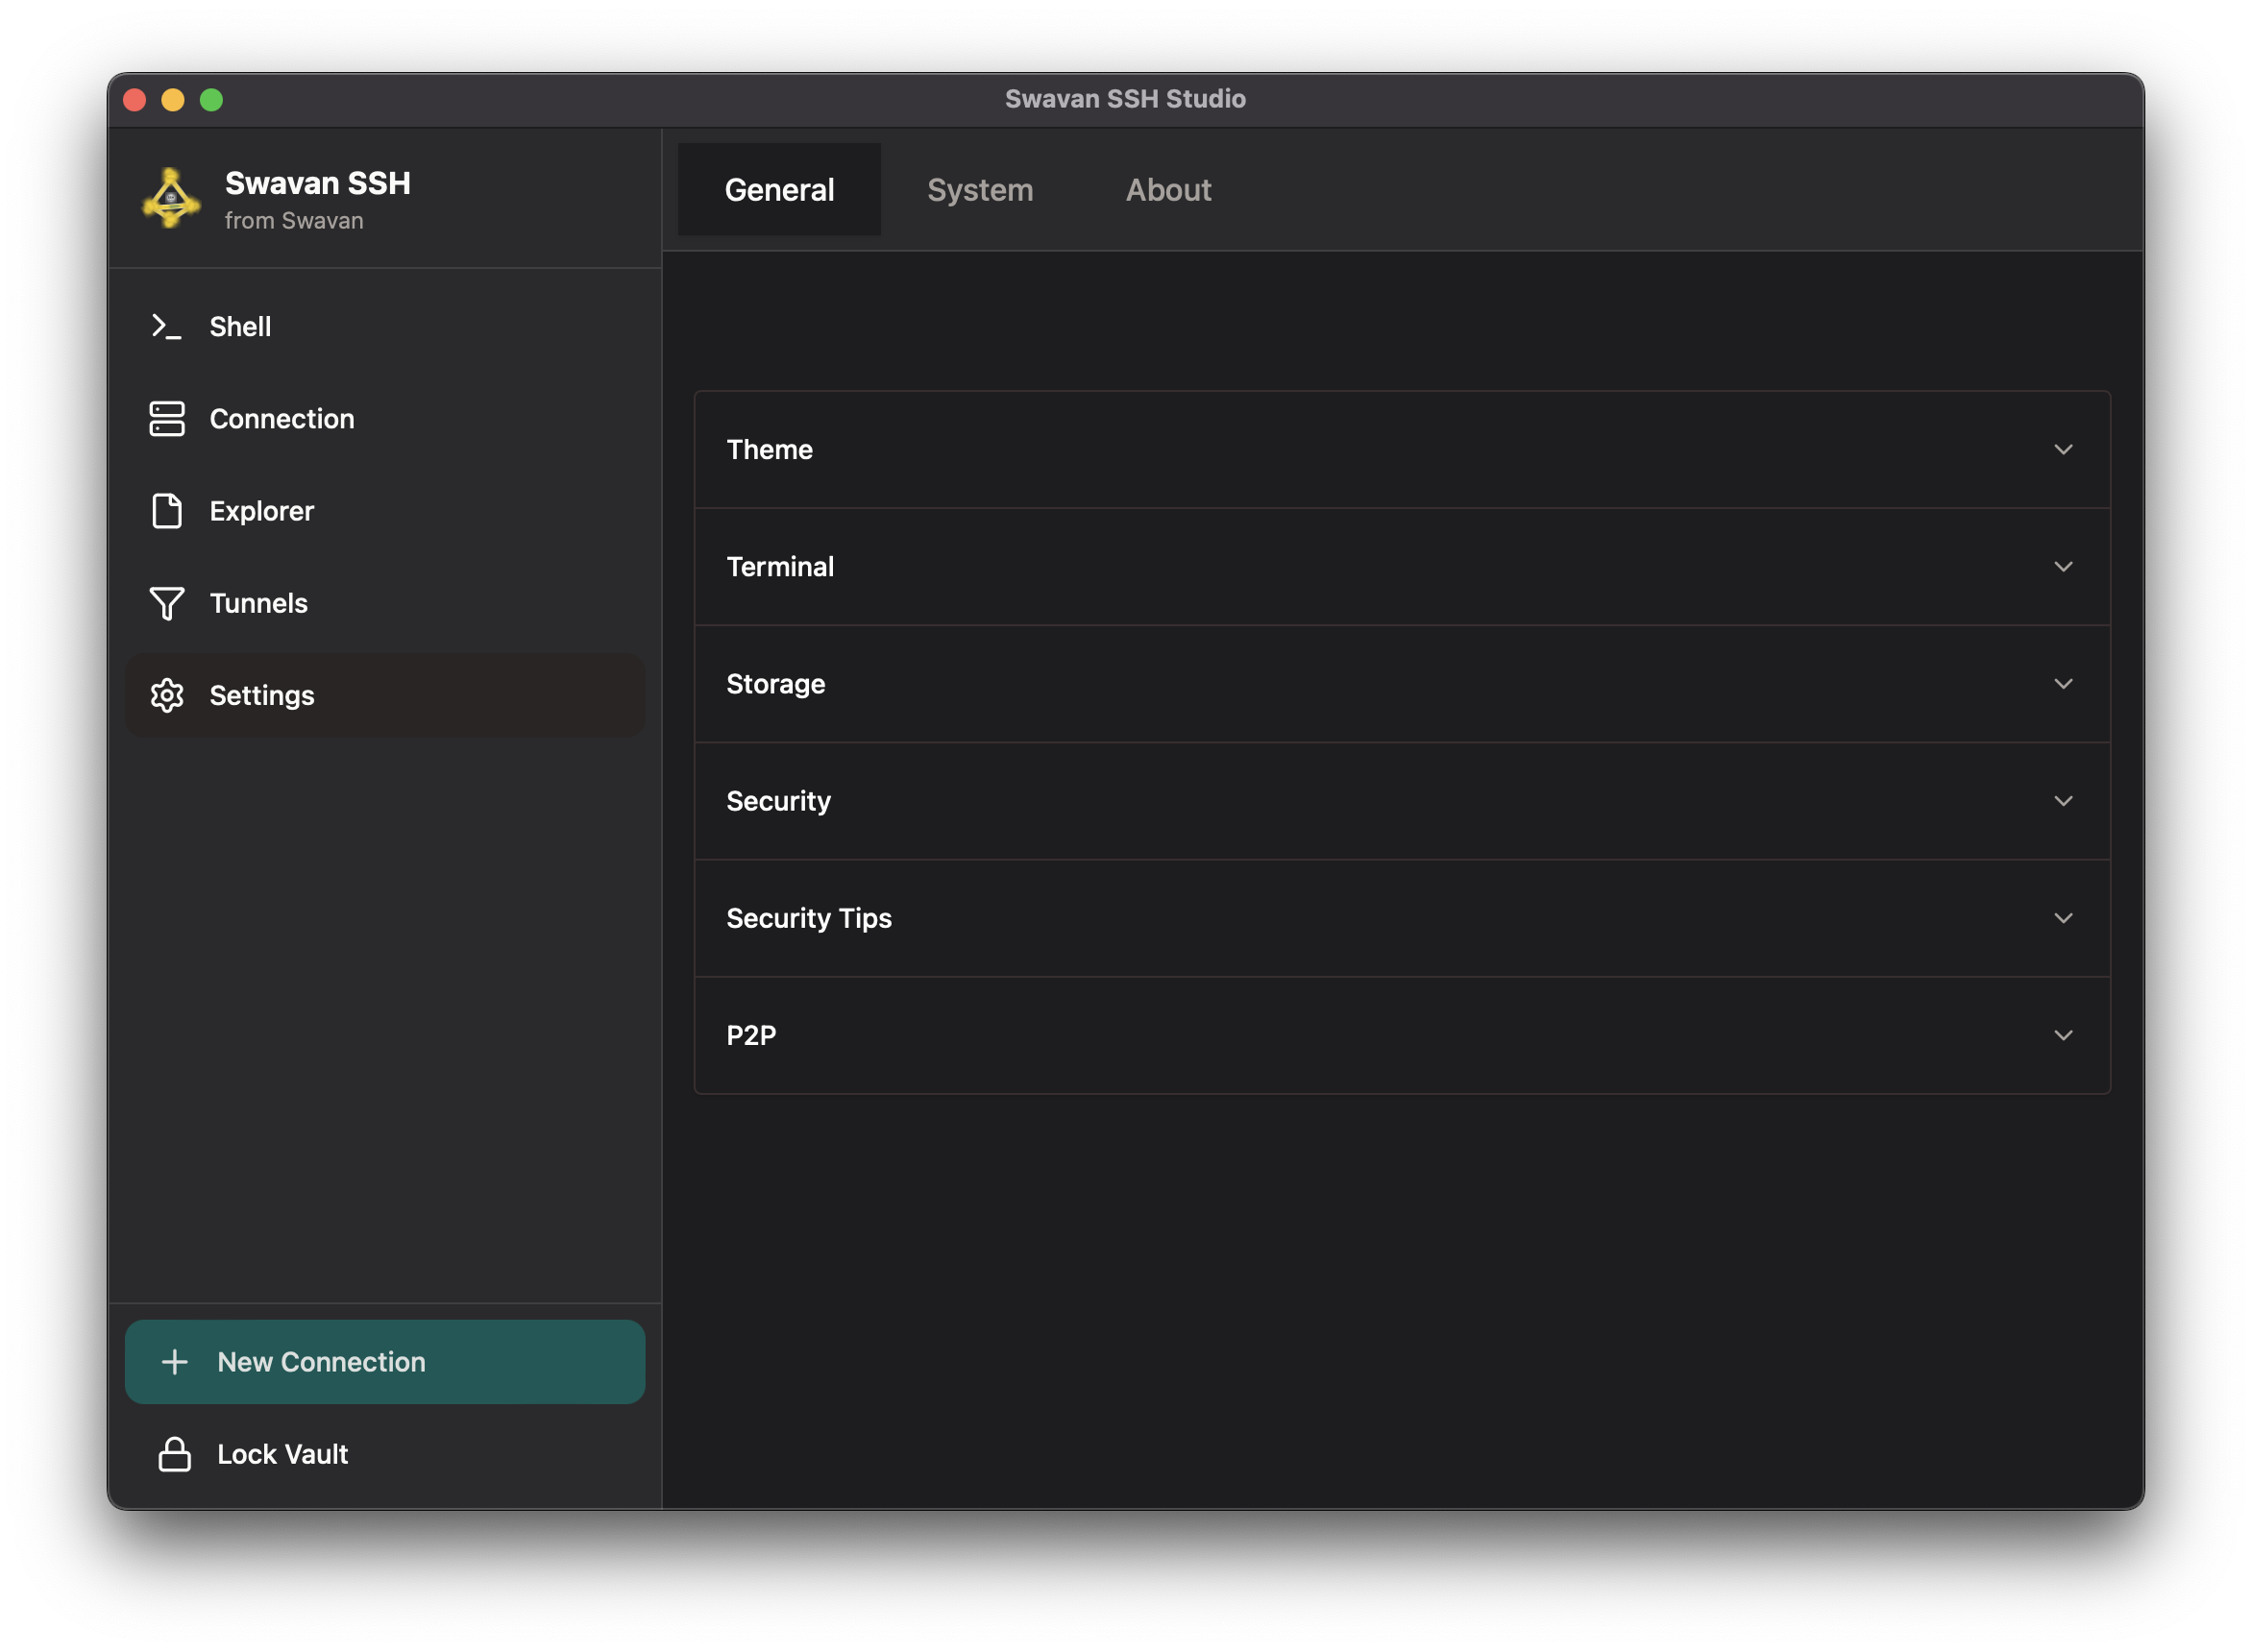
Figure 31: Main settings interface with all configuration categories
Settings categories include:
- General: Theme, terminal, file executors, keyboard shortcuts, storage, security, and P2P configuration
- System: System information and diagnostics
- Logs: Built-in application log viewer with search, level filtering, and clear functionality
- About: Application version and information
2 Theme Customization
Customize the application appearance with theme settings. Choose between light, dark, or system default:
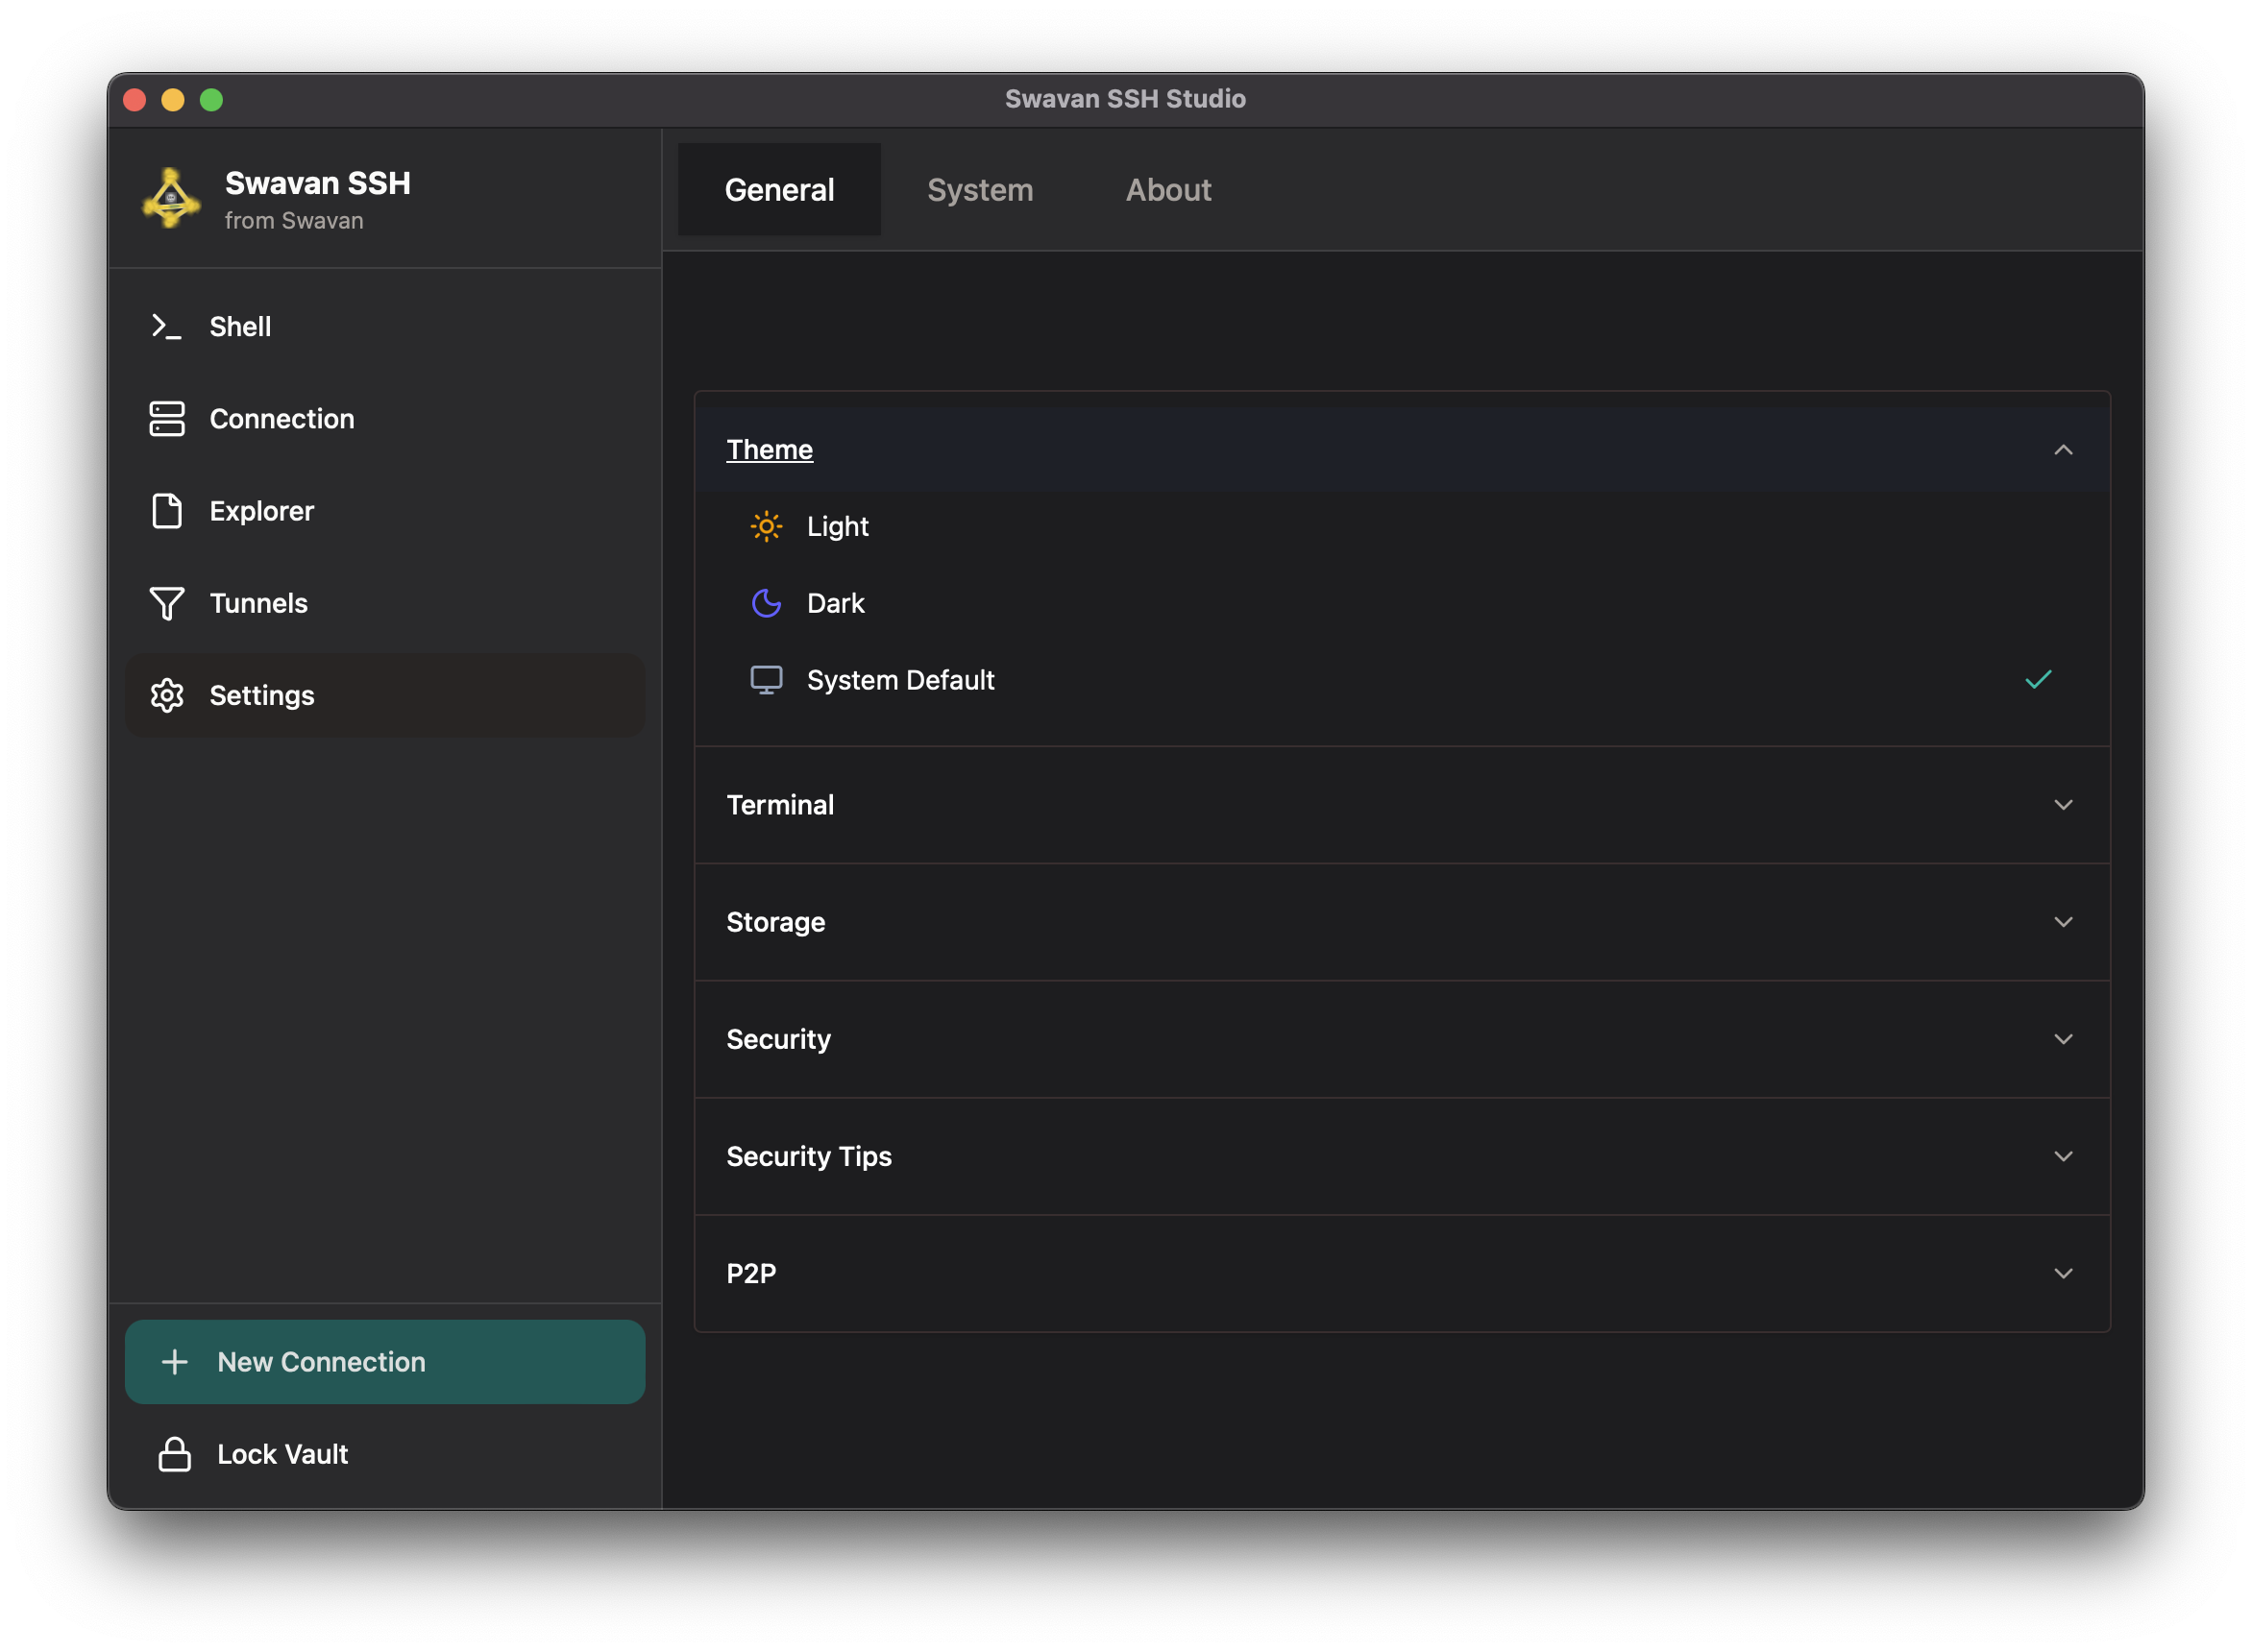
Figure 32: Theme selection interface
Available theme options:
3 Light Theme Example
Here's how the Light theme appears in the application:
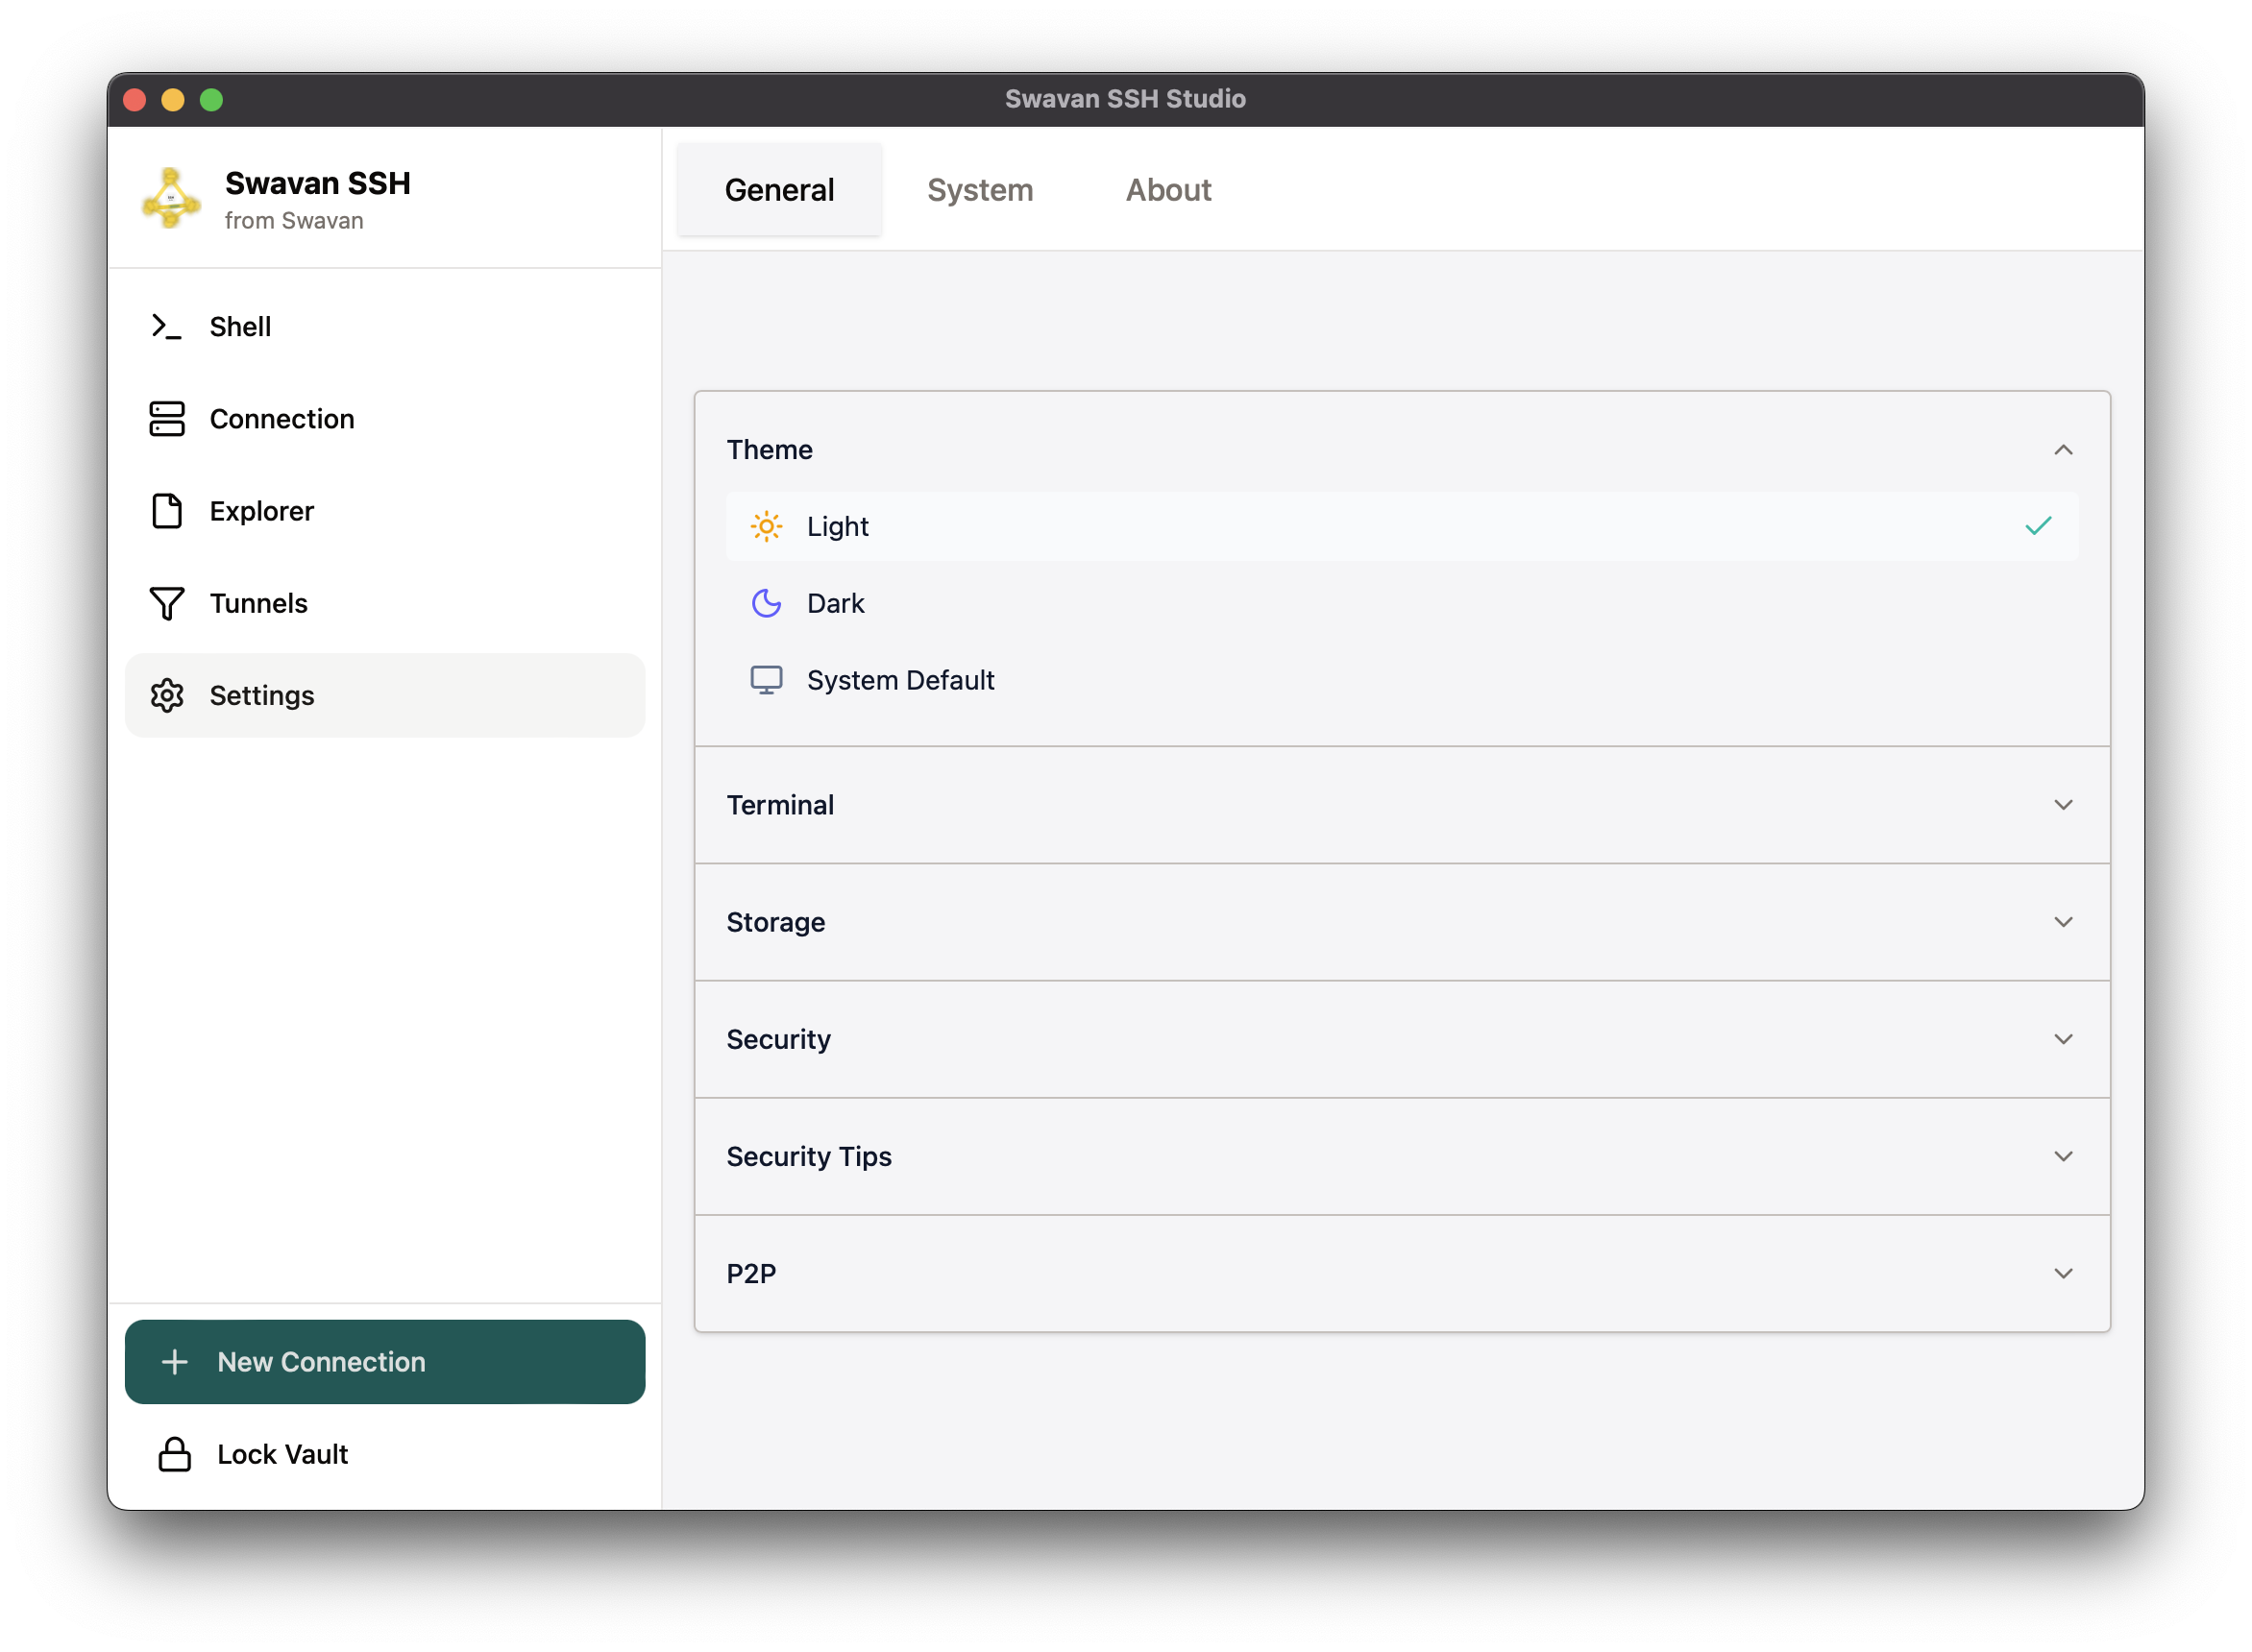
Figure 33: Application interface with Light theme applied
4 Terminal Customization
Personalize your terminal experience with extensive customization options:
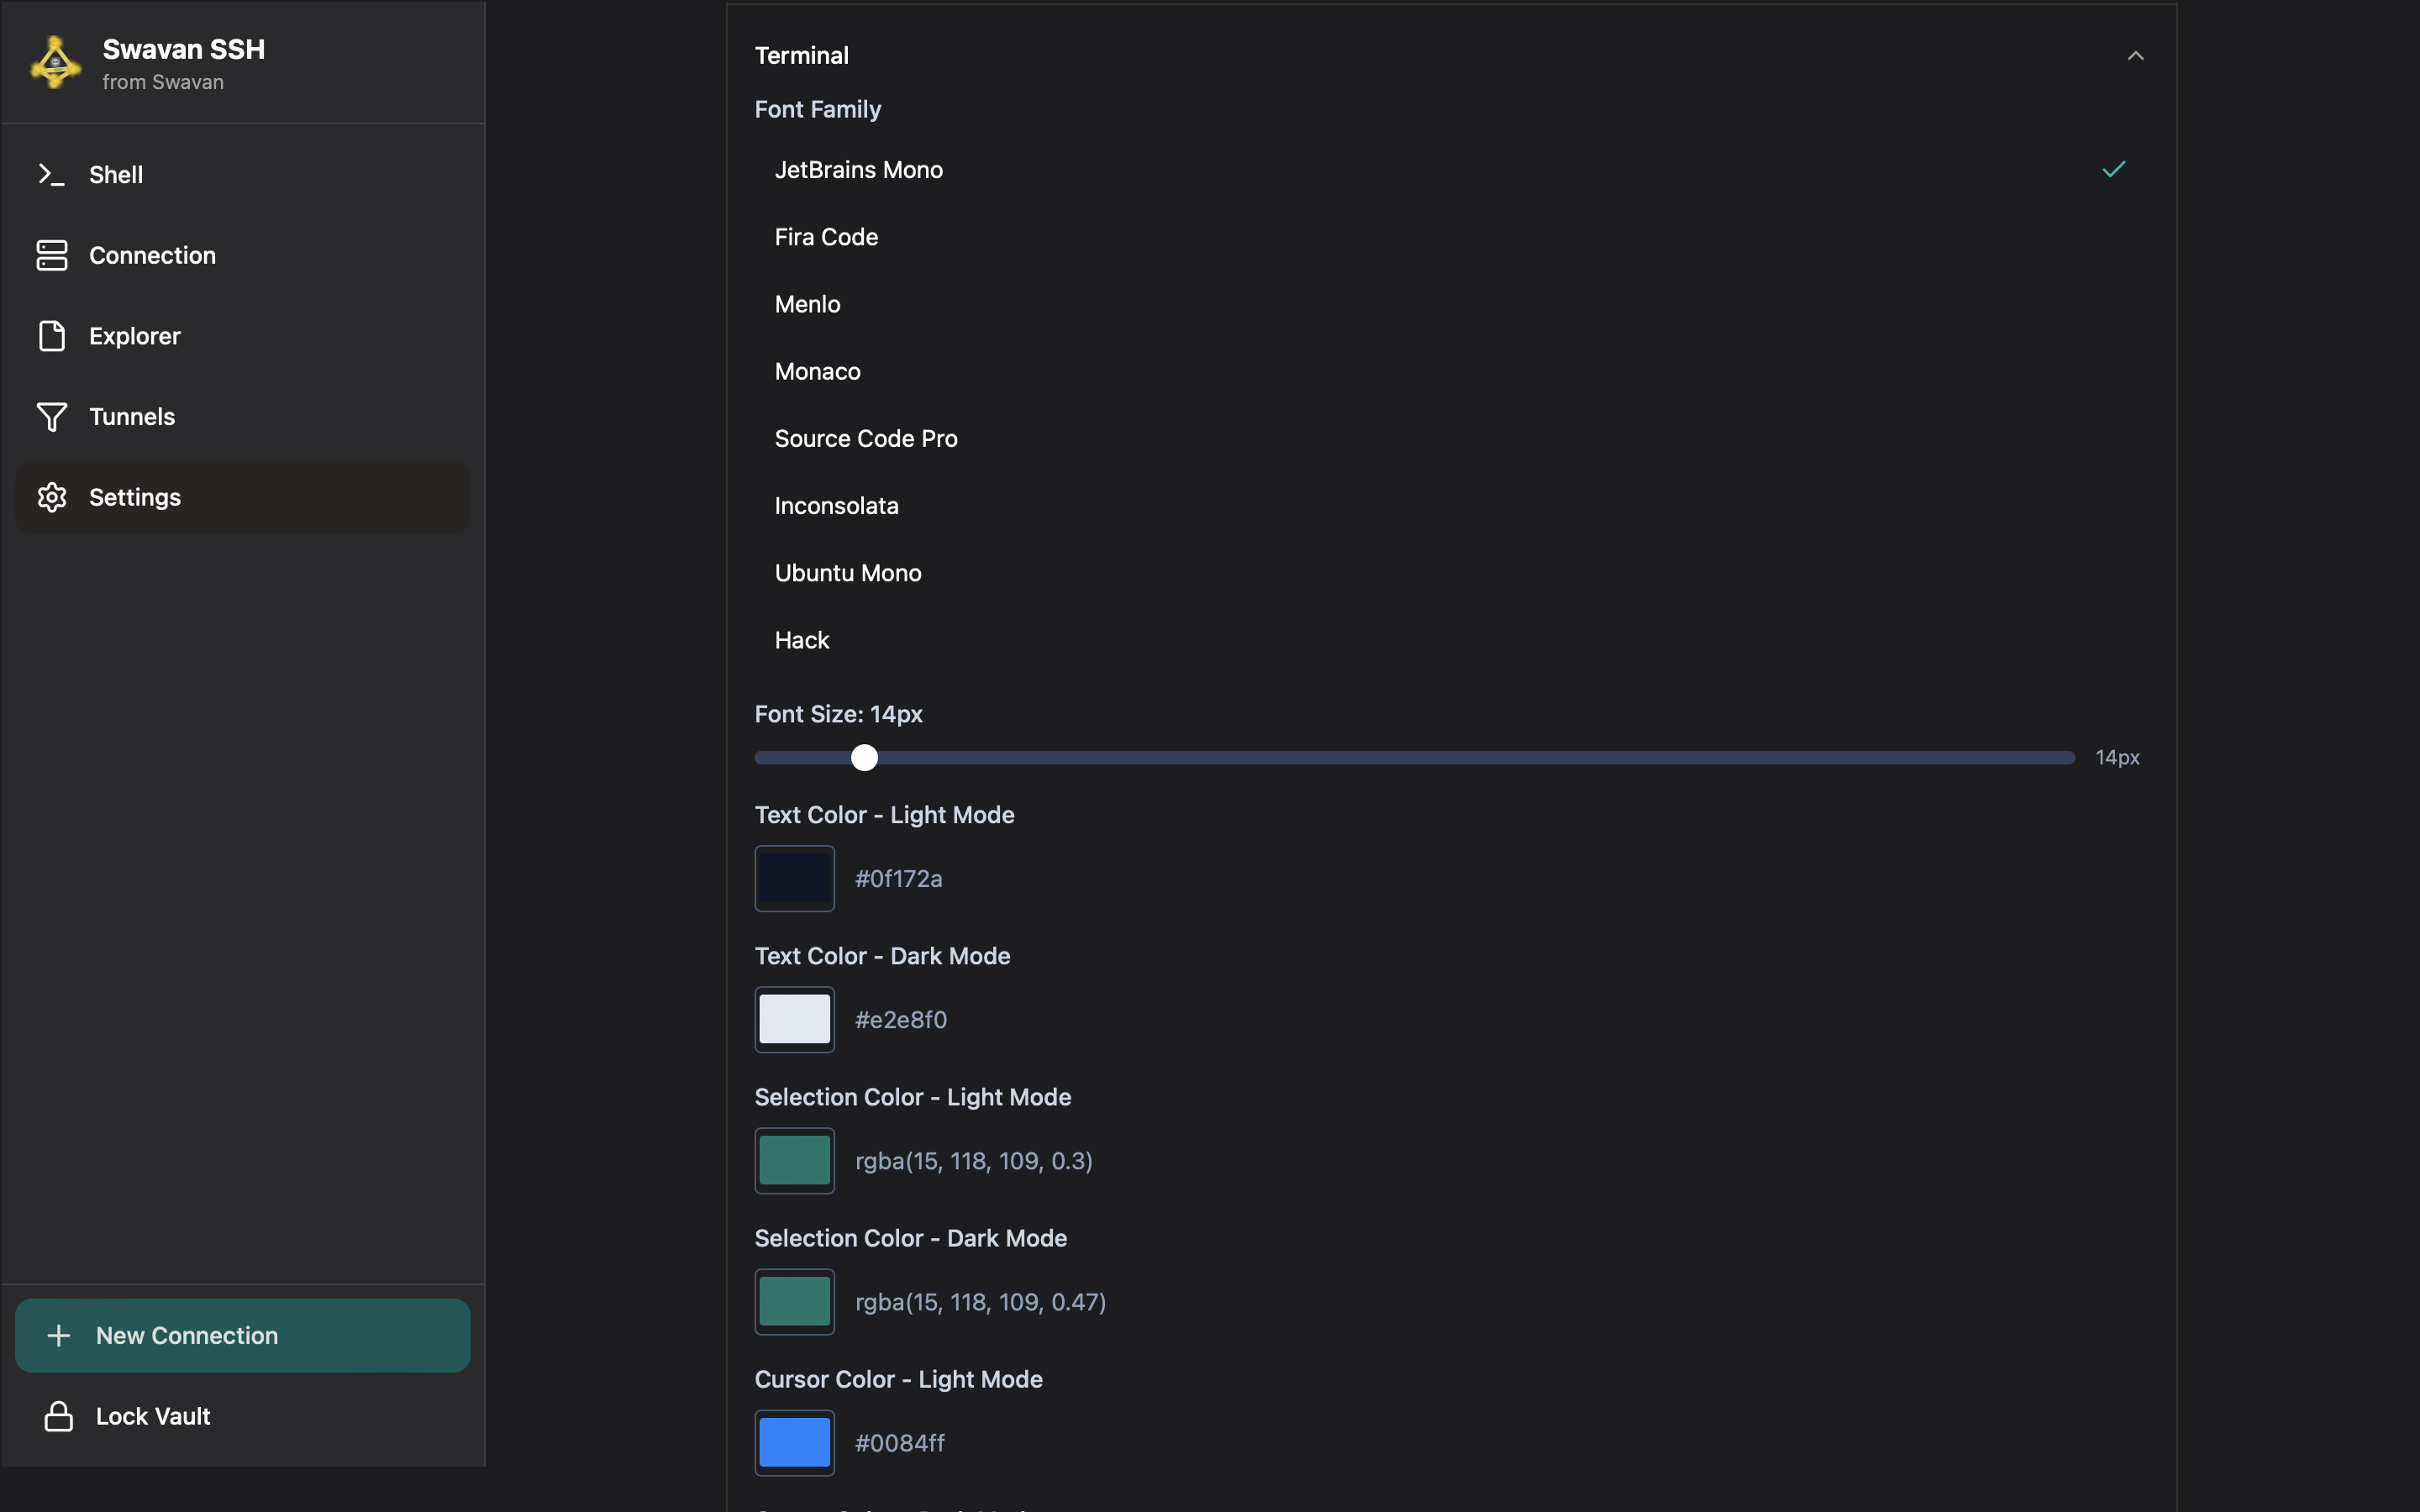
Figure 34: Terminal customization with font and color options
5 Storage Settings
Manage application data storage and access storage locations:
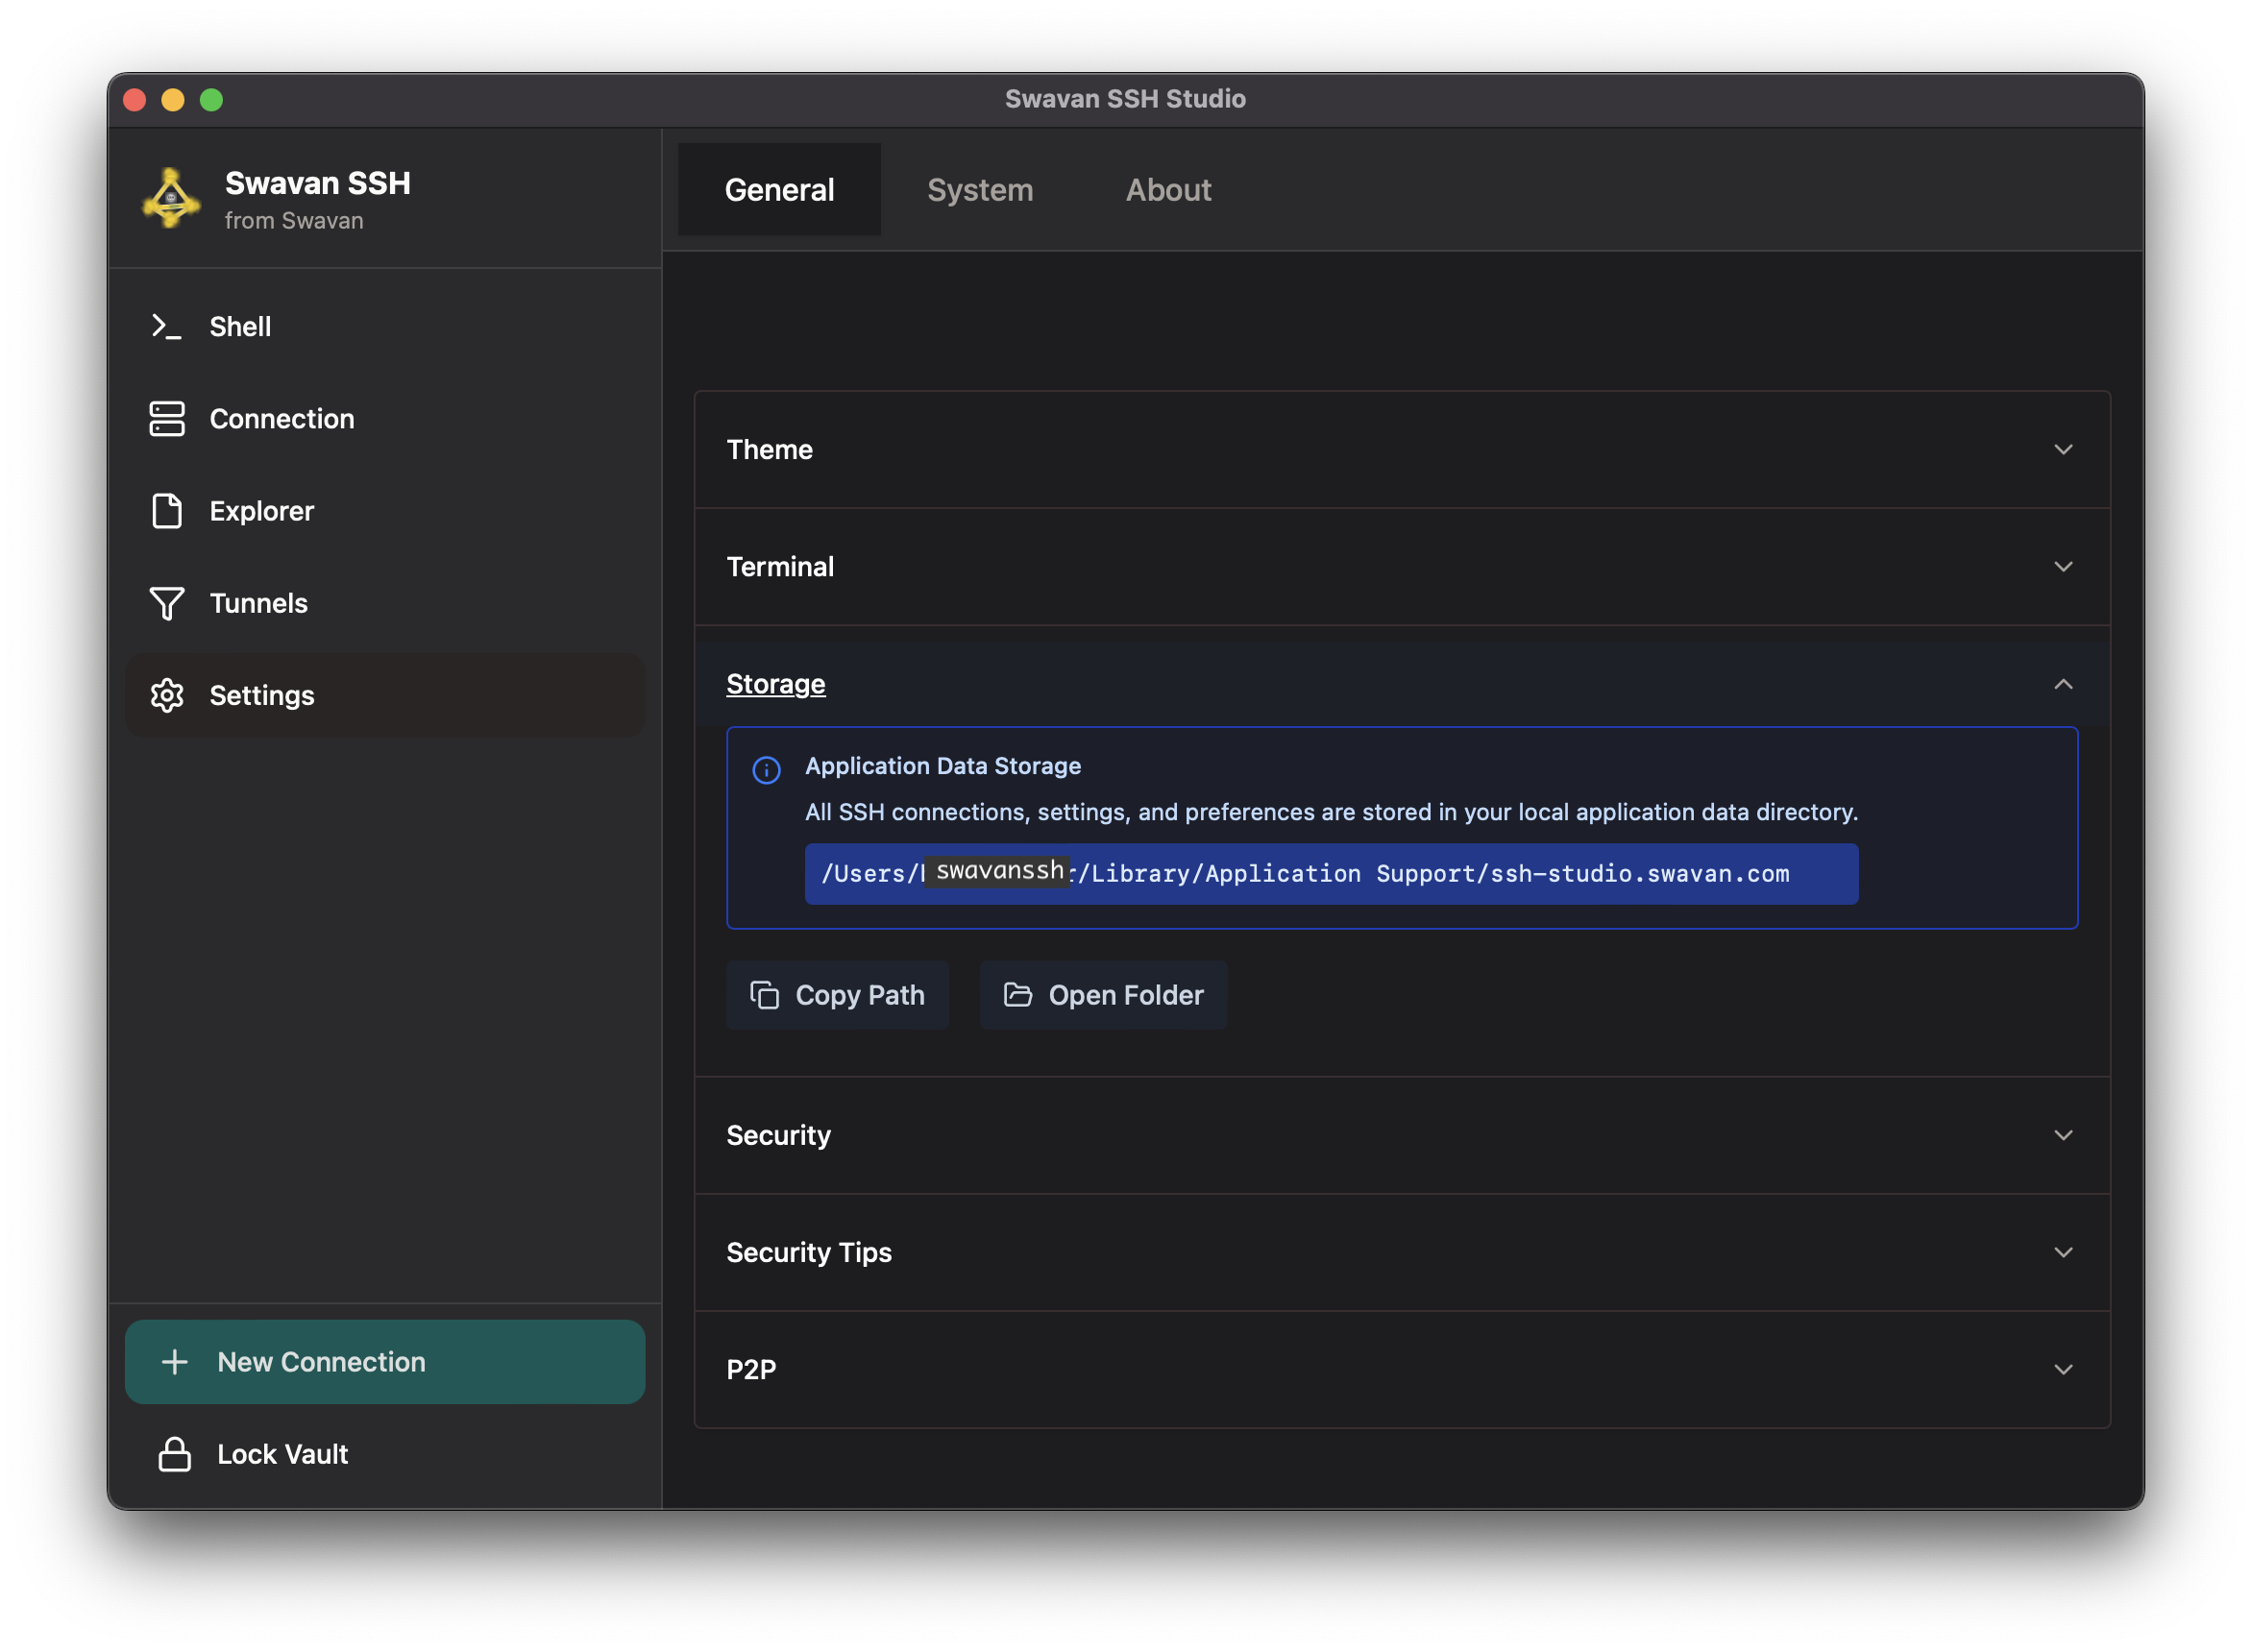
Figure 35: Storage configuration and data location
Storage management features:
- Local Storage: All data stored locally on your device for maximum privacy
- Application Data Directory: Standard system location for app data
- Data Included: SSH connections, settings, preferences, and configurations
- Path Display: Shows exact storage location on your system
- Quick Access: Copy path or open folder directly from the app
6 Security Settings
Configure security preferences and manage your vault protection:
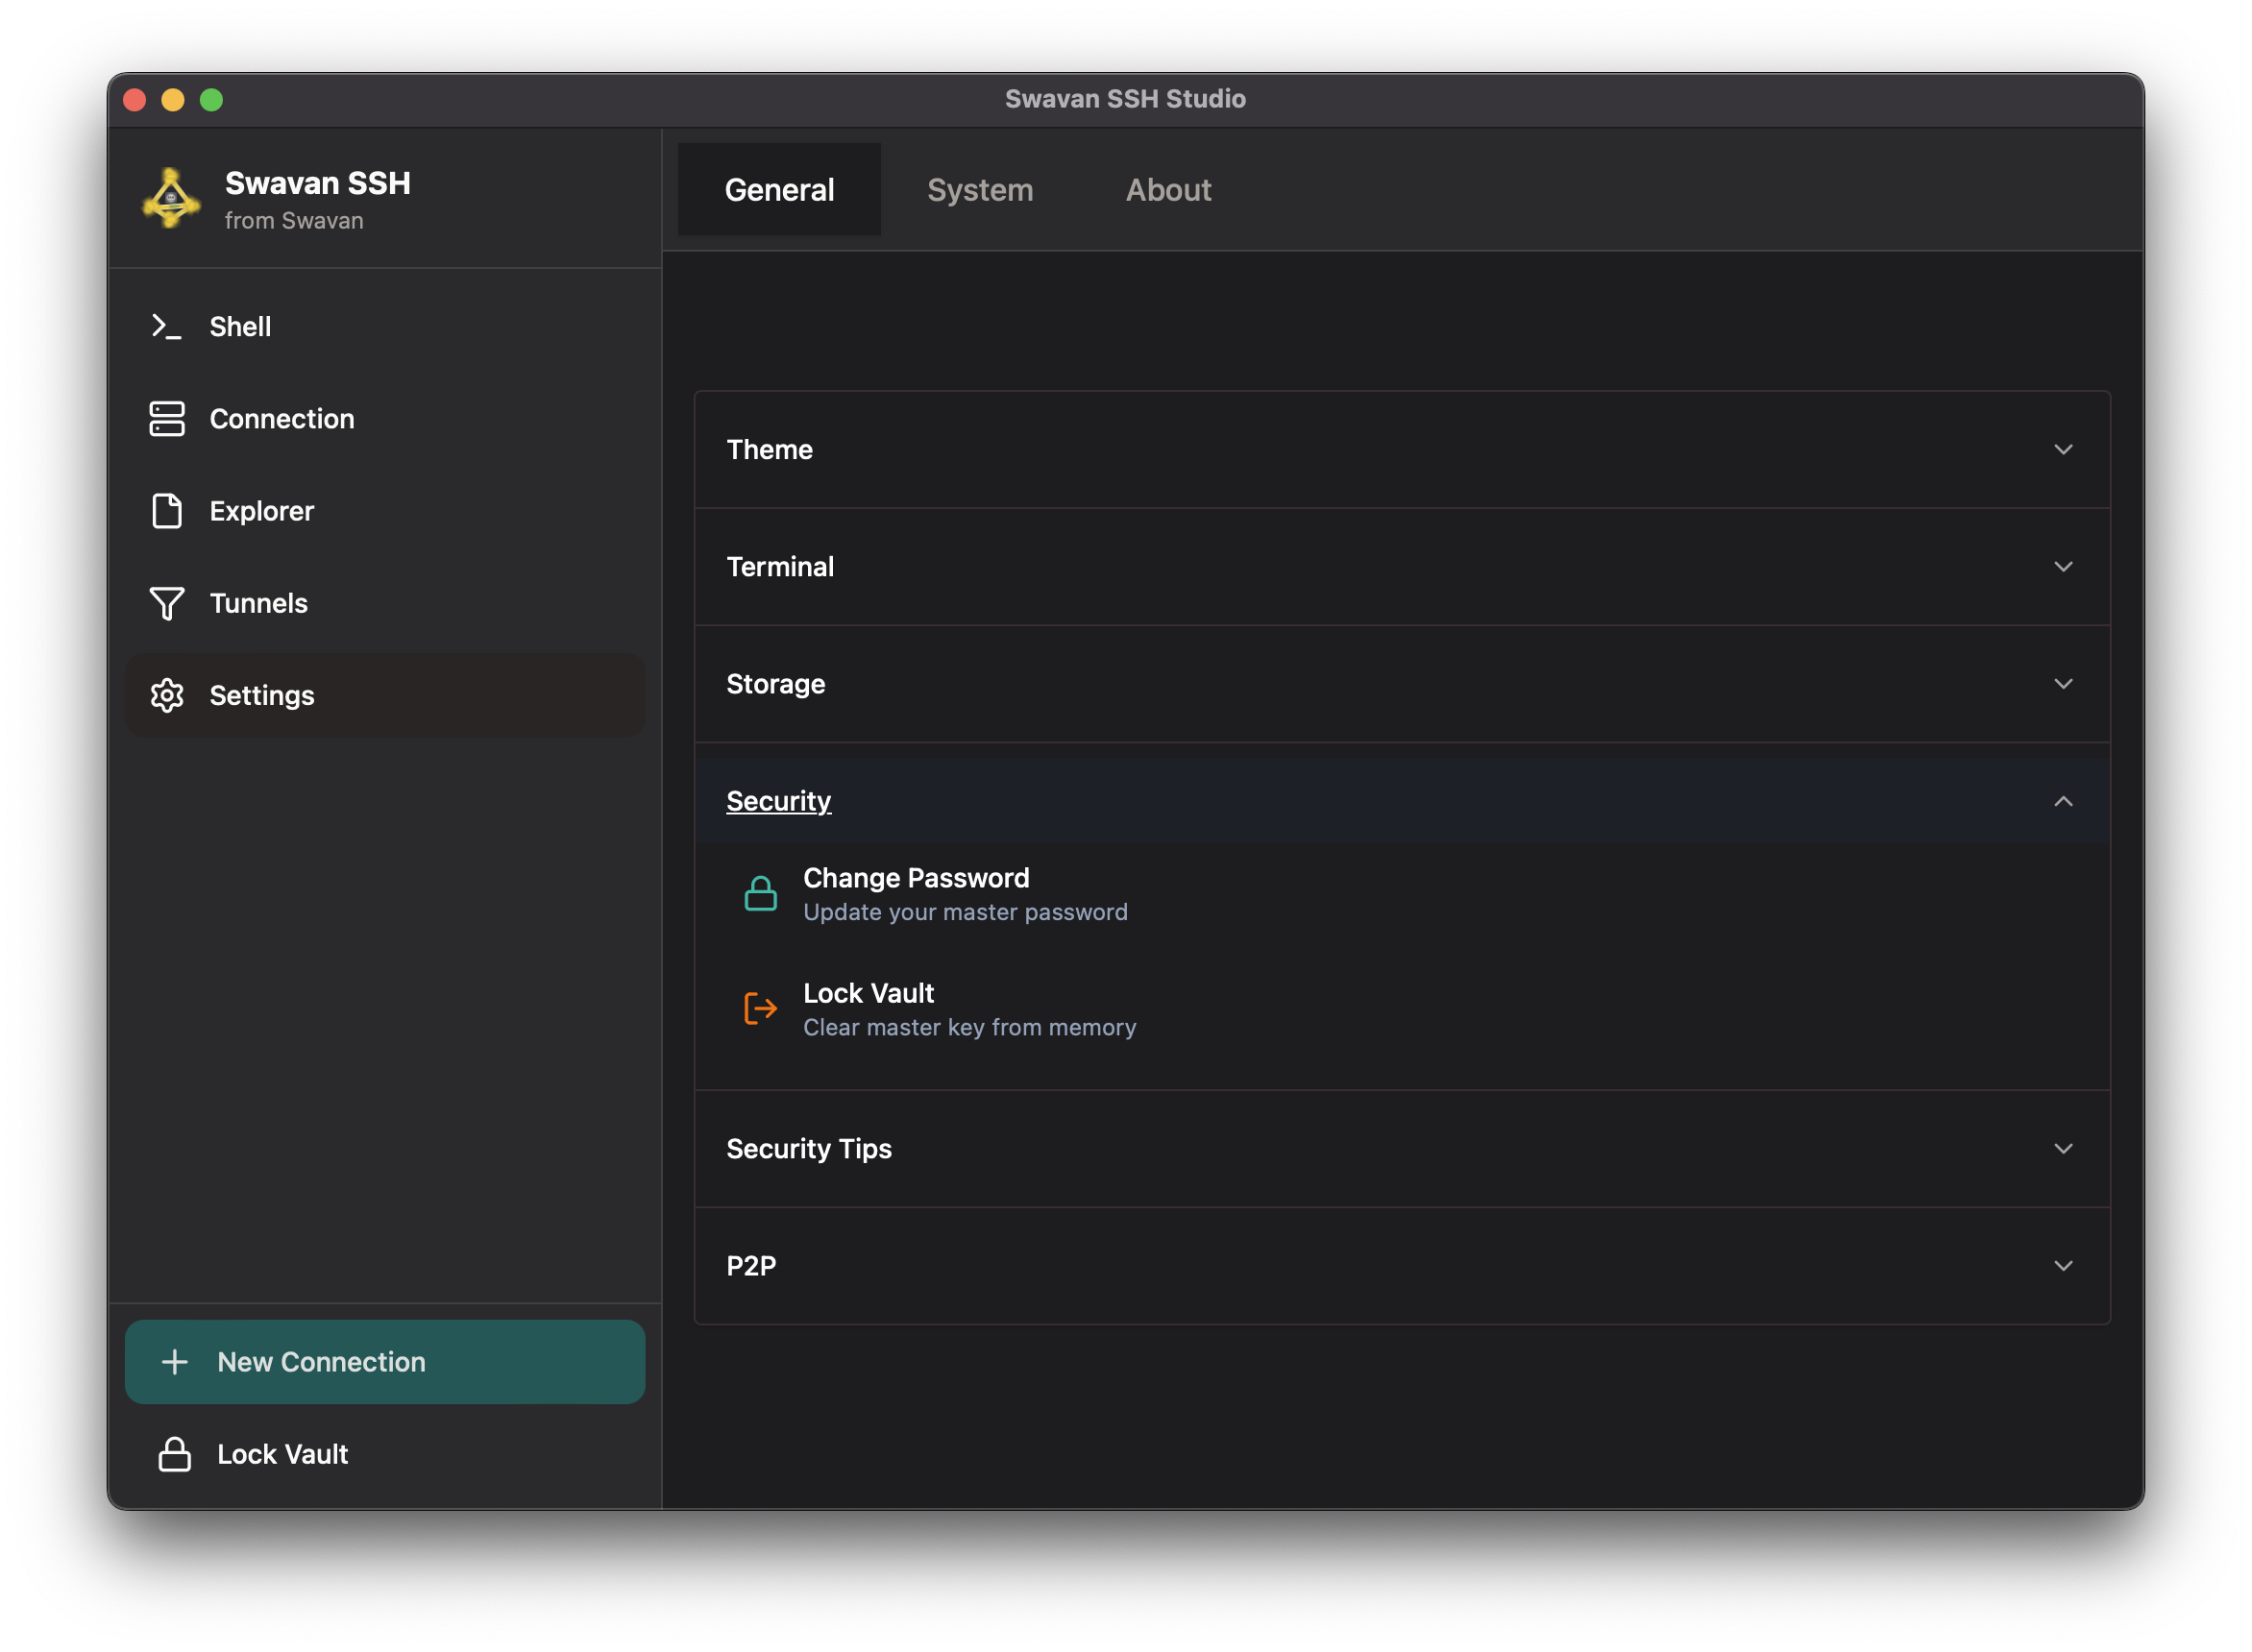
Figure 36: Security settings and vault management
Security configuration options:
7 Security Tips
Access security recommendations and best practices within the app:
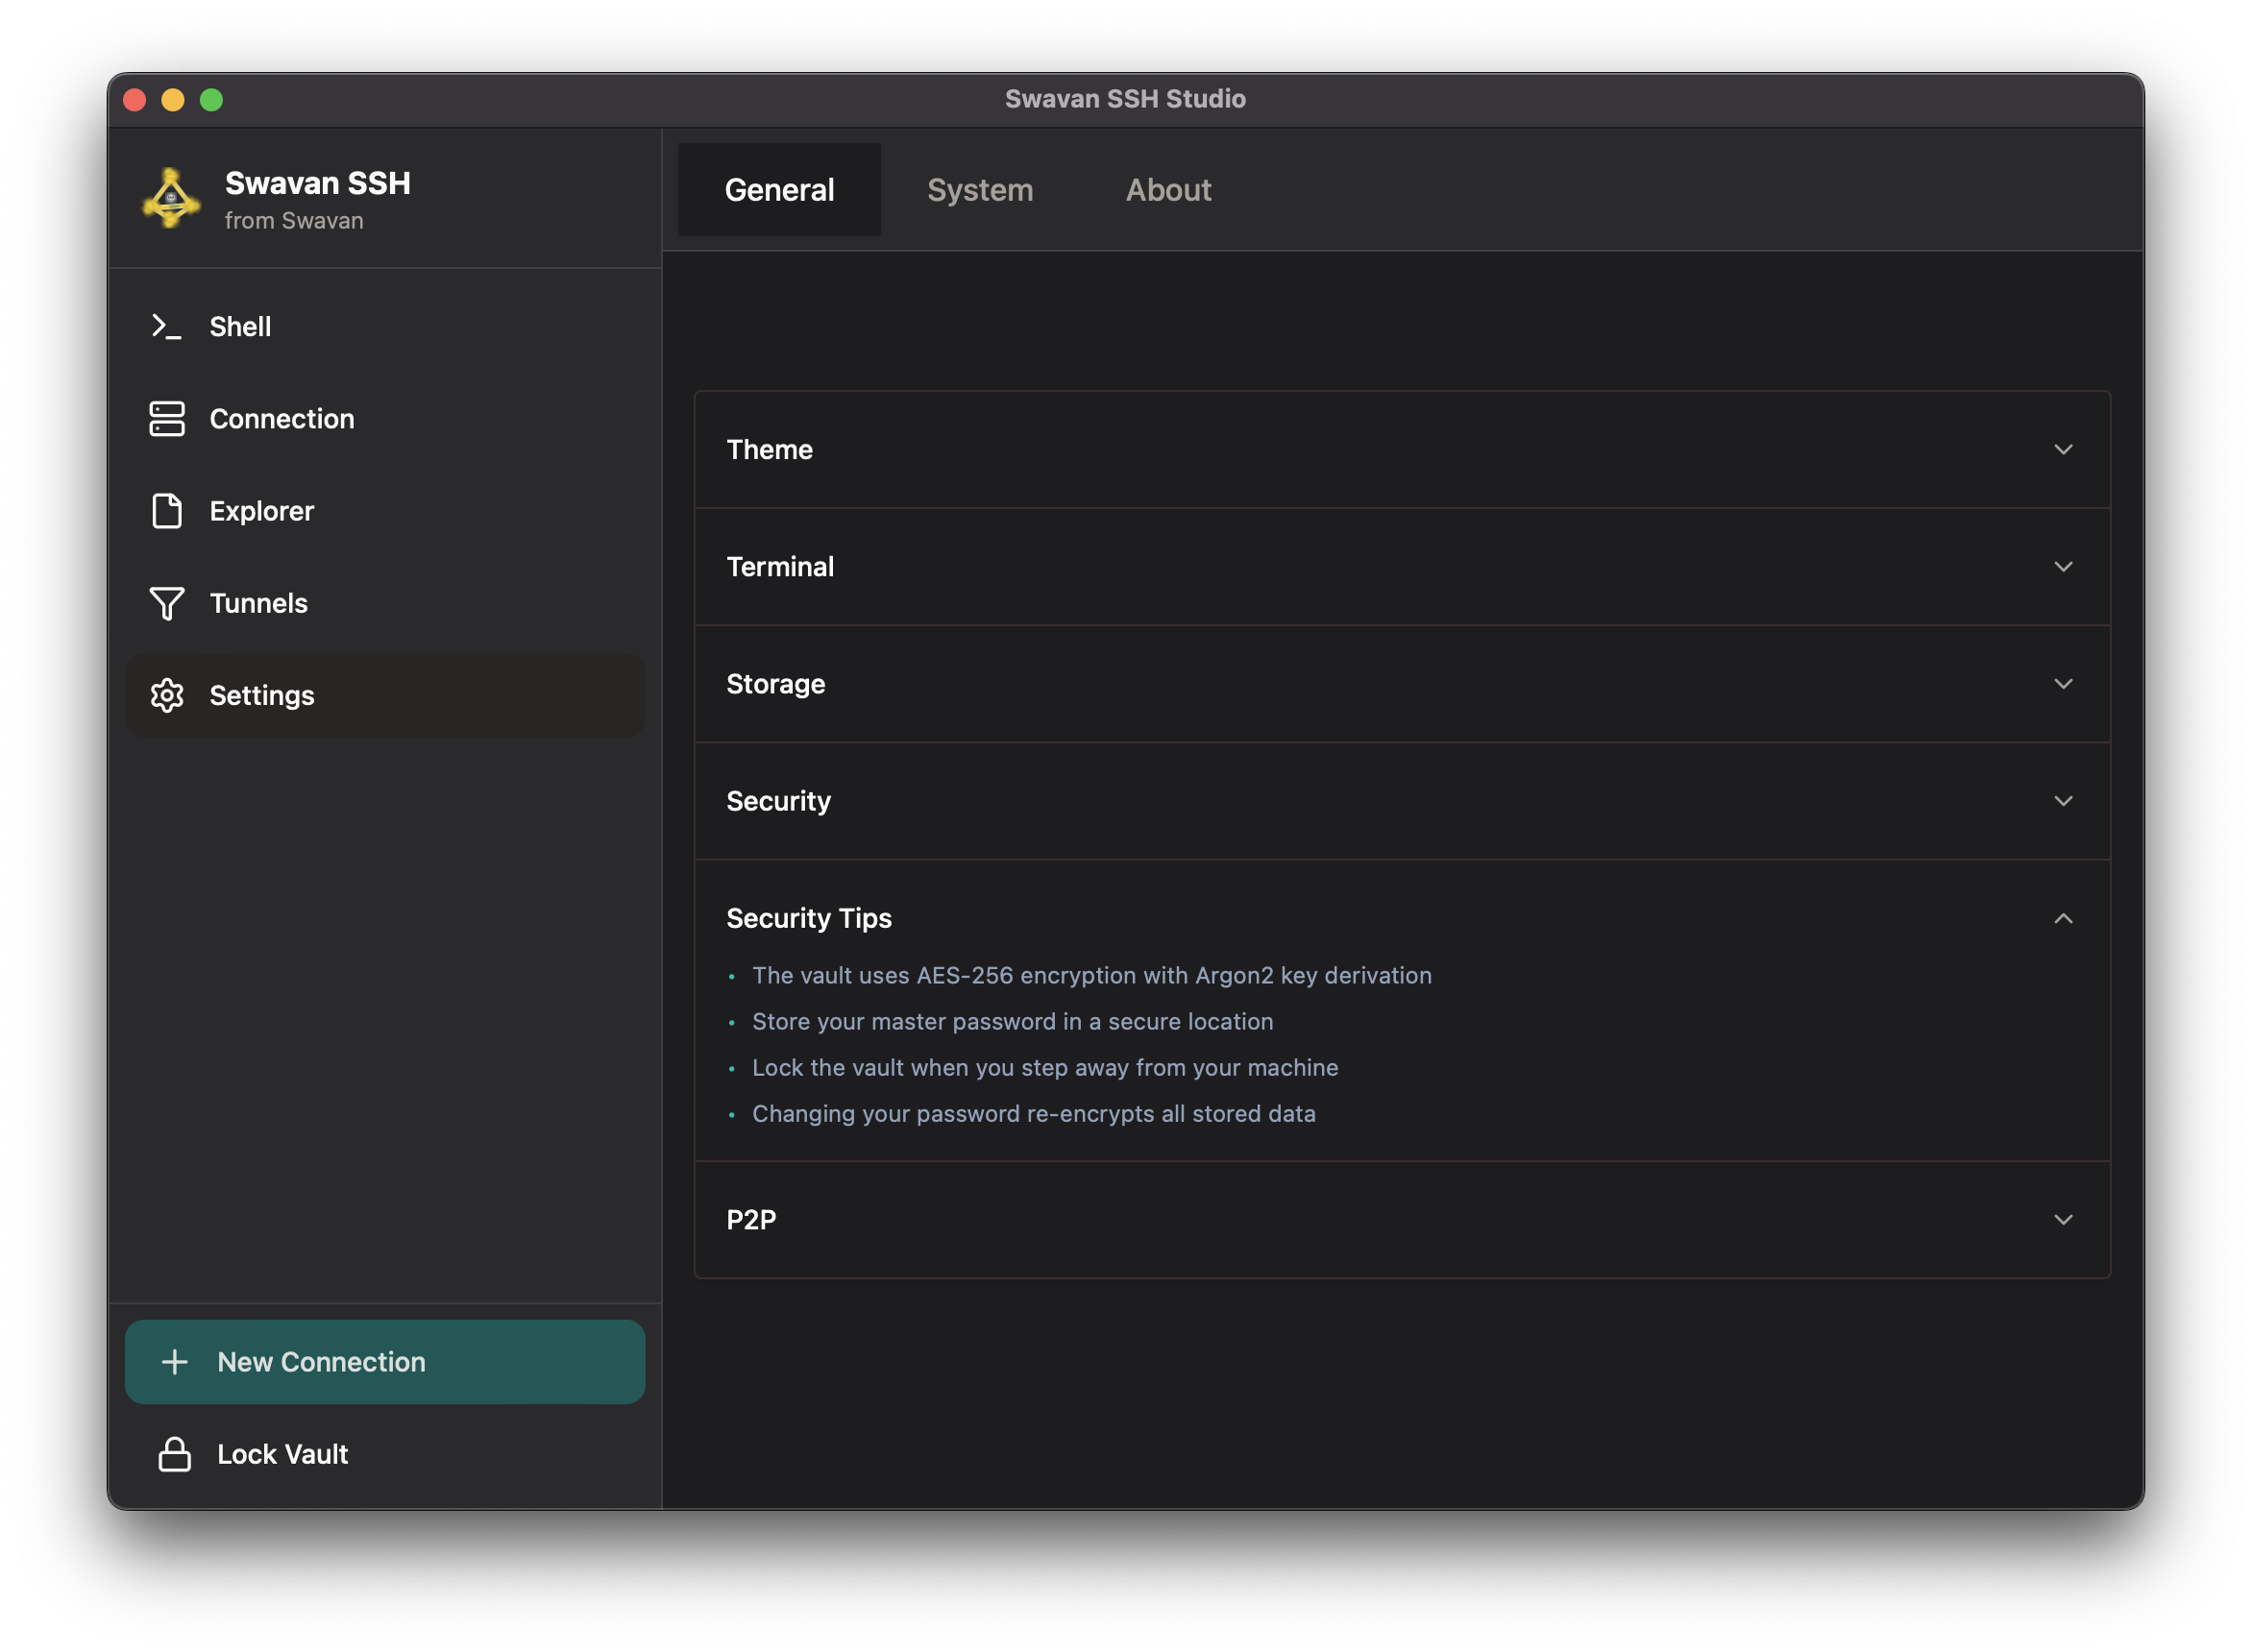
Figure 37: Security tips and encryption information
Key security information provided:
- Encryption Standard: AES-256 encryption with Argon2 key derivation
- Master Password Storage: Guidance on secure password management
- Vault Locking: Recommendation to lock vault when away from machine
- Password Change Process: Explanation of data re-encryption during password changes
- Best Practices: Security recommendations for optimal protection
8 P2P Sharing Settings
Configure peer-to-peer sharing for secure connection transfer:
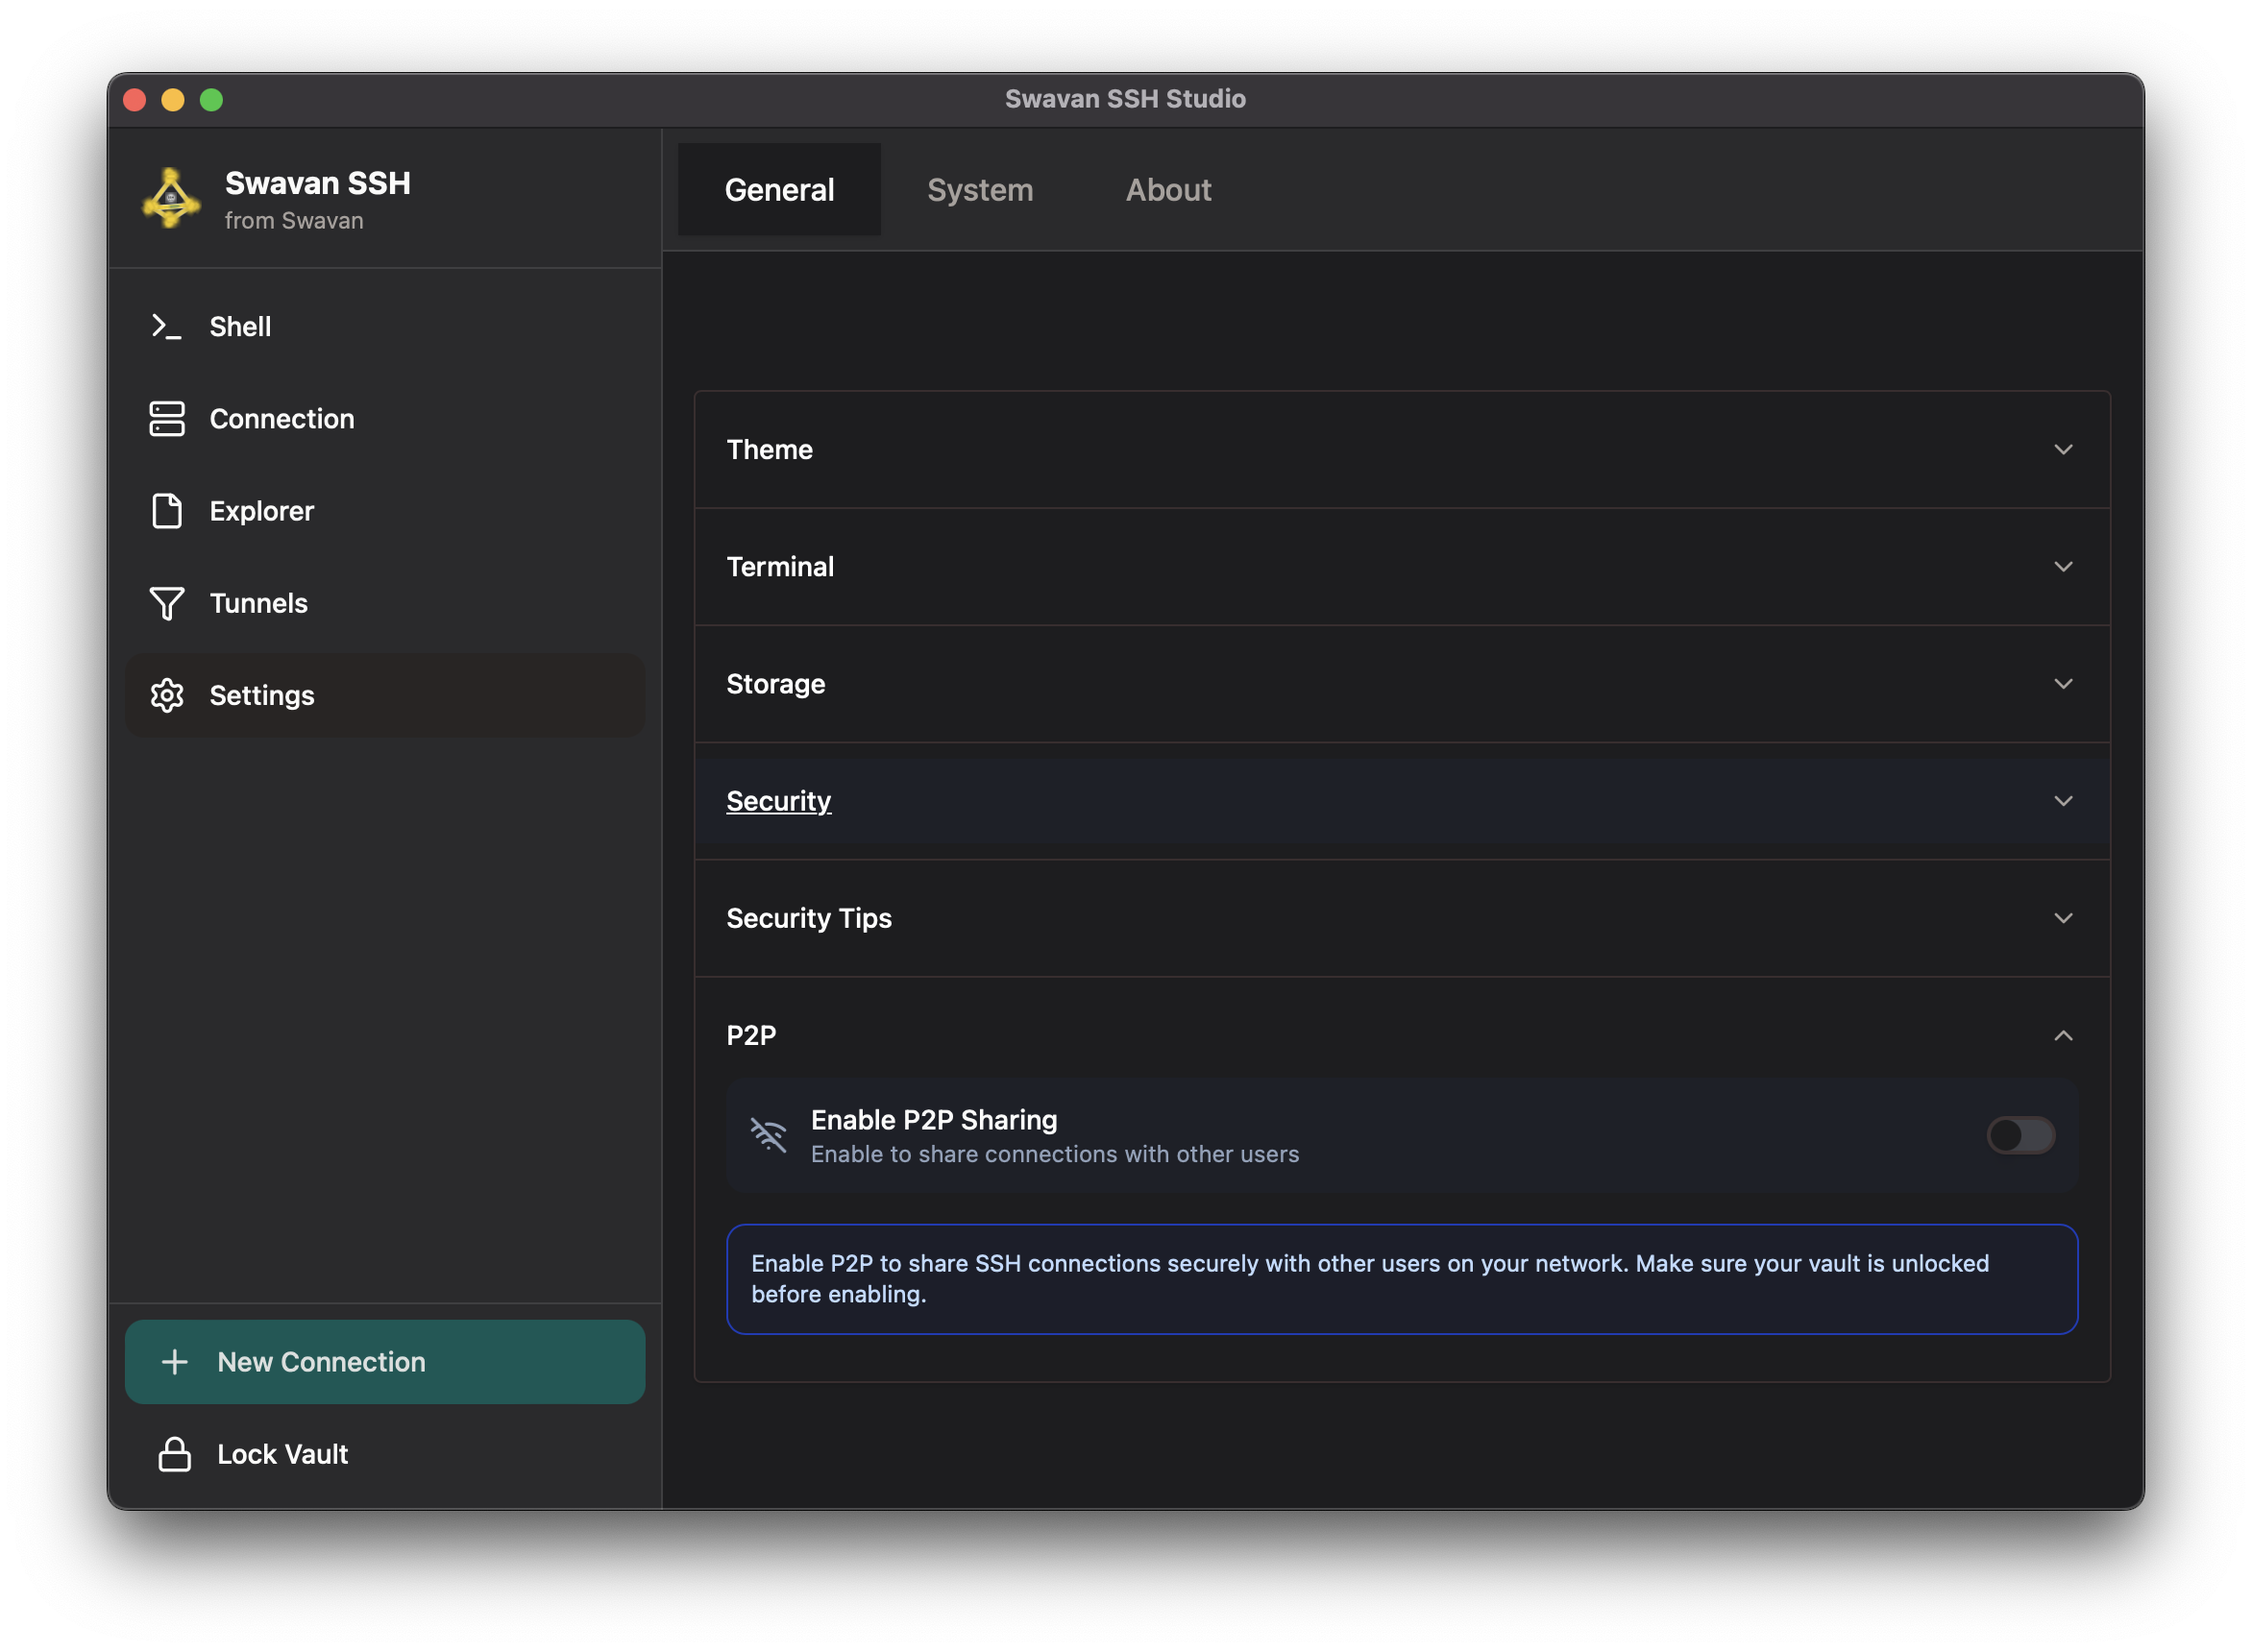
Figure 38: Peer-to-peer sharing configuration
P2P sharing features:
- Enable/Disable P2P: Toggle peer-to-peer sharing functionality
- Network Requirements: Devices must be on the same network
- Secure Transfer: Encrypted P2P transfers between devices
- Vault Requirement: Vault must be unlocked before enabling P2P
- Connection Sharing: Share SSH connections with other users securely
Log Viewer
Swavan SSH Studio includes a built-in log viewer that lets you inspect application logs directly from the Settings panel. This is useful for troubleshooting connection issues, P2P sharing problems, and other application behavior.
1 Accessing the Log Viewer
Navigate to Settings and click the Logs button (scroll icon) in the settings navigation bar, between the System and About buttons. The log viewer opens as a dedicated panel.
- Dedicated Panel: Logs have their own section in Settings, separate from General settings
- Auto-load: Logs are loaded automatically when you open the panel
- Refresh: Click the refresh button to reload the latest logs from the log file
2 Searching and Filtering Logs
Use the search input and log level filter to find relevant log entries quickly:
- Search: Type any text in the search box to filter log lines by keyword (case-insensitive)
- Log Level Filter: Use the dropdown to filter by level — ALL, ERROR, WARN, INFO, or DEBUG
- Color-coded Entries: ERROR lines appear in red, WARN in amber, DEBUG in gray, and INFO in the default color
3 Clearing Logs
Click the red trash icon button to clear all logs from both the log file on disk and the viewer. This is useful to start fresh when troubleshooting a new issue.
Installation (Linux)
Swavan SSH Studio is distributed as an AppImage for Linux, which works on most distributions without installation. Follow these steps to get started.
1 Download the AppImage
Download the latest .AppImage file from the GitHub Releases page. Choose the appropriate architecture (x86_64 or aarch64) for your system.
2 Make it Executable
After downloading, make the AppImage executable:
chmod +x swavan-ssh-studio_*.AppImage3 Install FUSE (if needed)
AppImages require FUSE to run. Most distributions include it by default, but if you encounter errors, install it:
sudo apt install libfuse2t64 (Ubuntu 24.04+) or sudo apt install libfuse2 (older versions)sudo dnf install fuse-libssudo pacman -S fuse24 Run the AppImage
Double-click the AppImage file, or run it from the terminal:
./swavan-ssh-studio_*.AppImage5 NixOS Users
NixOS does not support running AppImages directly due to its unique filesystem layout. Use one of these approaches:
programs.appimage.enable = true;programs.appimage.binfmt = true;appimage-run from nixpkgs:nix-shell -p appimage-run --run "appimage-run ./swavan-ssh-studio_*.AppImage"sudo nixos-rebuild switch to apply the changes.
Windows Firewall Configuration for P2P Sharing
On Windows, the built-in firewall may block P2P sharing features (peer discovery and connection transfer). If you experience issues with P2P sharing on Windows, you may need to add firewall exceptions.
1 Understanding the Issue
P2P sharing in Swavan SSH Studio uses mDNS (multicast DNS on UDP port 5353) for automatic peer discovery. Windows Firewall blocks mDNS multicast by default for applications that haven't been granted an explicit exception.
- Symptom: P2P sharing is enabled but no peers are discovered, or connection sharing times out
- Cause: Windows Firewall blocks UDP port 5353 (mDNS) and QUIC protocol traffic
- Solution: Add firewall exceptions for the application
2 Adding Firewall Exceptions
Open PowerShell as Administrator and run the following commands to allow P2P traffic:
New-NetFirewallRule -DisplayName "Swavan SSH Studio mDNS" -Direction Inbound -Protocol UDP -LocalPort 5353 -Action AllowNew-NetFirewallRule -DisplayName "Swavan SSH Studio QUIC" -Direction Inbound -Protocol UDP -LocalPort 1024-65535 -Action Allow -Program "C:\Program Files\Swavan SSH Studio\swavan-ssh-studio.exe"3 Verifying the Configuration
After adding the firewall rules:
- Restart Swavan SSH Studio on both devices
- Go to Settings → General → P2P Settings and enable P2P sharing
- Ensure both devices are on the same local network (same Wi-Fi or LAN)
- Try discovering peers and sharing a connection
4 Removing Firewall Rules
If you no longer need P2P sharing and want to remove the firewall exceptions:
Remove-NetFirewallRule -DisplayName "Swavan SSH Studio mDNS"Remove-NetFirewallRule -DisplayName "Swavan SSH Studio QUIC"